 Copy Objects ( Drawing Editor )
Tool summary :
Also see :
- Show ( Copy Objects copies from layers marked " Show ")
- Comment layer ( Copy Objects copies to layers of this type only)
- Layer selection tool (selects layer the copy is made to)
- Add Bevel Symbol (has Repeat mouse binding for fast copying)
- Add Bolt (has Repeat mouse binding for fast copying)
- Weld Add (has Repeat mouse binding for fast copying)
- Add Standard Detail (a way to copy from different files)
- Undo (undoes Copy Objects )
page 1 | contents | edit > | edit -- area mode
Example of an Copy Objects , Single :
Following is an example of Copy Objects with ' Single ' selected as the " Copy type ."
|
1 . Select the objects you want to copy, then invoke Copy Objects . | |||
|
2 . Select ' Single ' as the " Copy type ," optionally set a " Rotation " or " Mirror image ." | |||
|
3 . Left-click ( Locate ) to locate a reference point . | |||
|
4 . Left-click ( Locate ) to locate a second point . | |||
|
5 . Right-click ( Return ) when done placing copies. | |||
|
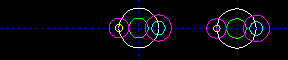
6 . The objects have been copied. |


page 1 | contents | edit > | edit -- area mode | top
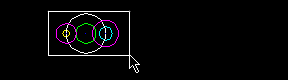
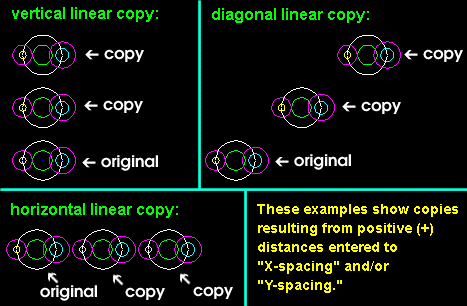
Example of an Copy Objects , Linear direction :
Following is an example of Copy Objects with ' Linear direction ' selected as the " Copy type " and ' Horizontal ' selected as the " Linear direction ."
|
1 . Select the objects you want to copy, then invoke Copy Objects . | |||
|
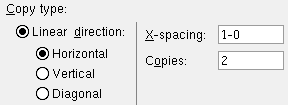
2 . Select ' Linear direction ' as the " Copy type ," then select a " Linear direction " and enter the spacing and the number of copies. | |||
|
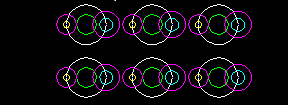
3 . The originally selected objects have been copied twice, horizontally to the right. |

page 1 | contents | edit > | edit -- area mode | top
Example of Copy Objects , Fill :
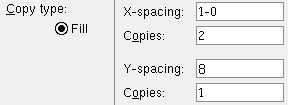
Following is an example of Copy Objects with ' Fill ' selected as the " Copy type ."
|
1 . Select the objects you want to copy, then invoke Copy Objects . | |||
|
2 . Select ' Fill ' as the " Copy type ," then enter the spacing and number of copies in the X and Y directions. | |||
|
3 . Five new copies are made of the originally selected objects. |
page 1 | contents | edit > | edit -- area mode | top
Step-by-step instructions :
The following instructions assume that you are using a 3-button mouse. You must be in the Drawing Editor and do either step 1d (preselection) or step 3 (in-tool selection) to perform this operation.
1a : Use Layer Edit All to show the layers in your current Drawing Editor drawing that you want to select graphics for copying from.
1b : On the layer selection tool , select the comment layer that you want to copy the selected graphics to.
1c (optional) : Set selection filter(s) for the type(s) of objects that you want to copy.


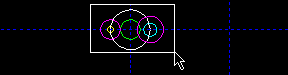
Select Items bindings (step 1d) 1d (optional) : Draw an area box to select the object(s) that you want to copy. Use Select- if you want to deselect objects. Use Select + to select additional objects.
2 . Invoke Copy Objects using any one (1) of the following methods:
Method 1 : Click the Copy Objects icon. The icon can be taken from the group named ' Edit -- Area Mode ' and placed on a toolbar (classic) or the ribbon (lightning).
Method 2 : If " Drawing Editor layout style " is ' Classic ', you can use the menu system to choose Edit > Copy Objects .
Method 3, 4 or 5 : Copy Objects can also be invoked using a keyboard shortcut , the context menu , or a mode . For the ' Lightning ' layout style, configuration of the interface is done using Customize Interface .
3 . Skip this step if you already selected objects in step 1d.
|
|
|
Select Item(s) bindings |
3a (if you didn't do 1d) : You are now prompted to use Select Item(s) Mode options to select the object(s) you want. Press the Enter key or right-click ( Menu ) and choose " OK " on the context menu when you are done selecting objects.
4 . The Copy Objects window opens. Select the " Copy type " before making other choices on the window.
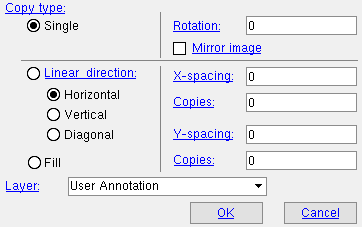
Copy type: Single or Linear direction or Fill . ' Single ' generates a single copy of the selected graphic objects (see the example ). ' Linear direction ' generates multiple copies of the selected graphic objects (see the example ). ' Fill ' generates multiple copies of the selected graphic objects (as many copies as are necessary) to fill a space (see the example ).
Linear direction: Horizontal or Vertical or Diagonal . This applies when ' Linear ' is the " Copy type ." Select ' Horizontal ' to copy horizontally along the X screen axis , with settings for " Y-spacing " and " Copies ." Select ' Vertical ' to copy vertically, with settings for " X-spacing " and " Copies ." Choose ' Diagonal ' to copy diagonally, with settings for " X-spacing ," " Y-spacing " and " Copies ."
|
Rotation: Any positive or negative angle from 360 to -360 degrees. ' 0 ' is no rotation. A ' positive number ' rotates the image counter clockwise. A ' negative number ' rotates the image clockwise. This applies when ' Single ' is the " Copy type ."
Mirror image:
or
. This applies when ' Single ' is the " Copy type ." If this box is checked (
X-spacing: The spacing (+/- distance) between copies along the X screen axis . A ' positive distance ' adds copies to the right of the objects selected to be copied, a ' negative (-) distance ' adds copies to the left. This applies when ' Fill ' is the " Copy type " or when ' Diagonal ' or ' Horizontal ' is the " Linear copy direction ."
Copies: The number ( 1 or 2 or 3 ...) of times horizontal you want the " X-spacing " to be duplicated.
Y-spacing: The spacing (+/- distance) between copies along the Y screen axis . A ' positive distance ' adds copies above the objects selected to be copied, a ' negative (-) distance ' adds copies below the objects selected to be copied. This applies when ' Fill ' is the " Copy type " or when ' Diagonal ' or ' Vertical ' is the " Linear copy direction ."
Copies: The number ( 1 or 2 or 3 ...) of times vertical you want the " Y-spacing " to be duplicated.
Layer: The comment layer (any comment layer " Name ") in your current drawing that you want the copy to be drawn on after you press " OK " to close this window. If the comment layer happens to be a hidden layer (not marked " Show "), the copies will not be visible until you check the box to " Show " the hidden layer. The default selection for this field is the layer that was selected on the layer selection tool before you began this operation.
Alternative 1 : Press " OK " to continue. Go to step 7 if you are doing a ' Linear ' or ' Fill ' copy. Go to step 5 if you are doing a ' Single ' copy.
Alternative 2 : Press " Cancel " to end the Copy Objects operation. Do not continue.
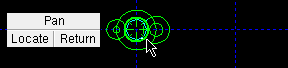
5 . Go to step 7 if you are doing a ' Linear ' or ' Fill ' copy. If, in step 4, you selected ' Single ' as the " Copy type ," the status line will read, "Locate a reference point." All to-be-copied items will be highlighted. Locate- Pan -Return mouse bindings will be active along with various Locate options.
|
|
|
bindings |
5a : Position the point location target where you want the reference point (for instance, on an exact point within the area box designated in step 2), then left-click ( Locate ).
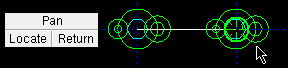
6 . The status line prompts, "Locate second point."
|
|
|
bindings |
Alternative 1 : Position the point location target to where you want the copy of the objects to be placed with respect to the reference point, then left-click ( Locate ). The copy is performed, and the screen redraws to show the newly copied objects (unless they were copied to a hidden layer). Either repeat this step to place other copies or right-click ( Return ) if you are done.
Alternative 2 : Right-click ( Return ) to end the ' Single ' copy operation without placing any more copies. Go to step 7.
7 . The copy operation is done. The mouse bindings that were active before you invoked Copy Objects are again active. All copied items are placed on the comment layer that was selected as the " Layer " on the Copy Objects window.
Possibility 1 : For a ' Single ' copy, one or more copies of the objects selected in step 1e (or step 3 if you didn't pre-select) are placed exactly the distance that the point(s) you located in step 6 are from the reference point you located in step 5 .
Possibility 2 : If you did a ' Linear ' copy, the objects selected in step 1e (or step 3 if you didn't pre-select) are duplicated horizontally, vertically or diagonally on the screen.
Possibility 3 : If you did a ' Fill ' copy, an area on the screen is filled with copies of the objects you selected in step 1e (or step 3 if you didn't pre-select).
Note: At this point you can still undo your changes by using Revert or Undo . If you Save to make your changes permanent, you will no longer be able to Revert , but you can still Undo . For an ' Single ' copy operation, Undo undoes each copy you made, one at a time.
page 1 | contents | edit > | edit -- area mode | top