 Hole - Review Reference Point ( Modeling )
Tool summary :
page 1 | contents | model > holes > | 3D holes
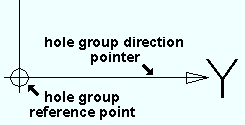
Example :

|
In this example, the hole group dimension point is on the work line (the half-depth line) of the column, and the direction is along the work line of the brace. |
page 1 | contents | model > holes > | 3D holes | top
Step-by-step instructions :
You must be in Modeling and do either step 1d (preselection) or step 3 (in-tool selection) to perform this operation.The following instructions assume that you are using a 3-button mouse.
1 . Before using this tool:
1a : Make sure that material the hole is on is displayed in one of the three solid forms .
1b : Snap to a surface that is in the same plane as the hole you want to perform this operation on.
1c : If you are going to do 1d, you may want to set the selection filter to ' Material '.

Select Items bindings (step 1d) 1d (optional) : In Select Items mode with an appropriate selection filter selected, left-click ( Select ) the one (1) hole that you want. When selected, the hole is displayed in the User and Site Options > Modeling > " Primary selection color ," which by default is green.
2 . Invoke Review Reference Point using any one (1) of the following methods:
Method 1 : Click the Review Reference Point icon, which is pictured above. The icon can be taken from the group named ' Model -- Hole ' and placed on a toolbar (classic) or the ribbon (lightning).
Method 2 : If " Modeling layout style " is ' Classic ', you can use the menu system to choose Model > Hole > Review Reference Point .
Method 3, 4 or 5 : Review Reference Point can also be configured to be invoked using a keyboard shortcut , the context menu , or a mode . For the lightning interface, this configuration is done using Customize Interface .
3 . Skip this step if you already selected a hole in step 1d or if you did method 4 of step 2
|
|
|
Select One Item bindings |
3a (if you didn't preselect) : The program activates Select One Item options and prompts you to select the hole you want. This also happens if, for example, more than one hole is selected or if a member or material is selected.
4 . The status line prompts, "Verify hole group reference location and direction." The hole reference point symbol and an arrow indicating the direction of dimensioning appears along with Yes - No mouse bindings.
|
|
|
bindings |
Alternative 1 : Left-click ( Yes ) if you want both the reference point and direction to remain as they are shown on screen. The hole reference point symbol and an arrow disappear, and the mouse bindings that were active before you invoked Set Hole Group Reference Point again become active. Do not continue.
Alternative 2 : Right-click ( No ) if you want to change either the reference point location or dimensioning direction shown on screen. Go to step 5.
5 . The status line prompt prompts, "Locate hole group reference point." Various Locate options become active along with Locate- Pan -Return mouse bindings.
|
|
|
bindings |
Alternative 1 : Right-click ( Return ) to skip this step. Go to step 6.
Alternative 2 : Place the mouse pointer (
) so that the point location target snaps to the place on screen where you want the reference point, then left-click ( Locate ). Go to step 6.
6 . The status line prompts, "Locate hole group direction point:"
|
|
|
bindings |
Alternative 1 : Right-click ( Return ) to skip this step. Go to step 7.
Alternative 2 : Move the mouse pointer so that the point location target defines the exact direction you want this hole group to be dimensioned from with respect to the reference point located in the previous step, then left-click ( Locate ). Go to step 4.
7 . The status line prompts, "Verify hole group reference location and direction." Yes-No mouse bindings become active.
![]()
![]() bindings
bindings
Alternative 1 : Left-click ( Yes ) if you want both the reference point and direction to remain as they are shown on screen.
Alternative 2 : Right-click ( No ) if you want to change either the reference point location or dimensioning direction shown on screen. Go back to step 5.
page 1 | contents | model > holes > | 3D holes | top