 Set Selection Filter ( Model > press s f )
Tool summary :
- LIsts available selection filters in Modeling . Select one or more filters prior to selecting items that you want to edit or perform a particular operation on.
- Selection filters can limit selection by area box or in the Model Tree as well as by click, right-click and double-click.
- To select construction lines/circles, you must set the selection filter to ' Construction lines ' and/or ' Construction circles ' or ' All ' and draw the area box from right to left. To select/edit members that are grouped, you must select ' Members in Groups ', or you can choose " Select Other " or " Edit Other " on the context menu when a group member is hovered.
- If User and Site Options > Modeling > " Highlight surfaces " or " Show hidden lines in 3D wire frames " is checked (
 ), the selection filter limits mouseover highlighting as well as selectability to the filter (class of item) that is selected.
- Selection filters are useful for Update Attributes . First select the filters for member types you want changed, then draw an area box around members that you want. Invoke Update Attributes , then enter the specifications you want applied to the members and press the " By Area " button.
- See (on this page):
- Step-by-step instructions (" Save " is optional -- see step 2b)
- Examples
- The 'Default' filter (
 )
)
- The 'Legacy Default' filter ( )
- To select items 'By Expression'
- The 'Group Members' and 'Members in Groups' filters
- The 'Material Construction Lines' filter ( )
- The 'Model Dimensions' filter ( )
- The 'Connection Components' and 'Custom Components' filters ( )
- The 'Grid Lines' filter ( )
- The 'By Status Display' filter ( )
Also see :
- Modeling (where Set Selection Filter is a tool)
- Select Items (mode the selection filter operates in)
- Shift (hold key down to select a group of filters)
- Ctrl (hold key down to deselect or select individual filters)
- Esc or Enter (closes this window -- selected filters remain active)
- Keyboard shortcuts for selection
- Model Tree (selection on is affected by the selection filter)
- Selection filter (toolbar or ribbon item)
page 1 | contents | model > set selection filter | top
![]() Step-by-step instructions :
Step-by-step instructions :
Selection filters can be used in Modeling to limit the types of items that can be selected in Select Items mode.
|
|
|
1 . Open the Set Selection Filter window using any one (1) of the following methods:
Method 1 : Click the Set Selection Filter icon, which is pictured above. The icon can be taken from the group named ' Selection ' and placed on a toolbar (classic) or the ribbon (lightning).The Drawing Editor group is ' Tools '.
Method 2 : If " Modeling layout style " is ' Classic ' or you are you can use the menu system to choose Model > Set Selection Filter . In the Drawing Editor , choose Tools > Set Selection Filter .
Method 3, 4 or 5 : Set Selection Filter can also be configured to be invoked using a keyboard shortcut , the context menu , or a mode . For the lightning interface, this configuration is done using Customize Interface . The default keyboard shortcut s f stands for "set filter."
Method 6 : On the selection filter widget, select ' Custom '.
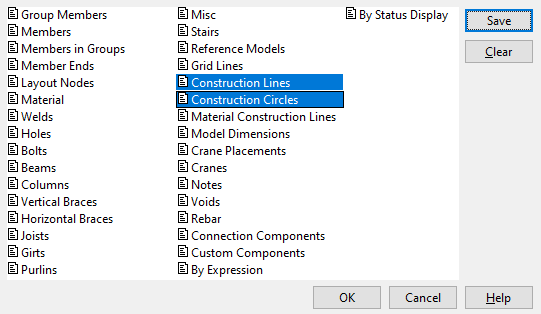
2 . On the Set Selection Filter window, select one or more filters. Drag or hold down the Shift key to select a range of filters. Hold down the Ctrl key to toggle filters on and off. Press the " Clear " button if you to use the ' Default ' filter. Steps 2a and 2b are optional. You can skip them and go directly to step 3.
|
The Set Selection Filter window . Most filters that you can select on the window are fairly self-explanatory. Programmable filters that have a steeper learning curve are ' By Expression ' and ' By Status Display ' ( |
2a (optional) : While the Set Selection Filter window is still open, you can optionally select items in the model using the filters you have set in order to test how those filters behave.

Select Items mouse bindings
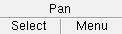
Selection is done when you left-click ( Select ) an item or hold down the Shift key and left-click ( Select + ) a series of items, or when you draw an area box . The filters that you selected in step 3 limit the types of items that you can select.
2b (optional) : You can optionally press " Save " to open the Custom Filter Save window and give the custom filter a name.
Custom Filter Save Custom filter name:
Con Lines & Circles 
Possibility 1 : If you type a " Custom filter name " and press " OK ," please note the following:
Possibility 2 : If you press " Cancel " on the Custom Filter Save window, the Custom Filter Save window closes without saving a custom filter. The Set Selection Filter window remains open. Go back to step 2a or go on to step 3.
3 . When you are done using the Set Selection Filter window:
![]()
![]()
Alternative 1 : Press the " OK " button to close the window. The filter that is currently selected on the Selection filter toolbar item remains selected after the window closes.
Alternative 2 : Press the " Cancel " button to close the window, but without applying any of your changes. The selection filter that was active before you opened the Set Selection Filter window will be active again.
page 1 | contents | model > set selection filter | top
![]() Examples :
Examples :
Example 1: With ' Default ' the selection filter in Select Items mode, you can double-click a member main material to open the review window for that member. If you double-click a connection material, bolt or weld, you open the Connection Component window for the item that you double-clicked.
Example 2: With ' Legacy Default ' the selection filter in Select Items mode, double-clicking a connection material opens the material window, not the Connection Component window. Similarly, double-clicking a connection bolt opens the bolt window, and double-clicking a weld opens the weld window.
Example 3: With the ' Material ' filter selected, double-clicking a member main material opens the review window for that material, while double-clicking a connection material opens the review window for that material. Unless other filters are also set, you will not be able to select items other than material.
Example 4: With the ' Member ' filter selected, you can double-click anywhere on a member to open the review window for that member. Unless other filters are also set, you will not be able to select items other than members.
Example 5: With the ' Bolts ' filter the only filter selected, you are limited to selecting bolts in Select Items mode.
Example 6: With the ' Columns ' and ' Beams ' filters selected, you are limited to selecting columns and beams when in Select Items mode. On the Selection filter toolbar item, the filter is named ' Custom '.
Example 7: With the ' Construction Lines ' and ' Construction Circles ' filters selected on the Set Selection Filter window, you press the " Save " button and name the custom filter ' Con Lines & Circles '. The new custom filter will be available in Modeling for all jobs until you " Delete " it in the Edit Selection Filter window.
page 1 | contents | model > set selection filter | top
![]() The ' Default ' selection filter :
The ' Default ' selection filter :
|
When ' Default ' is the selected selection filter, you can select 3D modeling objects other than construction lines and construction circles and grid lines (see tip 2 ). That is, you can select members, components, materials, bolts, holes or welds. Tip 3 explains how to select system connection materials, bolts and welds.
To select a user-added material when ' Default ' is the filter:

selection filter 1 . Left-click ( Select ) a use-created material . 2 . The material (e.g., a shear stud ) turns the " Primary selection surface color " ( green in this example).
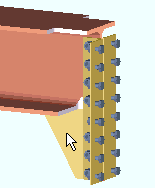
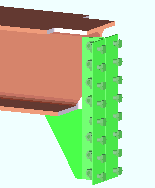
To select a connection component when ' Default ' or ' Components ' is the selection filter:
selection filter 1 . Left-click ( Select ) any one connection material. 2 . The entire connection turns the " Primary selection surface color " ( green in this example).
To select a connection material when ' Default ' is the filter:
selection filter 1 . Hover the material you want with your mouse pointer, right-click ( Menu ), then choose " Select Other " on the menu and select the material you want. 2 . The selected material turns the " Primary selection surface color " ( green in this example).
To select a member when ' Default ' is the selection filter:
selection filter 
1 . Left-click ( Select ) the main material of the member you want. 2 . The selected member turns the " Primary selection surface color " ( green in this example).
To switch views when ' Default ' is the selection filter:
selection filter 1 . Double-click the grid bubble (or name) of the straight grid line whose view you want to open. 2 . That erection view opens. This is a direct alternative to Open View .


Tip 1: You can use the context menu to select a member main material regardless of the filter. To do this, right-click ( Menu ) in Select Items mode.
Tip 2: If ' All ' is selected, you can select construction lines and circles and grid lines in addition to all of the other classes of items that are selectable when the ' Default ' filter is used.
Tip 3: To select or review system connection bolts, welds or materials instead of their connection, right-click ( Menu ) then choose " Select Other ..." or " Review Other ..." on the context menu .
page 1 | contents | model > set selection filter | top
![]() The ' Legacy Default ' selection filter
The ' Legacy Default ' selection filter
|
|
The ' Default ' and ' All ' filters do not allow you to select/review individual materials, bolts or welds that are parts of a connection component or custom component . If you want to select/review individual elements (e.g., materials) of a component in the model, you can use the ' Legacy Default ' filter or right-click and choose ' Select Other ' or ' Review Other ' on the menu . Also, you could use the ' Material ' or ' Bolts ' or ' Welds ' or ' Holes ' filters.
When ' Legacy Default ' is the selection filter:
- Double-click a connection material to review that material.
- Double-click a connection bolt to review that bolt.
- Double-click a connection weld to review that weld.
- To review multiple items, first select the bolts or materials or welds, then right-click ( Menu ) and choose " Review " on the context menu .
- To access connection component settings or custom component settings when the ' Legacy Default ' filter is active, you can use the Model Tree or find the equivalent component settings on the review window of the member that the component belongs to.
- In other respects, the ' Legacy Default ' filter is very similar to the ' Default ' filter. For example, to select a member main material , hover the main material with your mouse pointer (
), then right-click ( Menu ) and choose " Select Other " on the context menu . As with the ' Default ' filter, clicking the main material does not select the material -- it selects the member.
page 1 | contents | model > set selection filter | top
![]() To select items ' By Expression '
To select items ' By Expression '
1 . Select ' By Expression ' as the selection filter, or choose Model > Selection Filter by Expression .
Possibility 1 : If this is the first time in your current Modeling session that you set the ' By Expression ' filter, the Selection Filter by Expression window opens. The Selection Filter by Expression window always opens if you chose Model > Selection Filter by Expression . Go to step 2.
Possibility 2 : If you previously set the ' By Expression ' filter in your current Modeling session, skip steps 2 and 3. Go to step 4.
2 . On the Selection Filter by Expression window, you can do combinations of the following:
Press the " Open ... " button to load a selection script that has already been created.
Enter new code to the " Code " text-entry area.
Press the " Save... " button to save any script you have defined on the Selection Filter by Expression window under a file name of your choosing.
3 . After you are satisfied that the Selection Filter by Expression window defines the script the way you want it to be run, press the " OK " button to close that window. Note that if the script launches a dialog, you will have to make appropriate entries on that dialog.
4 . Draw an area box to select items in the model (or select items in some other way). Only those items that meet the selection criteria in the script can be selected when this filter is set. Please note the following:
The selection count tells you how many items are selected.
Items that are selected are displayed in the " Primary selection color ."
To review the selected items, right-click ( Menu ) then choose " Revoew " on the context menu . Be aware that the selected items need to be alike if you want to review multiple members of the same type or review multiple materials or review multiple bolts or review multiple holes or review multiple welds .
page 1 | contents | model > set selection filter | top
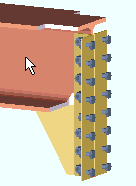
![]() ' Group Members ' and ' Members in Groups ' selection filters :
' Group Members ' and ' Members in Groups ' selection filters :
page 1 | contents | model > set selection filter | top
![]() The ' Material Construction Lines ' selection filter :
The ' Material Construction Lines ' selection filter :
|
- Material construction lines are construction lines ( or construction circles ) that have been added using Model > Construction Lines > Construction Line Add Material . They are marked internally to be distinct from other construction lines. Selecting the ' Material Construction Lines ' selection filter limits selectability to material construction lines.
page 1 | contents | model > set selection filter | top
![]() The ' Model Dimensions ' selection filter :
The ' Model Dimensions ' selection filter :
|
page 1 | contents | model > set selection filter | top
![]() The ' Connection Components ' and ' Custom Components ' selection filters :
The ' Connection Components ' and ' Custom Components ' selection filters :
The ' Connection Components ' filter limits selectability to connection components .
The ' Custom Components ' filter limits selectability to custom components .
- A custom component is parametrically generated when it is added to a member in Modeling in a full-featured SDS2 program.
- With the ' Custom Components ' filter active, selecting any material, bolt or weld that is part of a custom component selects the entire custom component (all of its materials). Double-clicking a material of that custom component opens the custom component window.
- The custom component window also opens if you double-click a custom component material, bolt or weld using the ' Default ' or ' All ' filter.
VIDEO Custom components can be selected when ' All ' or ' Default ' or ' Custom Components ' is the selection filter. However, components such as Safety Holes , which does not generate a material, must be selected in the Model Tree . (Recorded in SDS2 Detailing , v2015.) Also see:
page 1 | contents | model > set selection filter | top
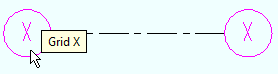
![]() The ' Grid Lines ' selection filter :
The ' Grid Lines ' selection filter :
|
|
page 1 | contents | model > set selection filter | top
![]() The ' By Status Display ' selection filter :
The ' By Status Display ' selection filter :
|
|
|
1 . The Status Display window opens when you select this filter. On that window, enter one or more conditions by which you want to select items.
2 . Draw by area box around an area in your model.
3 . Of all of the items that are within that area box that you drew in step 2, only those items that satisfy the condition(s) you specified in step 1 are selected.
Note: User and Site Options > Modeling > " Level of detail " must be sufficient if you want to be able to select items such as bolts or holes using the ' By Status Display ' selection filter.
Also see: Model > Status Select (