 Ruler ( Modeling or Drawing Editor > r r )
Tool summary :
- Measures the distance between two points and the angle beween two lines.
- After measuring a distance, you can locate additional points to get information reported to the " Angle " tab.
- To measure the acute angle between members, go to a view in which the members are flat.
- You can copy ( Ctrl + c ) a value reported on this window and later paste it ( Ctrl + v ) to another window (e.g., to a calculator program).
- See (on this page):
Also see :
- Add Dimension (alternative in the Drawing Editor )
- Ctrl+c (to copy a distance reported on this window)
- Global coordinate system
page 1 | contents | model > (3d) | tools > (2d) | measuring distances
Examples (also see the step-by-step instructions ) :
| YouTube video: The SDS2 Ruler can be used to measure the distance between two points. It can also measure angles . (Recorded in SDS2 Detailing , v2020i) |
|
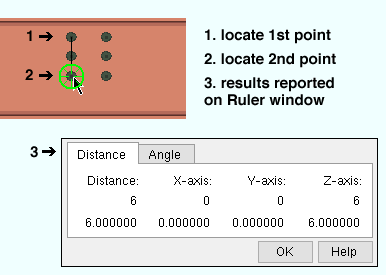
In this example, an exact point is located at the center of each of two bolts to measure the center-to-center distance between those bolts. |
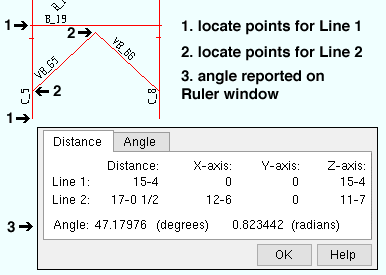
Measuring an angle is also demonstrated in the video shown above.
|
To measure the true angle between two members, you must be in a view in which those members are flat. The members can be in different planes since the Ruler measures in 2D space, not 3D space. The Ruler extrapolates lines of infinite length from the points you locate, enabling it to measure the acute angle between two member lines that do not touch. |
page 1 | contents | model > (3d) | tools > (2d) | measuring distances | top
Step-by-step instructions (also see the example ) :
The Ruler may be used in the Drawing Editor or in Modeling . The following instructions assume that you are using a 3-button mouse.
1 . Invoke Ruler using any one (1) of the following methods:
Method 1 : Click the Ruler icon, which is pictured above. The icon can be taken from the group named ' Model ' and placed on a toolbar (classic) or the ribbon (lightning). In the Drawing Editor , look for the icon in ' Tools '.
Method 2 : If " Modeling layout style " is ' Classic ', you can use the Modeling menu system to choose Model > Ruler . When " Drawing Editor layout style " is ' Classic ', you can choose Tools > Ruler .
Method 3, 4 or 5 : Ruler can also be configured to be invoked using a keyboard shortcut , the context menu , or a mode . For the lightning interface, this configuration is done using Customize Interface . The default keyboard shortcut for Ruler is r r .
2 . Locate - Pan - Return mouse bindings become active along with various Locate options.
|
|
|
bindings |
2a (optional) : Select the Locate icon that you want (if it's not selected already).
2b : Place the mouse pointer (
) so that the point location target (
) snaps to the point from which you want to measure, then left-click ( Locate ).
2c : Locate a second point in the same way you located the first point (steps 2a & 2b).
3 . Ruler measures the distance between the points located in step 2 and reports that distance (in the primary dimension " Units ") on the " Distance " tab of the Distance Ruler window. In Modeling , Ruler uses the global coordinate system to calculate the distance between the points. Note that you must do step 4 to get complete information written to the " Angle " tab.
|
|
|||
| Distance | X-axis | Y-axis | Z-axis
(Modeling only) |
| actual distance between the two points | absolute value of the difference between the first point's and second point's X coordinate | absolute value of the difference between the first point's and second point's Y coordinate | the difference in elevation between the first point and the second point |
| The first row reports the display value . The second row reports the stored value (to six decimal places). For ' Imperial (ft-in frac) ' dimensioning, the display value is in feet, inches and fractional inches, while the stored value is in decimal inches. See the example above. | |||
|
|
| " Line 1 " and " Line 2 " report distances (display values) just like the " Distance " tab. You need to locate another line (two points -- step 4 ) for " Line 2 " and " Angle " data to be shown. |
| " Angle " reports the acute angle between extrapolations of " Line 1 " and " Line 2 " in 2D space. See the example above. Even in Modeling , the angle is measured in 2D space, which means the reported angle may not necessarily be the true angle. To measure the true angle between two lines, each line must be in a plane that is parallel with the view in which they are measured (example: in a plan view, each line must consist of points at the same elevation). If the lines are parallel, an " Angle " of ' 0 ' is reported. |
| " Bevel " expresses the slope of " Line 1 " with respect to " Line 2 " as a ratio of dimensions, where the Home > Project Settings > Fabricator > Detailing Symbol Settings > " Bevel symbol base dimension " is the larger dimension that is reported. |
4 . Locate- Pan -Return mouse bindings continue to be active. Do one (1) of the following:
|
|
|
bindings |
Alternative 1 : Locate two additional points (like you did in step 2). The " Distance " tab on the Distance Ruler window reports the distance between these points, and the " Angle " tab reports the acute angle between an infinite line that includes these two points and the infinite line that includes the previous two points. You can locate as many pairs of points as you like.
Alternative 2 : Right-click ( Return ) to end this operation and reactivate the mouse bindings that were active before step 1.
5 . The Distance Ruler window remains open regardless of your choice in step 4. To close the Distance Ruler window, press the " OK " button at the bottom of it.
Note: You may want to keep the Distance Ruler window open to, for example, measure additional distances, or as a reference so that you don't have to write down the distances or angles that are reported on it.
page 1 | contents | model > (3d) | tools > (2d) | measuring distances | top