 Snap to Surface ( Modeling )
Tool summary :
|
- See the step-by-step instructions
Also see :
- Surfacing Depth (option for Snap to Surface )
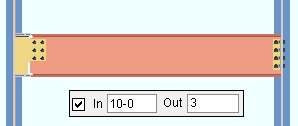
- Surface "In" "Out" ( User and Site Options > Modeling > )
- Ctrl + middle click (snaps to the surface you click on)
- Undo View Change (undoes Snap to Surface )
- Snap to Farside Surface (similar to Snap to Surface )
- Snap to Adjacent Surface (similar to Snap to Surface )
page 1 | contents | navigate > surface > | navigate -- surface mode | 3D evus
Step-by-step instructions :
Snap to Surface moves the work plane of your current view in Modeling to the surface that you locate. The material surface must be displayed in one of the three solid forms in order for you to perform this operation. The following instructions assume that you are using a 3-button mouse. Also, performing this same operation in Surface Mode combines steps 1 and 2.

|
1 . Invoke Snap to Surface . |
|
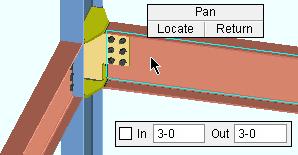
2 . Left-click ( Locate ) the surface that you want to go to. If you right-click ( Return ), you cancel the operation. |
|
3 . Snap to Surface adjusts depth checking per User and Site Options > Modeling > " Snap to surface depth check ." The surface you located fills your view. |
Note 1: To invoke Snap to Surface ...
Method 1 : Click the Snap to Surface icon, which is pictured above. The icon can be taken from the group named ' Navigate -- Surface Mode ' and placed on a toolbar (classic) or the ribbon (lightning).
Method 2 : If " Modeling layout style " is ' Classic ', you can use the menu system to choose Navigate > Snap to Surface .
Method 3, 4 or 5 : Snap to Surface can also be configured to be invoked using a keyboard shortcut , the context menu , or a mode . For the lightning interface, this configuration is done using Customize Interface .
Method 6 : You can Snap to Surface from Surface Mode or by holding down Ctrl in Select Items Mode . First place the mouse pointer (
) on the surface of the material you want to snap to, then left-click ( Surface ). In the above instructions, skip step 2 and go to step 3.
Note 2: Since the snapped-to surface is your work plane, it is displayed in a lighter color (see work plane highlighting ).
Note 3: Snap to Surface relocates your current view. It does not create a new view. To undo your changes, you can Open ( Ctrl + o ) your current view again. Or you can use Undo View Change or Revert to undo those changes. If you want to keep a temporary copy of the view -- maintained during your current Modeling Session -- you can use Retain View . A retained view retains zoom and pan operations as well as the view's 3D location.
page 1 | contents | navigate > surface > | navigate -- surface mode | 3D evus | top