 Plotting ( Home & Modeling & Drawing Editor )
Tool summary :
Defaults Plot revision layers Hide ... Scale plots (windows) Detail sheets OK and Cancel Reverse plot order Gather sheets Plot comment layers Erection sheets
Also see :
VIDEO 
A selection list is used to print gather sheets loaded one part per sheet. The technique selects gather sheets by sequence. (Recorded in SDS2 Detailing , v7.3.)
- Detail sheets , gather sheets & erection sheets (may be plotted)
- Print (to print your current drawing)
- Home > Export > 2D > Export PDF Drawing (alternative to printing)
- Plot to file directory ( User and Site Options , > Output > )
- Default for "plotting" ( User and Site Options , > Output > )
- Line Widths (pen color & width for printers and plotters)
home > export | interface > | interface | exporting | top
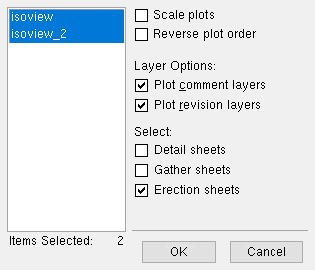
![]() The Plotting selection dialog :
The Plotting selection dialog :
Defaults: The default settings for " Scale plots ," " Reverse plot order ," " Plot comment layers " and " Plot revision layers " come from the last time you printed. This is a user setting, not a site setting, which means that different users on the same network can set different defaults for themselves.
|
The program automatically selects for plotting (that is, highlights): 1) Any sheet that has never been printed. 2) Any sheet that has been altered. 3) Any sheet that has a sheet item (detail) placed on it which has been altered since that sheet was last printed. |
Scale prints - ![]() or
or ![]() . This applies to Windows operating systems only. It is not available in Linux.
. This applies to Windows operating systems only. It is not available in Linux.
If this box is checked (
), the program will to automatically adjust the print size (up or down) so that it fits onto the actual sheet.
If the box is not checked (
), the program does not automatically adjust the print size.
If this box is checked (
If the box is not checked (
Layer Options :
| Note: The program does not print layers that are hidden (" Show " not checked in Layer Edit All ). |
If this box is checked (
If the box is not checked (
If this box is checked (
If the box is not checked (
Select :
| Note: You can simultaneously print detail sheets and/or gather sheets and/or erection sheets. |
If this box is checked (
If the box is not checked (
If this box is checked (
If the box is not checked (
If this box is checked (
If the box is not checked (
![]() opens the Hide Items window so that you can mask the sizes of sheets that you do not want displayed on the selection list .
opens the Hide Items window so that you can mask the sizes of sheets that you do not want displayed on the selection list .
"OK" prints those sheets that are selected (highlighted) on the selection list. Go to step 7 (Windows).
"Cancel" cancels the printing operation.
home > export | interface > | interface | exporting | top
![]() Printing/output to disk under the Windows operating systems :
Printing/output to disk under the Windows operating systems :
1 . Do one (1) of the following to invoke Plotting :
Method 1 : Click the Plotting icon, which is pictured above. The icon can be taken from the group named ' Interface ' and placed on a toolbar (classic) or the ribbon (lightning).
Method 2 : Home > Export > 2D > " Plotting ."
Method 3 : In Modeling (classic) or the Drawing Editor , choose Interface > Plotting , or click the icon pictured above, or use a keyboard shortcut .
2 . A selection dialog opens. The default settings for " Scale prints ," " Reverse print order ," " Plot comment layers " and " Plot revision layers " come from the last time you printed. These are user settings, not site settings, which means that other users on your same network can make changes to this window without affecting the settings that you make for yourself.
2a (optional) : Check the box for " Scale plots " if you want the program to automatically adjust the print size (up or down) so that it fits onto the actual sheet. Check the box for " Reverse print order " if you want the sheets to be printed opposite to their order in the selection list .
2b (optional) : Press the " Hide ... " button if you want to select sheets by sheet size.
2c : Check " Detail sheets " and/or " Gather sheets " and/or " Erection sheets " to display the type(s) of sheets you want to choose from, then select the sheets that you want to plot, then press the " OK " button.
Note: The program automatically selects for plotting (that is, highlights) any sheet that has never been printed or which has been altered or which has a detail placed on it which has been altered since that sheet was last printed.
3 . If you deselected sheets that the program automatically selected in step 2 and thus caused them to no longer be selected for plotting, the program opens a yes-no dialog with the message, "Sheets automatically selected for plotting have been deselected? Would you like to retain automatic selections for next time?"
Alternative 1 : Press " No " to permanently clear the print flags.
Alternative 2 : Press " Yes " to cause the items you deselected in step 2 to be automatically selected (highlighted) the next time you print a sheet.
4 . The Windows Print dialog opens.
4a : To " Select Printer ," select the name of the printer or printer you are outputting to.
4b : To " Number of copies ," enter the number of copies of each sheet that you want to print ( 1 or 2 or 3 , etc.).
Alternative 1 : Click the " Preferences " button. Go to step 5.
Alternative 2 : Go to step 6.
5 (if applicable) : If you pressed " Preferences " in step 4, the Printing Preferences dialog opens for the printer you selected. The options available on this window may be different for different printers.
5a : To " Orientation " select either ' Landscape ' (long side horizontal) or ' Portrait ' (long side vertical).
5b : Make any additional changes you want to the Printing Preferences window.
5c : Press the " OK " button on the bottom of the window.
6 . The Print dialog (which first appeared in step 4) becomes active again.
6a (optional) : At this point, if you so choose, you can select the " Print to file " option (this outputs the sheets to a file instead of the printer). The files are given a .plt extension. By default, the files are sent to the User and Site Options > Output > " Plot to file directory ."
6b : Press the " Print " button.
7 . One (1) of the following happens:
Possibility 1 : The sheets you selected are output to the designated printer.
Possibility 2 : If the " Print to file " check box was checked in step 6 , the Save As dialog opens, allowing you to select the file folder you want the file to be placed in.
home > export | interface > | interface | exporting | top