 Vertical Brace Workpoint Adjustment
This tool must be downloaded from SDS2 Toolbox and installed in order to use it.
- General Overview
- Step-By-Step
- Related Tools

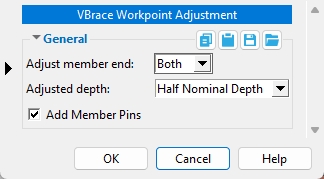
Adjustment member end: Left or Right or Both.
Select Left to move the left member end of the vertical brace.
Select Right to move the right member end of the vertical brace.
Select Both to move both the left and right member end of the vertical brace.
Adjusted depth: Half Nominal Depth or Half Actual Depth.
Half Nominal Depth locates the vertical brace member end at half of the supporting beam's nominal depth.
Half Actual Depth locates the vertical brace member end at half of the supporting beam's actual depth.
Example: The full nominal depth of a W18x35 beam is 18 inches, while the full actual depth is 17.7 inches. The half nominal depth of this beam is 9 inches, and the half actual depth of this beam is 8.85 inches.
When checked (
), one or more member pins are added to the member end.
When unchecked (
), the no member pins added to the member end.

Member pins added for half nominal (left) compared to member pins added for half actual (right).
![]() Copy, Paste, Save, Load buttons:
Copy, Paste, Save, Load buttons:
OK: Applies the settings to the selected vertical brace(s) and initiates the final step of the command.
1 . Click the Vertical Brace Workpoint Adjustment icon, which is pictured above. The icon can be found on the Toolbox page.
Alternative: Invoke Vertical Brace Workpoint Adjustment using the Find Tool by searching the command name and clicking the icon, which is pictured above.
Learn more about alternative methods for launching commands.
2 . The status line prompts you to "Locate Vertical Brace(s)". Select one or more vertical brace members, then press Enter or right-click and select OK.
Alternative: Press Esc or right-click and select Cancel to end the command.
3 . The Vertical Brace Workpoint Adjustment window appears. When you are done adjusting its settings, click the OK button to continue.
Alternative: Press Esc or right-click and select Cancel to close the window and end the command.
4 . The Vertical Brace Workpoint Adjustment window is dismissed and the status line prompts you to "Deselect vertical brace(s) which should remain in place". While holding Ctrl , left-click any vertical brace you do not want included in this operation. Then press Enter or right-click and select OK. The vertical brace ends are moved according to your settings.
Alternative: Press Esc or right-click and select Cancel to return to the Vertical Brace Workpoint Adjustment window. Your original selection of vertical braces is restored. Repeat step 3.
Tip: You can re-select vertical brace members if they were inadvertently deselected.
- Vertical Brace Workpoint Adjustment Setup (Project Settings)
- Member Pins (Index)
- Member End Edit window
- Set Vertical Brace Workpoints to 1/2 Nominal Depth of Supporting Beam (Utilities > Change Options)


