Member End Edit window ( Modeling )
- See (on this window):
- Ways to open the Member End Edit window .
- " OK " " Cancel " " Reset "
Also see :
|
- Member end (double-click to open this window)
- Ways to open the Member End Edit window (various ways to open this window)
- Member ends (selection filter) (
 )
)
- Member Pins ( Home > Project Settings > Job ) ( )
- Member ends always displayed ( Display Options in Modeling ) ( )
- Model > Member > Move/Stretch (pins can affect such operations) ( )
- File > Views/Grids > Move View (pins can affect such operations) ( )
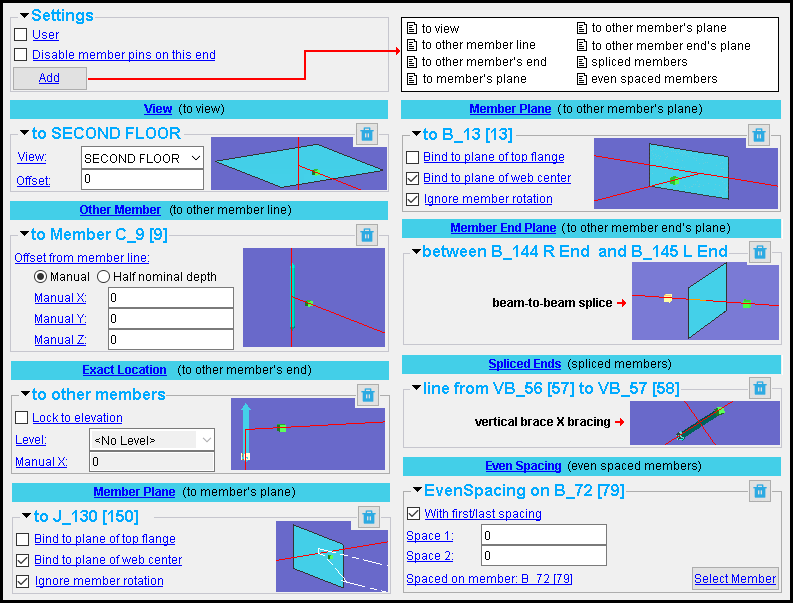
-----  Settings -----
|
||
|
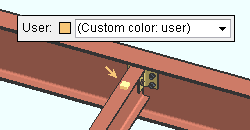
If this box is checked (
), the settings on this window are locked and will not be changed during Process and Create Solids or when, for example, a new view is added in the vicinity of this member end or when the framing situation of this member end changes. When you make a change to a pin setting -- for example, enter an offset -- all pins associated with that member end become user pins, and this option is set to "
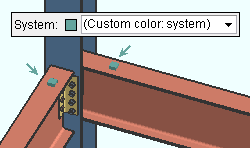
If the box is not checked (
), the pins associated with this member end are system pins, which means that they can change as the member end's framing situation changes or, for example, as new views are added within the member end's vicinity.
If you change this option from "
Regardless of whether a pin is "
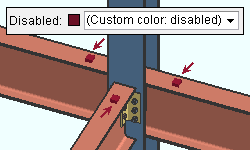
Disable member pins on this end: ![]() or
or ![]() .
.
|
" |
If this box is checked (
If the box is not checked (
Also see: "
" Add " lets you add a new pin. That pin's settings will be found in a new leaf on this window. There are eight types of pins that can be added. Each pin type pins the member end in a unique way to a member end or grid line (view) or member line .
|
|
|
adds a new pin |
1 . Press the " Add " button.
2 . A window opens with the following options. Double-click the option you want, then perform the action that is required of you in the model.
Option Action Required in Model Heading Under Which the New Pin Is Shown to view
Select a grid to pin the member end to.. " View " Select a member to pin the member end to. " Other Member " Select another member's end. " Exact Location " No action is required in the model. The new section is created without your having to select anything " Self " Select a member. " Member Plane " Select a member end. " Member End Plane " Select a member line. " Spliced Ends " Select a beam that you want the member end to pin to. " Even Spacing " 3 . A new pin ( leaf ) is added on this window. The table in step 2 tells you the name of the leaf. In that leaf, you may be able to adjust settings applied to the new pin.
| View |
|
Each view listed on this Member End Edit window represents a distinct view that this member end is pinned to. Additional views can be pinned to by pressing the " Add " button then choosing " |
View: Any grid line/ view in you current model can be pinned to. See grid lines .
|
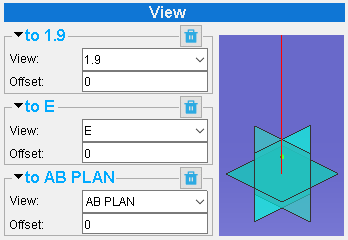
The bottom column end that is shown in this example is pinned to three different views, which are named 1.9 and E and AB PLAN . Each pin restrains the column's bottom end to a different plane. |
Warning: Be aware that the member end that you are editing will snap to the grid line that you select as the " View " that the end is pinned to. Applying Auto Pins to a member end pins that end only to views that do not cause the member to move; however, manually selecting a view can cause the member to move (after you press " OK ").
For example, if the column's top end is auto pinned to a plan view named Second Floor that is at an elevation of 126-0 and you switch " View " to a different plan view that is at an elevation of 127-0 , your change will result in the column's top end " End elevation " being changed from ' 126-0 ' to ' 127-0 '. "
Also see: Member ends that are pinned to a particular view may move as a result of your performing a File > Views/Grids > Move View operation on that view.
Offset: A positive (+) or negative (-) distance (in the primary dimension " Units " or other units ). The " Offset " distance is the distance perpendicular from the work plane of the " View " (selected above) to the member end.
|
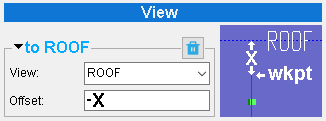
The top column end in this example is pinned to a view named ROOF and an offset of ' -X ' (negative) is entered, causing the column's top work point ( wkpt ) to be a distance of X below the ROOF grid line. |
|
' 0 ' results in the end of the member (its work point) snapping to the work plane of the " View " selected above. For example, if the member is a beam and the " View " is a plan view at 100-0 , then that beam's " End elevation " (for the end being edited on this window) will be ' 100-0 '.
' A positive distance ' moves the end of the member (its work point) away from the direction that the view faces. For example, plan views look downward. if the " View " entered above is a plan view, then entering a positive distance to ' Offset ' and pressing " OK " moves the end of the member upward that distance.
' A negative distance ' moves the end of the member (its work point) in the direction that the view faces. For example, if the " View " is a plan view, then entering a negative " Offset " moves the end of the member downward that distance.
Also see: Member ends that are offset a particular distance from a particular view may move as a result of your performing a File > Views/Grids > Move View operation on that view. The offset will be maintained.
| Other Member |
|
A member end can be pinned to an " Other Member ." If the end is pinned to more than one member -- for example, in a vertical brace to beam & column framing situation -- each of these other members will have its own leaf . A pin to an " Other Member " can be deleted by pressing the trash can button ( |
Offset from member line: Manual or Half Nominal Depth .
|
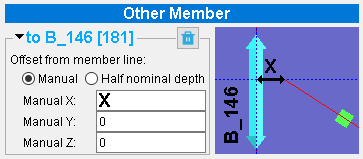
The member end is pinned to the member line of B_146 . A " Manual X " distance of ' X ' results in the end of the member being moved a distance of X away from the member line of B_146. |
' Manual ' lets you set the global ' Manual X ' and ' Manual Y ' and ' Manual Z ' distances that you want the work point associated with this member end to be offset from the member line the end is pinned to. 0 to each of these offsets results in the work point at this member being pinned to the nearest point on the member line. A positive or negative distance moves the work point of the member that distance away from the nearest point on the pinned-to member line.
VIDEO 
One end of the ridge beam on a hip-and-valley roof is raised, also raising the ends of all beams that are pinned to that ridge beam's member line. The auto pins for each of the beams pinned to the ridge beam have their " Offset from member line " auto set to ' Manual ' with X, Y and Z offsets of ' 0 '. ' Half Nominal Depth ' is the choice made for auto pins on the end of a vertical brace to a beam.
VIDEO Vertical X braces that frame opposite to one another have " Spiced ends " pins. A vertical brace to a beam-column is pinned to the beam with an " Offset from member line " of ' Half nominal depth '. When the beam's left and right " End elevation " are moved up, the X braces remain colinear and the brace to beam-column stays aligned to half the nominal depth of the beam. Also see: Member ends that are offset a particular distance from a particular member line may move as a result of your performing a Model > Member > Move/Stretch operation on that member line. The offset will be maintained. The same is true if you change the member " End elevation " of one or both ends of that member line.
| Exact Location |
|
The Exact Point of one member end can be pinned to the Exact Point of another member end. You can create the pin by pressing the " Add " button then choosing " |
If this box is checked (
If the box is not checked (
Level: <no level> or a plan view . Any plan view that is stored in your current Job can be selected.
' <no level> ' keeps the ends of the two members in their current position. If a Move/Stretch operation moves one member end from that position, the other end will move as well, unless it is constrained by other pins.
' a plan view ' snaps the end to the reference elevation of the selected plan view. If the reference elevation of that plan view is different than the current location of the member end, the member end will snap to the elevation of that plan view.
Manual X: A positive (+) or negative (-) distance (in the primary dimension " Units " or other units ).
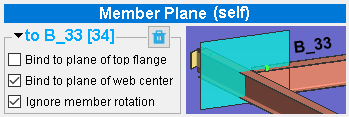
| Member Plane (self) |
|
A member end can be pinned to a plane of its own member that end belongs to. In which case, it will appear under a heading that reads " Self " or " Member Plane ." A pin to a " Member Plane " or " Self " can be deleted by pressing the trash can button ( |
Bind to plane of top flange: ![]() or
or ![]() .
.
|
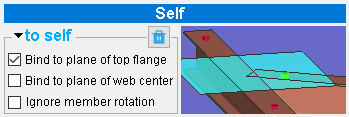
In this example the plane that the member end is pinned to is the plane of its own member's top flange. |
If this box is checked (
If the box is not checked (
Bind to plane of web center: ![]() or
or ![]() .
.
|
In this example the plane that the member end is pinned to is the plane of B_33's web center. B_33 is the member that the end belongs to. |
If this box is checked (
If the box is not checked (
Ignore member rotation: ![]() or
or ![]() . This may apply when either "
. This may apply when either " ![]() Bind to plane of top flange " or "
Bind to plane of top flange " or " ![]() Bind to plane of web center " is checked.
Bind to plane of web center " is checked.
If this box is checked (
If the box is not checked (
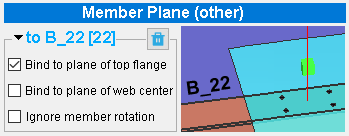
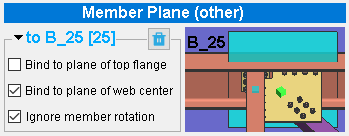
| Member Plane (other) |
|
A member end can be pinned to a plane of another member. Auto Pins can create such a pin, or you can create such a pin by pressing the " Add " button then choosing " |
Bind to plane of top flange: ![]() or
or ![]() .
.
|
In this example, the bottom end of a column is pinned to the top flange of beam B_22 . The column's bottom end elevation will adjust when the beam's elevation changes. |
If this box is checked (
If the box is not checked (
Bind to plane of web center: ![]() or
or ![]() .
.
|
In this example, the plane that the member end is pinned to is the web center of B_25 . The left end of the horizontal brace is the end being edited. |
If this box is checked (
If the box is not checked (
If this box is checked (
If the box is not checked (
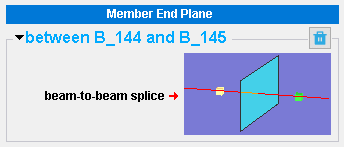
| Member End Plane |
|
Member ends can be pinned to each others end planes. You can create such a pin by pressing the " Add " button then choosing " |
----- between Member XXX and Member YYY -----
|
Each of the two pins shown in this example are pinned to the same plane. The two beam's connect with a beam-to-beam splice plate connection. |
| Spliced Ends |
|
Member ends can be pinned so that their members remain colinear to one another. You can create such a pin by pressing the " Add " button then choosing " |
----- ![]() line from XXX to YYY -----
line from XXX to YYY -----
|
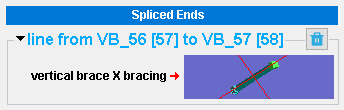
Auto Pins creates " Spliced Ends " pins that align the opposing ends of the supported vertical braces in an X bracing framing situation. |
|
| Even Spacing |
----- EvenSpacing on XXX -----
|
|
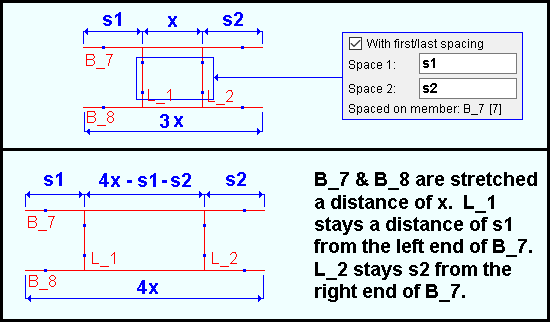
With first / last spacing: ![]() or
or ![]() . Note in the examples below that the four member ends on members L_1 and L_2 are set to be " Spaced on member: B_7 " and that B_7 is one of the members that are stretched when B_7 and B_8 are stretched.
. Note in the examples below that the four member ends on members L_1 and L_2 are set to be " Spaced on member: B_7 " and that B_7 is one of the members that are stretched when B_7 and B_8 are stretched.
| " |
|
| " |
|
If this box is checked (
If the box is not checked (
Space 1: The distance (in the primary dimension " Units " or other units ) from the left end of the " Spaced on member " to the work point associated with the leftmost member end that is attached to the " Spaced on member ." This applies only when " ![]() With first / last spacing " is checked.
With first / last spacing " is checked.
Example: In the example for "
Space 2: The distance (in the primary dimension " Units " or other units ) from the right end of the " Spaced on member " to the work point associated with the rightmost member end that is attached to the " Spaced on member ." This applies only when " ![]() With first / last spacing " is checked.
With first / last spacing " is checked.
Example: In the example for "
Spaced on member: The member ( pcmk [ num ]) that the member end is spaced on. Press the " Select Member " button if you want to select a different " Spaced on member ."
Tip: If you want to change the " Spaced on member ," you should multi-edit and do it for all member ends that are spaced on the " Spaced on member ."
Example: In the example for " With first / last spacing " (above), the two member ends associated with L1 and the two member ends associated with L2 are all set to " Spaced on member : B_7 ," resulting in the spacing being maintained when beams B_7 and B_8 are stretched. Since the two beams are stretched equally, the same results would have been maintained if all four ends were instead set to " Spaced on member : B_8 ."
" OK " can result in serious changes to the member whose end you are editing.
The member whose member end you edited may undergo Process and Create Solids .
The member may be relocated, for example, due to your pinning it to a particular view or member or due to your entering an offset.
Settings such as " End elevation " on the member's edit window may change.
If "
"Cancel" (or the Esc key) closes this window without changing any of the pin settings associated with the member end(s) you are editing..
"Reset" undoes any changes made since you first opened this window. That is to say, " Reset " populates this window with the settings that were originally entered to it when you first opened the window. The window remains open.

