 Mode Configuration ( Modeling & Drawing Editor , ' Classic ' or ' Lighting ')
- Different configuration files are used in Modeling and the Drawing Editor .
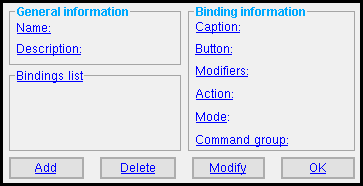
Follow the instructions on this page to " Add " " Delete " or " Modify " the mouse bindings for the mode that you selected before opening this window.
|
Also see (lightning) :
- Customize Interface ( Mode Configuration is opened from)
- Mode configuration ( Mode Configuration can edit one such file at a time)
- Role configuration file (may contain multiple roles)
- Role switcher (each role has an associated keyboard configuration file)
- A role (may be assigned 1 context menu configuration, but other roles can have the same menu config)
- Lightning role configuration (role configuration file loaded when, for example, Modeling is launched)
- Note: A single context menu file can be used across multiple roles in multiple role configurations.
Also see (classic) :
- Toolbar configuration file (mode configuration settings reside in)
- Modeling default ( User and Site Options > Toolbars > " Modeling " > loaded at startup)
- Drawing Editor default ( User and Site Options > Toolbars > " Drawing Editor " > loaded at startup)
- Load Configuration ( Settings > )
- Delete Toolbar Configuration ( Home > Utilities > Utility Functions > )
Also see (lightning & classic) :
- Mouse buttons (sets the number of mouse bindings)
- User mode icons (blank modes you can set up with Mode Configuration )
page 1 | contents | customize interface > mode configuration > edit | settings > | top
 Example :
|
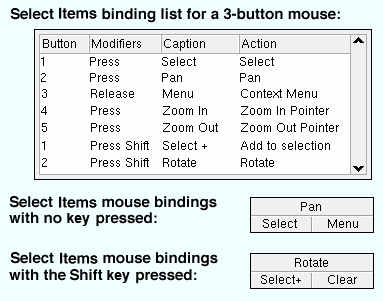
The " Bindings list " compared with the mouse bindings of Select Items mode in Modeling . |
page 1 | contents | customize interface > mode configuration > edit | settings > | top
 Command groups :
| Command groups in Modeling : File | File - Views/Grids | Edit | Edit - Search | Edit - Edit Piecemarks | Edit - Change Options | View | View - Solids Mode | View - Tiles | Navigate | Navigate - Navigation Mode | Navigate - Surface Mode | Model | Model - Construction Lines | Model - Construction Circles | Model - Member | Model - Group Member | Model - Material | Model - Hole | Model - Bolt | Model - Weld | Model - Component | Model - Assembly | Model - Reference Drawing | Model - Parametric | Model - Cranes | Model - Concrete | Model - Parametric - BVD | Locate | Process | Reports | Reports - SDS2 User | Reports -- Viewer | Interface | Settings | Settings - Job Settings | Settings - Fabricator Settings | Settings - Concrete Settings | Miscellaneous | Selection | Toolbox | |
| Erection View Detailing : File | View - Tiles | Navigate | Navigate - Navigation Mode | Navigate - Surface Mode | Settings | User Modes | Selection | Solids | |
| Assembly Editor : File | Edit | View | View -- Solids Mode | View - Tiles | Navigate | Navigate - Navigation Mode | Navigate - Surface Mode | Model | Model - Construction Lines | Model - Construction Circles | Model - Member | Model - Material | Model - Hole | Model - Bolt | Model - Weld | Locate | Settings | User Modes | Selection | |
| The " Miscellaneous " command group | |
| Shortcut Menu | opens the shortcut menu . |
| Next Mode | cycles alphabetically through modes with the mouse wheel . On a 3-button mouse with a mouse wheel, " Button " number ' 4 ' is a roll forward, ' 5 ' is a roll backward. |
| Previous Mode | see Next Mode . |
| Toggle Depth Checking | turns depth check controls on/off. |
page 1 | contents | customize interface > mode configuration > edit | settings > | top
 Preselection modes & in-tool selection modes
Preselection modes:
|
|
|
Select Items default bindings (no modifier key pressed) |
Select Items ( Modeling ) and Select Items ( Drawing Editor ) are preselection modes. Use Select Items to select one or more items, then invoke the command (tool) that operates on those items. For example, if you use the defaults for this mode in the Drawing Editor you can Select + a group of objects, then right-click ( Menu ) and choose " Delete " on the context menu to delete those objects.
In-tool selection modes:
Select Item(s) is an in-tool mode. It activates when you start up a tool that allows you to select multiple items and you have no valid preselection. It also activates for secondary selection during Cope , Exact Fit , Notch and Match Holes operations.


Select Item(s) default bindings (no modifier key pressed) Example: In the Drawing Editor , invoke Arc Erase when no arcs are selected. Select Item(s) mode becomes active so that you can select the arcs that you want to delete.
Default bindings for this mode (3-button mouse): The Select mouse binding (left mouse button) is linked to Select (in-tool only ). The Select+ mouse binding (left mouse button with Shift pressed) is linked to Add to selection (in-tool only) . The Select- mouse binding (left mouse button with Ctrl+Shift pressed) is linked to Deselect (in-tool only ). The Toggle mouse binding (left mouse button with Ctrl pressed) is linked to Toggle (in-tool only) . The OK (or Return ) mouse binding (right mouse button with Ctrl pressed) is linked to Finish Selection (in-tool only) .
To select/deselect items using these defaults: Left-click on items using Select+ or Toggle to select multiple items. Or draw an area box using Select+ or Select . To deselect items, use Select- or Toggle -- but be careful drawing an area box using Toggle .
To signal you are done selecting items, choose " OK " on the context menu or press the Enter key or hold down Ctrl and right-click ( OK or Return ).
Select One Item is an in-tool mode. It activates when you start up a tool that permits the selection of only a single item and you have no valid preselection.


Select One Item default bindings (no modifier key pressed) Example: In Modeling with no members or multiple members selected, press the F3 function key to add material to a member. Select One Item mode becomes active so that you can select the one member that you want to add the material to.
Default bindings for this mode (3-button mouse): The Select mouse binding (left mouse button) is linked to Add single item to selection (in-tool only ). The OK (or Return ) mouse binding is linked to Finish Selection (in-tool only) .
To select an item using these defaults: Left-click ( Select ) on the item or draw an area box around the item. Note that you can only select a single item of the type that is required for the tool.
To exit the tool without making a selection, right-click ( Menu ) and choose " Cancel " on the context menu or press the Esc key or hold down Ctrl and right-click ( OK or Return ).
page 1 | contents | customize interface > mode configuration > edit | settings > | top
![]() Step-by-step instructions :
Step-by-step instructions :
These instructions apply to both Modeling and the Drawing Editor :
1 . Before configuring modes.
1a : Make certain that you have set User and Site Options > General > " Mouse buttons " to the correct number (' 2 ' or ' 3 ' or ' 4 ').
1b : For ' Classic ', confirm that the correct toolbar configuration file is currently loaded. The default configuration is the choice selected for User and Site Options > Toolbars > " Modeling " or " Drawing Editor ." To load a configuration file other than the default file that is automatically loaded at startup, choose Settings > Load Configuration .
2 . Invoke Mode Configuration in the lightning or classic interface as described in the " Tool summary " at the top of this page.
3 . A selection dialog opens. On it is a list of all modes that are available in your currently loaded toolbar configuration (classic) or the " Cur rent role configuration " shown in Customize Interface (lightning). Do one (1) of the following:
Alternative 1 : Double-click the mode you want to review or modify (or select it then press " OK ").
Alternative 2 : Press the " Add " button on the selection dialog to add a user-created mode. After you have given the user-created mode a " Name " and " Description ," defined its mouse bindings (step 4), then saved it (step 4), you can access a different mode (step 2) and use the " Add " button on the Mode Configuration window (step 4) to add a mouse binding to the user-created mode within that other mode.
4 . The Mode Configuration window opens.
4a : Follow the instructions on this page to " Add " " Delete " or " Modify " the mouse bindings for the mode that you selected.
4b : When you are done, press the " OK " button.
page 1 | contents | options > mode configuration | top
------ General information ------
Name: The name (up to 15 characters - spaces allowed) of the mode you are currently reviewing or modifying. This name will be listed on the list box ( ![]() ) for " Mode " and will be stored as a part of your currently loaded tool bar configuration .
) for " Mode " and will be stored as a part of your currently loaded tool bar configuration .
Tip: Type in a " Name " only if you pressed the " Add " button on the selection dialog used to open this window (in which case, this field is blank). After entering the specifications for your new user-created mode, close this window, open another mode, then create a mouse binding for the user-created mode so that you can invoke the user-created mode from that other mode.
Warning: Do not change the " Name " of any default modes. Doing so breaks the link to the icon normally used to invoke that mode. This warning applies to user modes as well as the other default modes such as Member Mode or Arcs Mode or etc.
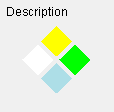
Description: The mode description (up to 50 characters - spaces allowed) that is entered here will appear on the mouse binding reporter when the mode you are working on is active. This same mode description will also be listed on the selection dialog that appeared (in step 3 ) when you opened this window.
![]()
page 1 | contents | customize interface > mode configuration > edit | settings > | top
------ Bindings list ------
The " Bindings list " is a list of the mouse bindings assigned to the particular mode whose " Name " is listed above. You may " Add " bindings to this list or " Delete " bindings from the list or " Modify " bindings that appear on the list. The illustration below shows the " Bindings list " for Construction Circle Mode .

| Column 1 | Column 2 | Column 3 | Column 4 |
| 3 | none | Erase | Construction Circle Erase |
| The mouse button to press in order to invoke the command listed in column 4. | The modifier key to press (if a modifier key needs to be pressed) to invoke the command listed in column 4. | The caption that appears on the mouse binding reporter (in the position listed in column 1) when this mode is active. | The command (or mode ) that can be invoked by holding down the modifier key listed in column 2 and pressing the button listed in column 1. |
page 1 | contents | customize interface > mode configuration > edit | settings > | top
------ Binding information ------
Caption: The text string (up to 20 characters) that you want to appear on the mouse binding reporter to describe the action that will be taken when you click the appropriate mouse button.
![]()
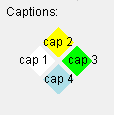
Related settings on this window: The position in which a caption appears on a mouse binding reporter depends on the choice made below, to " Button ." The caption is also reported in column 3 of the bindings list .
Button: The mouse button to press ( 1 or 2 or 3 or 4 or 5 ) in order to invoke the command that is selected in the " Command group " list or the mode that is entered to " Mode ." This is also the position on the mouse binding reporter that the " Caption " entered above appears on.
![]()
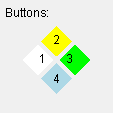
Example: If you enter ' 3 ' here, the caption appears in the 3rd position on the mouse binding reporter, which means you need to press the 3rd button to invoke that tool when this mode is active.
For a mouse with a mouse wheel: ' 2 ' is a click or press with the mouse wheel (which serves as the middle button), ' 4 ' is a roll forward with a mouse wheel, ' 5 ' is a roll backward with the mouse wheel.
Also see: The number of mouse binding positions that are available to you is determined by User and Site Options > General > " Mouse buttons ."
Modifiers: No boxes checked or ![]() Shift and/or
Shift and/or ![]() Control and/or
Control and/or ![]() Alt and/or etc.
Alt and/or etc.
If no boxes are checked (
), users in this mode will be able to invoke the command (or mode) without having to press a modifier key.
If the box for "
Shift " is checked, the user must hold down the Shift key in order to invoke the command (or mode).
If the box for "
Control " is checked, the user must hold down the Ctrl key in order to invoke the command (or mode).
If the box for "
Alt " is checked, the user must hold down the Alt key in order to invoke the command (or mode).
Select ' Command ' to use a particular tool from the " Tool list " as the mouse binding.
Select ' Mode ' to make an entry to " Mode ."
Mode: The name of the mode (not the description) you want to Add a mouse binding for. This only applies if you have selected ' Mode ' as the " Action " you wish to perform using your mouse.
To add a mouse binding for a mode: 1) Enter a " Caption " a " Button " and (if needed) a " Modifier ." 2) Select a mode, then press the " Add " button. 3) If the entries made in step 1 define a unique mouse binding, the new mouse binding appears on the Bindings list .
To modify a mouse binding to invoke a mode on this list: 1) On the Bindings list , select the binding you want to modify. 2) Select a mode. 3) Press the " Modify " button. 4) The mode you selected is now listed in Column 4 on the Bindings list .
Note: " Name " tells you the name that is listed for your current mode in the list box (
) for this field.
Command group: This applies when ' Command ' is the " Action . "
1 . Select a command group.


command group
2 . Select the command you want added to the " Bindings list " when your press " Add ."


commands (tools)
Note: With the exception of ' Miscellaneous ' and ' Selection ' and a few others, groups are named for classic drop-down menus and their submenus (cascade menus).
For selection: Commands marked "(in-tool only)" should only be added to in-tool selection modes .
To add a mouse binding for a command on this list: 1) Enter a " Caption " a " Button " and (if needed) a " Modifier ." 2) Select the tool on this list that you want, then press the " Add " button. 3) If the entries made in step 1 define a unique mouse binding, a new mouse binding for the tool selected in step 2 will appear on the Bindings list .
To modify a mouse binding to invoke a command on this list: 1) On the Bindings list , select the binding you want to modify. 2) Select a command on this list, then press the " Modify " button. 3) The command you selected will now be listed in Column 4 on the Bindings list .
page 1 | contents | customize interface > mode configuration > edit | settings > | top
 Adding, deleting and modifying bindings :
![]()
![]()
![]()
![]()
" Add" adds to the " Bindings list " a mouse binding for invoking a command or a mode.
1 . Make entries to " Caption " and " Button ."
2 . Optionally choose a " Modifier ."
3 . Either select a " Command group " and a command in that group's list, or enter a " Mode ."
4 . Press the " Add " button. A new binding now appears on the " Bindings list ."
"Delete" deletes the binding that is currently selected.
1 . Select a binding on the " Bindings list ."
2 . Press the " Delete " button. The binding you selected disappears from the " Bindings list ."
"Modify" modifies the binding that is currently selected on the " Bindings list "
1 . Select a binding on the " Bindings list ."
2 . Make changes to the " Caption " or to other fields under " Binding information ."
3 . Press " Modify " button. The binding that you selected in step 1 is now modified.
For ' Classic ' , when you press " OK " to close Mode Configuration, the Save Configuration File dialog opens, giving you the option to save your changes or not. Also, you can type a new file name. If you choose to not save (" Cancel "), any new entry you made here, in Mode Configuration , will be available for your use only during your current Modeling or Drawing Editor session.
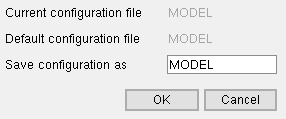
" Default ... " is the file selected under User and Site Options > Toolbars > Modeling . " Current ... " and " Default ... " are different when Load Configuration was used. For ' Lightning ' , pressing " OK " opens a yes-no dialog if you have made changes to this window. Press " Yes " to save your changes. The Customize Interface window reactivates. Any changes you made in Mode Configuration are written to the " Mode configuration " file that is entered on the Customize Interface window. Please be aware that that same file may be used across different roles .
Mode configuration:
my_personal_modes 

page 1 | contents | customize interface > mode configuration > edit | settings > | top


