The CMU Template Editor
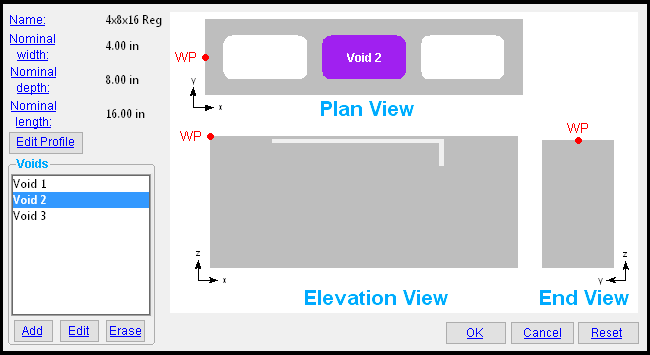
Three ways to open this window : 1) press the " Add " button on the CMU Templates window then, after making appropriate entries, press "OK" on the Add CMU Template window. 2) Double-click a template that is listed on the CMU Templates window. 3) Select a template that is listed on the CMU Templates window then press the " Edit " button.
If you are adding a new CMU template, this is the " Name " that you entered on the Add CMU Template window.
If you are editing an existing CMU template, this is the template name you double-clicked to open this window. Or it is the template name that you selected before pressing " Edit " to open this window.
This is the ' Width ' that was entered under the " Nominal " column on the Add CMU Template window when this template was created.
This is the ' Width ' that was entered under the " Nominal " column on the Add CMU Template window when this template was created.
This is the ' Length ' that was entered under the " Nominal " column on the Add CMU Template window when this template was created.
![]() opens the Block Profile window, which lets you edit the CMU profile in whichever plane was selected as the " Extrusion plane " when this CMU template was added.
opens the Block Profile window, which lets you edit the CMU profile in whichever plane was selected as the " Extrusion plane " when this CMU template was added.
If you are editing this profile immediately after doing an " Add " new CMU template operation, the template is rectangular and its coordinates are set using the actual " Length " and actual " Width " and actual " Depth " options on the Add CMU Template window. The values for the X and Y and Z coordinates of all points are measured in inches or mm depending on the primary dimension " Units ." You can adjust those coordinates for any point. To add a new point so you can adjust the shape of the template, click the approximate location the diagram where you want that point.
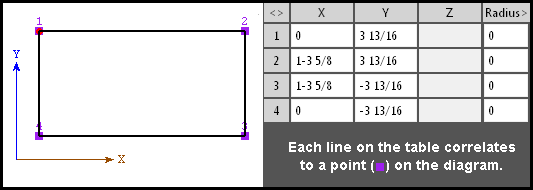
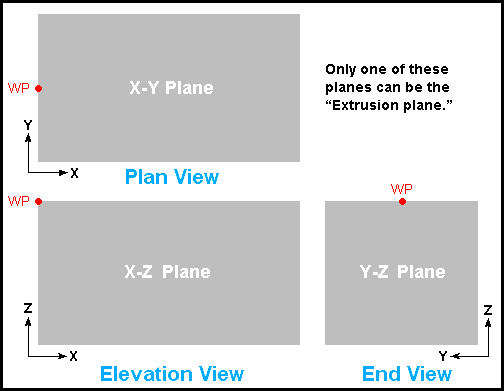
The axis shown in the Block Profile window identify whether the plane that the profile is in is the X-Y or X-Z or Y-Z plane. As mentioned previously, which plane is shown depends on the plane was selected as the " Extrusion plane " when this CMU template was added.
------ Voids ------
![]() opens the Void Profile window.
opens the Void Profile window.
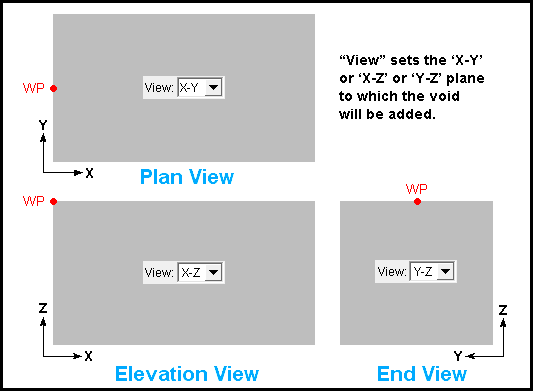
On the Void Profile window, " View " sets the ' X-Y ' or ' X-Z ' or ' Y-Z ' plane to which the void will be added.
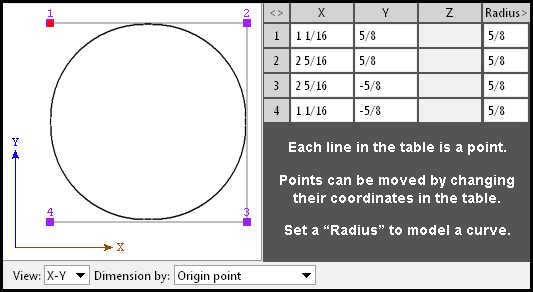
If " Dimension by " is set to ' Origin point ," all X and Y dimensions are from the origin point marked WP in each of the views shown above. Be aware, when entering point coordinates to a line in the table that a negative value designates a distance opposite to the direction the governing axis points.
When you first open the Void Profile window by pressing " Add ," only a single point is defined. To add additional points, click in the diagram. The coordinates of the clicked point will be shown in the table, where they can be adjusted. The values for the X and Y and Z coordinates are measured in the inches or mm depending on the primary dimension " Units ."

Circular voids can be added by entering a sufficiently large " Radius ."
![]() opens the Void Profile window for the void that you have selected. An alternative to selecting a void then pressing " Edit " is to simply double-click the void's name on the list.
opens the Void Profile window for the void that you have selected. An alternative to selecting a void then pressing " Edit " is to simply double-click the void's name on the list.
Selecting a void in the list highlights its representation on its view. That way you easily identify which void to select before you press " Edit ."

When you first open the Void Profile window by pressing " Edit ," the points needed to define the void are already defined. To add additional points, click in the diagram. The values for the X and Y and Z coordinates of all points are measured in the inches or mm depending on the primary dimension " Units ." You can adjust those coordinates for any point.
![]() deletes the void that you have selected.
deletes the void that you have selected.
concrete | cmu templates | top
To close/reset the CMU Template Editor :


"OK" (or the Enter key) closes the CMU Template Editor and saves the template you edited to the Job Settings file in your current Job . The CMU Templates window is reactivated and, if you added a new template, its name is listed with the other templates that are listed on that window. To apply template changes to a CMU wall that already uses this template in the model, you need to mark for processing that wall then Process and Create Solids .
"Cancel" (or the Esc key or the
button) closes this window without saving any changes made to it.
"Reset" undoes all changes made to this window since you first opened it. The window remains open.
Also see :
- CMU Templates (the CMU Template Editor is opened from)
- Add CMU Template (opens prior to this window when " Add " is pressed in the CMU Template Editor )
- CMU Course (member type, uses CMU templates)
- CMU Wall (member type, uses CMU templates)
concrete | cmu templates | top


