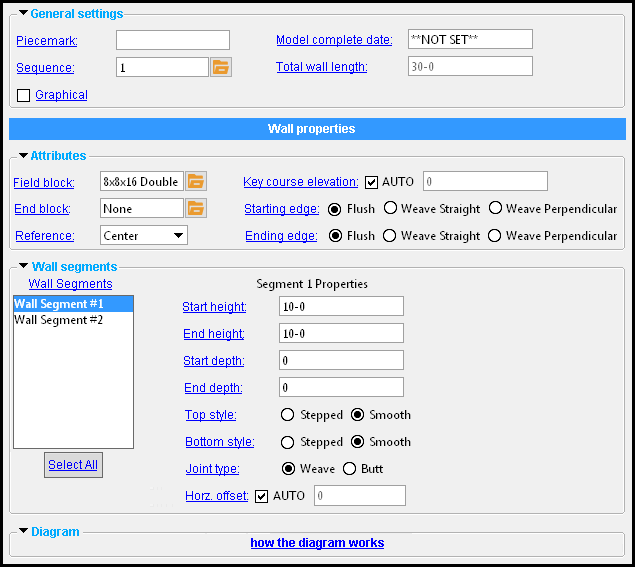
 The CMU Wall Edit window
|
To open this window (in Modeling ) :
- With the Default filter selected, double-click a CMU wall member.
- Add a CMU wall .
On this page or the Add CMU Wall page :
- To add a CMU wall (add page) (
 )
)
- Wall properties (this page)
- Wall segments (this page)
- Diagram (this page)
Also see :
- Modeling (where a CMU wall can be added or edited)
- CMU wall (definition)
- Concrete Setup > CMU Templates (lists available CMU templates)
- Add CMU Template (setup window that opens when you add a new CMU template)
- CMU Template Editor (setup window with settings for an individual CMU template)
- Move Layout Nodes (another way to edit the layout )
- Rebar System (may be added to a CMU wall )
- Rebar Area Layout (like Rebar System , except the user locates points to define the area)
| Wall properties |
------  Attributes ------
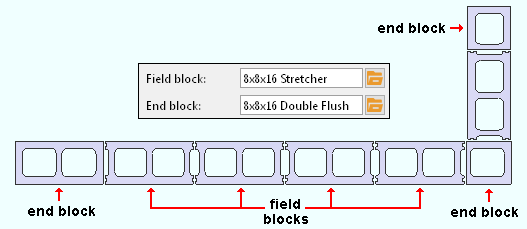
Field block: Any template that is listed in Concrete Setup > CMU Templates . Each template on that window defines the shape and dimensions of a CMU block . The block you select here sets the shape and dimension of interior blocks in the CMU course. If " End block " is set to ' None " (the default), then the selected " Field block " also applies to end blocks.
|
| Tip: If you want both a " Field block " and " End block ," they should be close to the same size. |
To enter a template, press the "file cabinet" browse button (
) and double-click any template that is listed.
End block: None or any template that is listed in Concrete Setup > CMU Templates . Each template on that window defines the shape and dimensions of a CMU block .
|
|
| Tip: For best results, the " Field block " and " End block " should be close to the same size. |
' None ' is the default choice Select ' None ' if you want field blocks and end blocks to be the same. Field blocks and end blocks will be defined by the template entered for " Field block ."
Reference: Center or Interior or Exterior . The choices you have for " Reference " behave differently depending on whether you laid out points for the CMU wall counterclockwise or clockwise. Changing the " Reference " of a wall does not reposition the member line of the wall. It repositions the CMU blocks with respect to that member line. The member line of a wall is originally defined by its layout points and may be modified using the diagram .
If points were laid out counterclockwise:
' Center '
' Interior '
' Exterior '
' Center ' centers the CMU wall around member line . ' Interior ' places the CMU blocks to the interior of the wall's member line. ' Exterior ' places the CMU blocks to the exterior of the wall's member line. If points were laid out clockwise:
' Center '
' Interior '
' Exterior '
' Center ' centers the CMU wall around the member line . ' Interior ' places the CMU blocks exterior to the member line. ' Exterior ' places the CMU blocks interior to the member line.
Key course elevation: ![]() Auto or
Auto or ![]() Auto . The key course is the 1st course above the member line .
Auto . The key course is the 1st course above the member line .
'
Auto (checked) ' instructs the CMU wall member to automatically calculate the key course elevation based on the height of the masonry unit as defined in its template and on the position of the member line . This means that the entry that is automatically made here should be fairly accurate if all segments of the member line are at the same elevation.
'
Auto (not checked) ' permits you to override the automatically calculated key course elevation with an entry that you make. Your entry will not affect the model.
Starting edge: ![]() Flush or
Flush or ![]() Weave straight or
Weave straight or ![]() Weave perpendicular . The starting edge of a CMU wall is its left end , which is set by the first work point that was located when the wall was added .
Weave perpendicular . The starting edge of a CMU wall is its left end , which is set by the first work point that was located when the wall was added .
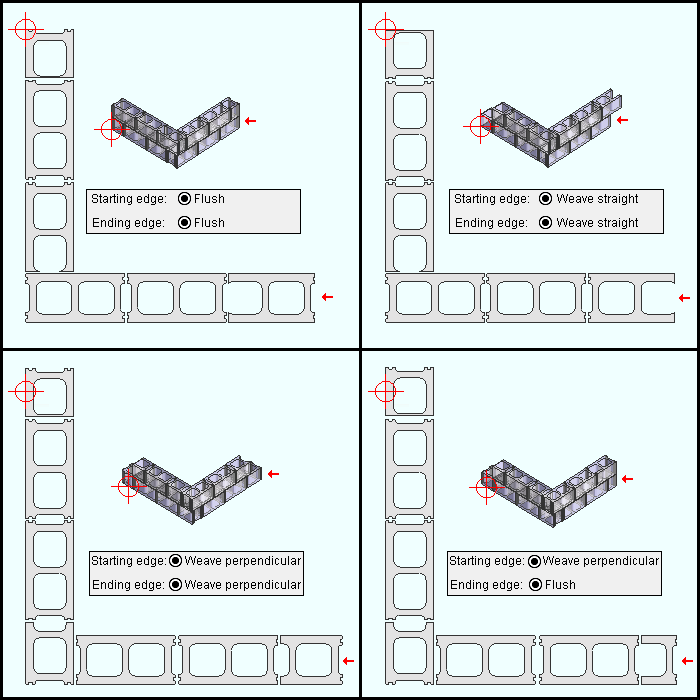
|
An origin symbol ( |
'
Flush ' aligns the left end edge of the CMU wall vertically, in alignment with the origin point
'
'
Note: Changing the " Starting edge " and/or " Ending edge " does not affect the " Total wall length ."
Ending edge: ![]() Flush or
Flush or ![]() Weave straight or
Weave straight or ![]() Weave perpendicular .
Weave perpendicular .
|
An arrow ( |
'
'
'
Note: Changing the " Starting edge " and/or " Ending edge " does not affect the " Total wall length ."
------ Wall segments ------
|
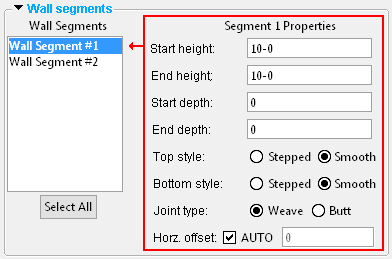
Select one of the " You can, if you so choose, edit or review the properties of multiple segments. Click the " Select All " button to select all of the wall segments. |
A wall segment is the segment of the wall that is between any two consecutive points in the diagram . " Wall segment 1 " is the segment that is closest to the left end of the wall. The left end of a wall is the first point that was located. " Wall segment 2 " is the segment that is the next point from the left end, and so on. If you located points in a counterclockwise fashion, " Wall segment 2 " is counterclockwise from segment 1. If you located points in a clockwise fashion, " Wall segment 2 " is counterclockwise from segment 1.
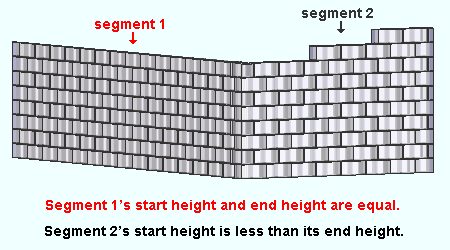
Start height: The vertical distance (in the primary dimension " Units " or other units ) from the bottom of the member line of the wall to the top of the wall. CMU walls are perfectly vertical. The " Start height " of a CMU wall segment is the height of the wall at the left end of the selected segment .
Warning : You are not permitted to close this window by pressing " OK " when you have entered a negative value (-) or zero (0) to " Start height " or " End height ."
End height: Same as " Start height ," except that this applies to the right end of the segment.
Start depth: The vertical distance (in the primary dimension " Units " or other units ) from the bottom of the member line of the wall to the bottom of the wall. CMU walls are perfectly vertical. The " Start depth " of a CMU wall segment is the depth of the wall below the wall's member line at the left end of the selected segment .
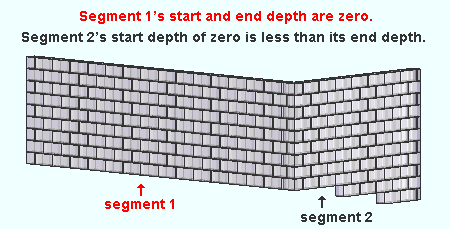
Note: Entering ' 0 ' (zero) to both " Start depth " and " End depth " keeps the bottom of the selected segment at the elevation of the corresponding segment of the member line .
Warning : You are not permitted to close this window by pressing " OK " when you have entered a negative value (-) to " Start depth " or " End depth ."
End depth: Same as " Start depth ," except that this applies to the right end of the segment.
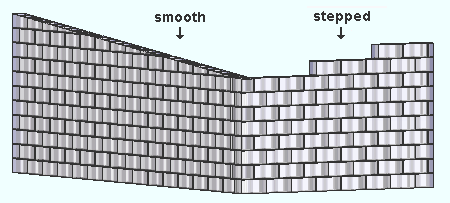
Top style: ![]() Stepped or
Stepped or ![]() Smooth . This applies to the selected segment . It can make a difference even when the " Start height " and the " End height " of that segment are the same.
Smooth . This applies to the selected segment . It can make a difference even when the " Start height " and the " End height " of that segment are the same.
'
'
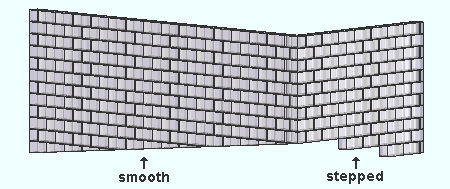
Bottom style: ![]() Stepped or
Stepped or ![]() Smooth . This applies to the selected segment only when either or both the " Start depth " and " End depth " are non-zero (not 0).
Smooth . This applies to the selected segment only when either or both the " Start depth " and " End depth " are non-zero (not 0).
'
'
Joint type: ![]() Weave or
Weave or ![]() Butt . This applies to 90-degree corner joints and affects the two adjacent segments of the CMU wall that together form the 90-degree corner. Select the leftmost segment at the corner. The choice made to that selected segment affects the right edge of that segment and causes " Joint type " (this option) to be disabled ( grayed out ) in the adjacent segment that is to the selected segment's right.
Butt . This applies to 90-degree corner joints and affects the two adjacent segments of the CMU wall that together form the 90-degree corner. Select the leftmost segment at the corner. The choice made to that selected segment affects the right edge of that segment and causes " Joint type " (this option) to be disabled ( grayed out ) in the adjacent segment that is to the selected segment's right.

'
'
'
'
------ Diagram ------
 |
| Tip: You can also change the coordinates by using the Move Layout Nodes tool in the model. |
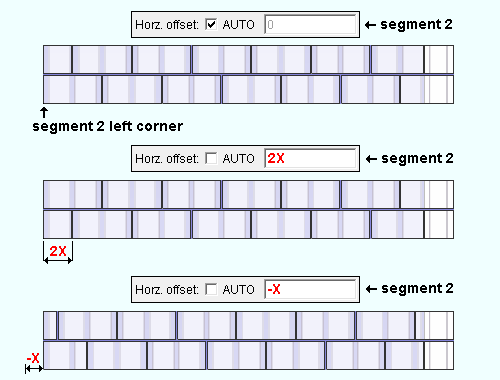
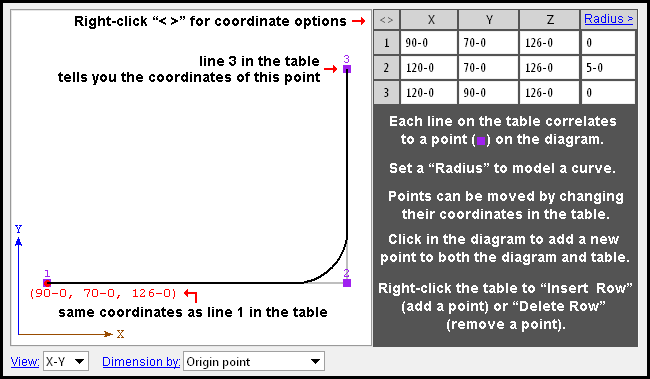
Radius: A distance (in the primary dimension " Units " or other units ) that defines the amount of corner rounding that takes place.
" Radius " is the radius of a circle. Two lines that are tangent to that circle meet at the located point. The arc of the rounded corner ends at the points of tangency of these two lines. 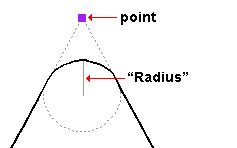
A " Radius " of ' 0 ' designates a sharp corner with no corner rounding.
Increasing the size of the " Radius " moves the edge of the rounded corner back from the corner point. This is because the " Radius " defines a circle that is tangent to both lines to the corner point. The arc of the rounded corner begins and ends at the tangent points.
You can set a different " Radius " for each corner. Clicking on the upper-right corner of the table (" Radius > ") lets you set the radius for each point to be the same value.
' X-Y ' shows a plan view of the layout points . If the " Z-axis " values of the CMU wall are the same (they don't necessarily have to be the same), then this is the view that will best represent the spatial relationships between those points.
' X-Z ' shows a elevation view of the layout points in a flat, X-Z plane that is at right angles to (orthogonal to) the Y global axis .
' Y-Z ' shows a elevation view of the layout points in a flat, Y-Z plane that is orthogonal to the X global axis.
Dimension by: Length and angle or Previous point or Origin point . This applies when you hover a point in the diagram with your mouse pointer ( ![]() ), regardless of whether or not you are adding points.
), regardless of whether or not you are adding points.
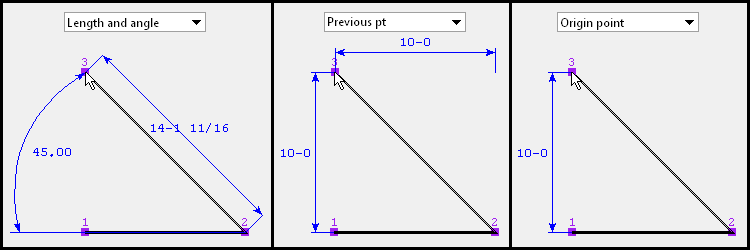
' Length and angle ' shows one or two dimensions and an angle. The dimension(s) are to the point you are hovering. One dimension may be to the previous point, and another dimension may be to the next point. The angle to the point you are hovering may be the included angle between the hovered point and the previous two points. Or it may be the angle between the hovered point and a horizontal or vertical bisector to the previous point.
' Previous point ' shows horizontal and/or vertical dimensions between the point you are hovering and the previous point in the diagram. Dimensions of zero will not be shown.
' Origin point ' shows horizontal and/or vertical dimensions from the origin point (point 1) to the point you are hovering. Dimensions of zero will not be shown.
Adding points: You can click a line in the diagram to add a point. The new point snaps to your mouse pointer until you left-click to locate that point or right-click to cancel. Dimensions are shown as you move your mouse pointer to reposition the snapped-to point. An alternative to clicking in the diagram to add points is to enter the points to the table.

