 CMU Course ( Modeling > F2 >
  Concrete / Rebar > select " CMU Course ")
Tool summary :
- Adds a CMU course whose length and position is set by the two points that you locate.
- The CMU Course Edit window opens.

- After you have added a CMU course, you can reopen the above-shown CMU Course Edit window by double-clicking a CMU course member with the ' Default ' flilter selected.
- CMU stands for "concrete masonry unit." See to add a CMU course .
- See (on this page):
Also see :
- Modeling (where a CMU course can be added or edited)
- CMU course (definition)
- Concrete Setup > CMU Templates (lists available CMU templates)
- Add CMU Template (setup window that opens when you add a new CMU template)
- CMU Template Editor (setup window with settings for an individual CMU template)
To add a CMU course :
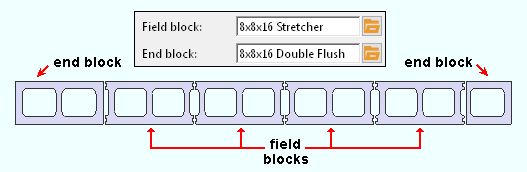
Before adding a CMU course , you should confirm that the " Field block " and " End block " templates that define the shape and dimension of the masonry units are listed in Concrete Setup > CMU Templates . Be aware that you can select ' None ' for " End block " if you want the course to be composed of a single type of masonry unit.
A CMU course can be added in Modeling by pressing F2 to open the Member Type Selection window, then double-clicking " CMU Course ."
A course can be added in a plan view or an elevation view. Two work points define the length of the course. The elevation of these work points sets the default elevation of the top of the course. Changing the " End elevation " on the CMU Course Edit window moves the top of the course up or down.
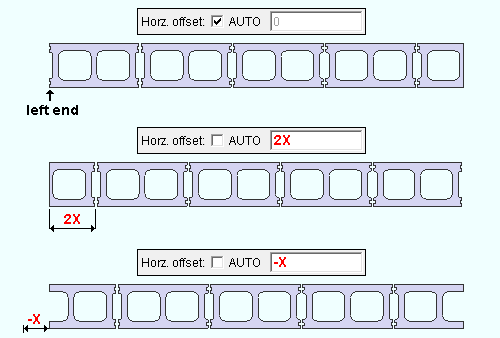
The left end of a CMU course is the 1st work point that you locate.
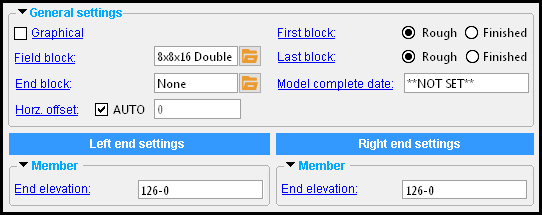
------  General settings ------
Field block: Any template that is listed in Concrete Setup > CMU Templates . Each template on that window defines the shape and dimensions of a CMU block . The block you select here sets the shape and dimension of interior blocks in the CMU course. If " End block " is set to ' None " (the default), then the selected " Field block " also applies to end blocks.
|
| Tip: If you want both a " Field block " and " End block ," they should be close to the same size. |
To enter a template, press the "file cabinet" browse button (
) and double-click any template that is listed.
End block: None or any template that is listed in Concrete Setup > CMU Templates . Each template on that window defines the shape and dimensions of a CMU block .
|
|
| Tip: For best results, the " Field block " and " End block " should be close to the same size. |
' None ' is the default choice Select ' None ' if you want field blocks and end blocks to be the same. Field blocks and end blocks will be defined by the template entered for " Field block ."
'
'
Auto (not checked) ' lets you enter a horizontal offset in the primary dimension " Units " or other units . A positive horizontal offset slides the key course (first course above the member line ) horizontally that dimension and affects all other courses in the pattern. A negative horizontal offset slides the key course in the opposite direction, affecting every other course in the pattern.
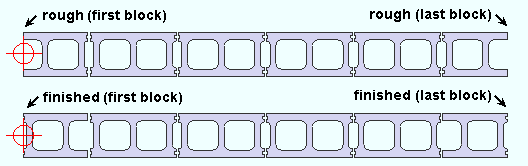
First block: ![]() Rough or
Rough or ![]() Finished . This applies when a block needs to be cut so that it can fit within the wkpt-to-wkpt distance established when the CMU course was added . Entering a non-zero " Horz offset " may cause the first block to be cut.
Finished . This applies when a block needs to be cut so that it can fit within the wkpt-to-wkpt distance established when the CMU course was added . Entering a non-zero " Horz offset " may cause the first block to be cut.
|
|
|||
|
'
Rough results in the outer block on the left end of the course -- if that block is cut -- being placed so that its cut end faces left.
'
Last block: ![]() Rough or
Rough or ![]() Finished . This applies when a block needs to be cut so that it can fit within the wkpt-to-wkpt distance established when the CMU course was added .
Finished . This applies when a block needs to be cut so that it can fit within the wkpt-to-wkpt distance established when the CMU course was added .
|
|
|||
|
'
'
|
|
------ Member ------
End elevation: The elevation (in the primary dimension " Units " or other units ) of the work point at the top of this end of the CMU course. For a non-sloping CMU course, both the left and right end elevations will be the same.
|
|
| A CMU course has two exact points , whose elevation you can change by changing the member's left- and/or right-end " End elevation ." |

|
To determine the end elevation on a CMU course in the 3D model, use Construction Line Add or a similar tool, select EXPT as the Locate option, then snap the point location target to the work point at the end of the course. The Z coordinate reported in the X-Y-Z display tells you the elevation at the snapped-to exact point.

