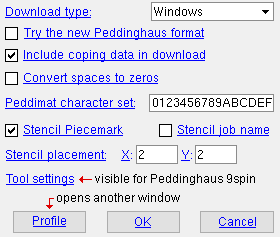
The Peddinghaus Options window
This window configures CNC downloading when the " CNC type " is ' Peddinghaus Angle ' or ' Peddinghaus Beam ' or ' Peddinghaus Cope ' or ' Fabripunch ' or ' Peddinghaus 3spin ' or ' Peddinghaus 9spin '.
To open this window :
1 . On the Computer Numerically Controlled window, confirm that the " CNC type " is ' Peddinghaus Angle ' or ' Peddinghaus Beam ' or ' Peddinghaus Cope ' or ' Fabripunch ' or ' Peddinghaus 3spin ' or ' Peddinghaus 9spin '. Then press the " Setup " button to open the CNC Setup window.
Tip : To select a new or existing " CNC configuration ," press the " File " browse button (
) on the Computer Numerically Controlled window.
2 . On the CNC Setup window, press the " Options " button.
3 . The Peddinghaus Options window opens. Click here for information about the options that appear on this window.
------- Settings -------
| These options let you customize a download file to include particular CNC instructions or to format those instructions in a particular way. |
Download type: DOS or Windows . This applies when ' Peddinghaus Angle ' or ' Peddinghaus Beam ' or ' Peddinghaus Cope ' or ' Fabripunch ' or ' Peddinghaus 3spin ' or ' Peddinghaus 9spin ' is the " CNC type ."
Select ' DOS ' if the version of software that you use to send instructions to the CNC machine is written for the DOS operating system.
Select ' Windows ' if the version of software that you use to send instruction to the CNC machine is written for the Windows operating system. Please note that the ' Windows ' version of a Peddimat download allows for slots, whereas the ' DOS ' version does not.
Try the new Peddinghaus format: ![]() or
or ![]() . This is for alpha testing. It applies when the " Download type " is ' Windows ' and you want to include cope or cut data. It can be used when the " CNC type " is ' Peddinghaus Angle ' or ' Peddinghaus Beam ' or ' Fabripunch ' or ' Peddinghaus 3spin ' or ' Peddinghaus 9spin '.
. This is for alpha testing. It applies when the " Download type " is ' Windows ' and you want to include cope or cut data. It can be used when the " CNC type " is ' Peddinghaus Angle ' or ' Peddinghaus Beam ' or ' Fabripunch ' or ' Peddinghaus 3spin ' or ' Peddinghaus 9spin '.
If this box is checked (
), any " Top/bottom flange operation " or " Web cut " or " Flange cut " can be downloaded. Peddimat considers " Cope plain " or " Cut flange width " or " Cut flange flush " or " Notch top/bottom " (tubes) or " Notch near side/far side " (tubes) to be "standard copes." Each other " Top/bottom flange operation " is considered to be a "custom cope." Other settings on this window (for example, " Stencil piecemark ") also apply when this format is used.
If the box is not checked (
), the download is formatted based on the " CNC type " that is selected.
Include coping data in download: ![]() or
or ![]() . This applies when ' Peddinghaus Beam ' or ' Peddinghaus Cope ' or ' Peddinghaus 3spin ' or ' Peddinghaus 9spin ' is the " CNC type ." It also applies when " Try the new Peddinghaus format " is checked.
. This applies when ' Peddinghaus Beam ' or ' Peddinghaus Cope ' or ' Peddinghaus 3spin ' or ' Peddinghaus 9spin ' is the " CNC type ." It also applies when " Try the new Peddinghaus format " is checked.
If this box is checked (
If the box is not checked (
Convert spaces to zeros: ![]() or
or ![]() . This applies when ' Peddinghaus Angle ' or ' Peddinghaus Beam ' or ' Peddinghaus 3spin ' or ' Peddinghaus 9spin ' is the " CNC type ." It also applies when " Try the new Peddinghaus format " is checked.
. This applies when ' Peddinghaus Angle ' or ' Peddinghaus Beam ' or ' Peddinghaus 3spin ' or ' Peddinghaus 9spin ' is the " CNC type ." It also applies when " Try the new Peddinghaus format " is checked.
If this box is checked (
If the box is not checked (
Peddimat character set: A list of characters (numbers and/or letters) that you want the CNC machine to be able to stencil. Be sure to enter the exact same character set (in the same order and in the same case) that is used in the Peddimat software.
This applies when when ' Peddinghaus Beam ' or ' Peddinghaus Cope ' or ' Peddinghaus 3spin ' or ' Peddinghaus 9spin ' is the " CNC type " and ' Windows ' is the " Download type ." It also applies when " Try the new Peddinghaus format " is checked.
Stencil piecemark: ![]() or
or ![]() . This applies when ' Peddinghaus Beam ' or ' Peddinghaus 3spin ' or ' Peddinghaus 9spin ' is the " CNC type ." It also applies when " Try the new Peddinghaus format " is checked.
. This applies when ' Peddinghaus Beam ' or ' Peddinghaus 3spin ' or ' Peddinghaus 9spin ' is the " CNC type ." It also applies when " Try the new Peddinghaus format " is checked.
 |
 |
If this box is checked (
If the box is not checked (
 |
|
If this box is checked (
If the box is not checked (
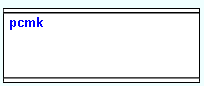
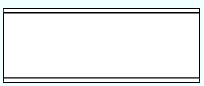
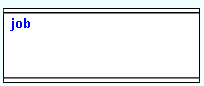
Stencil placement: This sets the X and Y distance that the stenciled piecemarks and/or Job name are placed from the reference point. As shown in the illustration below, if both " Stencil piecemarks " and " Stencil job name " are checked, the Job name is placed first, followed by a space then the piecemark.
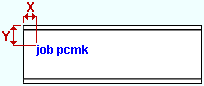
|
X is the distance (in the primary dimension " Units " or other units ) from the left end of the material to the left end of the stenciled characters.
Y is the distance (in the primary dimension " Units " or other units ) from the top of the material to the top of the stenciled characters.
A special case: For an angle , the reference point is the heel (outside corner) of the angle, and the stencil is placed on the long leg.
------ Tool settings for Peddinghaus 9spin ------
| These settings appear on this window when ' Peddinghaus 9spin ' is selected as the " CNC configuration type ." |
Top Flange Tool 1: ![]() Auto or
Auto or ![]() Auto and a tool size .
Auto and a tool size .
'
'
Tip: Enter the non-moment " Bolt diameter " set in Bolt Settings for your current Job to " Top Flange Tool 1 ," then set " Top Flange Tool 2 " and " Top Flange Tool 3 " to "
Error handling: If all three top flange tools are set to specific sizes and the material has holes that cannot be fabricated using those sizes, the SDS2 CNC program looks to the setup option " Download holes outside diameter range as " to determine what to do. Depending on the selection made to that setup option, each offending hole may be downloaded as a mark or not downloaded. Or the offending hole may stop the download file from being generated.
Top Flange Tool 2: Same as " Top Flange Tool 1 ," except that this applies to tool 2.
Top Flange Tool 3: Same as " Top Flange Tool 1 ," except that this applies to tool 3.
Web Tool 1: ![]() Auto or
Auto or ![]() Auto and a tool size .
Auto and a tool size .
'
'
Tip: Enter the non-moment " Bolt diameter " set in Bolt Settings for your current Job to " Web Tool 1 ," then set " Web Tool 2 " and " Web Tool 3 " to "
Error handling: If the web of a material has holes that are not any of the specific sizes which are set here, the SDS2 CNC program looks to " Download holes outside diameter range as " to determine how to handle those holes.
Web Tool 2: Same as " Web Tool 1 ," except that this applies to tool 2.
Web Tool 3: Same as " Web Tool 1 ," except that this applies to tool 3.
Bottom Flange Tool 1: ![]() Auto or
Auto or ![]() Auto and a tool size .
Auto and a tool size .
'
'
Tip: Enter the non-moment " Bolt diameter " set in Bolt Settings for your current Job to " Bottom Flange Tool 1 ," then set " Bottom Flange Tool 2 " and " Bottom Flange Tool 3 " to "
Error handling: If all three bottom flange tools are set to specific sizes and the bottom flange of the material has holes that are not any of those specific sizes, the SDS2 CNC program looks to the setup option " Download holes outside diameter range as " to determine how to handle those holes.
Bottom Flange Tool 2: Same as " Bottom Flange Tool 1 ," except that this applies to tool 2.
Bottom Flange Tool 3: Same as " Bottom Flange Tool 1 ," except that this applies to tool 3.
"Profile" opens the CNC Profile Machine Setup Data window. This applies when the option to " Include coping data in download " is checked.
"OK" (or the Enter key) closes the Peddinghause Options window. The CNC Setup window again becomes active. Press " OK " on that window to save the choices made on this window to the currently selected " CNC configuration " file in your current Job .
"Cancel" (or the Esc key) closes this window without saving any changes made to it. The CNC Setup window again becomes active.

