The Footing Step Template Editor
- A template that you create/edit in the Footing Step Template Editor window can be entered to " Step template " on the Continuous Footing Edit or Grade Beam Edit window.
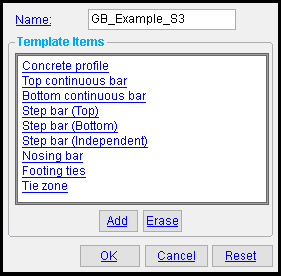 |
To open this window , double-click a template on the Footing Step Templates window, or on that same window select a template and press " Edit " or press " Add ." One " Template item " (a profile) should always be shown. To add an item to that profile, press the " Add " button. To delete an item, select it and press the " Erase " button. Select a " Template Item " to edit that item. |
opens a window with a list of template items that you can add to the " Template items " list shown above. In order to select " Tie zone," you need to first have a bar pattern already added to the list of " Template Items ."
Also, if the concrete footing or grade beam template that was chosen in the Select Footing Template window lacks a Tie Definition template item, you will not be offered the choice of adding a tie zone to this footing step template. (The footing template that you edit here, in this window, was chosen when the footing step template was created.)
Step bar

After pressing " Add " then selecting " Tie zone ," you select the item's shape (its picture), and for step bars, the " Type ". It is permissible to select the same item twice. When adding a step bar template item, you are required to select a " Type " as well as a shape. The type selected determines its location in the footing. You can choose between three types of step bars:
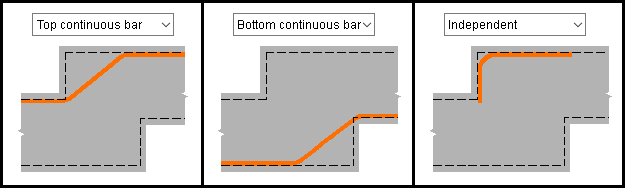
Top continuous bar: When you choose this option, a " Step bar (Top) " item is created.
Bottom continuous bar: When you choose this option, a " Step bar (Bottom) " item is created.
Independent: When you choose this option, a " Step bar (Independent) " item is created.
deletes the item on the " Template Items " list that you have selected.
Some " Template Items " cannot be deleted. When you " Add " a footing template -- either a grade beam or continuous footing -- a " Concrete profile " template item is added to the list. Be aware that you cannot delete a profile. Nor can you delete " Template Items " such as ties and continuous bars that are derived from the footing template that you added. The " Erase " button is disabled -- grayed out -- when the item selected under " Template Items " is a profile or is derived from the footing template.
![]()
![]()
![]()
"OK" (or the Enter key) closes the Footing Step Template Editor and reactivates the Footing Step Templates window. The template edited using this window will be saved to the Job Settings file in your current Job . To apply template changes to a Footing Step that uses that template in the model, you can mark that the Footing Step to which the template was added for processing then Process and Create Solids .
"Cancel" (or the Esc key or the
button) closes this window without saving any changes made to it.
"Reset" undoes all changes made to this window since you first opened it. The window remains open.
"Left" and "Right" bars :
The left bars of a stepped footing are not necessarily at the left end of the grade beam or continuous footing member on which the footing step is placed. Rather, bars that are determined to be "left" are found on the portion of the step that is at the lower elevation. Likewise, the "right" bars are on the higher portion of the step. When seen in a section view, depending on the view's orientation and the placement of the step, the left bars may appear on the right side of the view.
" Name " and " Offset step bars... " :
Name: A string or Blank . The name of the Footing Step template that you are adding or editing.
If " Name " is a string , this is the name of the " Template " that you selected on the Footing Step Templates window when you opened this window. It is the name of the template that you are editing. If you enter a new name, the template will be saved under the new name, but the previously selected " Template " will not be overwritten. If there is another template with the same name as the new name, a dialog box will ask you if you wish to overwrite the other template.
I f " Name " is blank, then you pressed " Add " to open this window, You must type a " Name " in order to complete the creation of the new template.
Tip: If you want to change the name of a template, you can create a template exactly like that template but with the new name that you want. Just select that template (on the Footing Step Templates window, not this window) then press " Save As ."
The following options can be found in various " Template Items " :
Function: Any usage description from the " Grade Beam / Continuous Footing " section of the Rebar Usage Descriptions window. The " Function " that you enter here is used on rebar schedules to identify step bars.
A " Function " can be selected for a " Step bar (Top) " or " Step bar (Bottom) " or " Step bar (Independent) "or " Nosing bar "
User configuration: To add a " Function " that you can select here, you can type that function to the " Grade Beam / Continuous Footing " section of the Rebar Usage Descriptions window.
offset step bars (diagram only) ![]() or
or ![]() .
.
If this box is checked (
), step bars are shown offset from nearby continuous bars in the template diagram for clarity. Checking this box does not change their locations in the model.
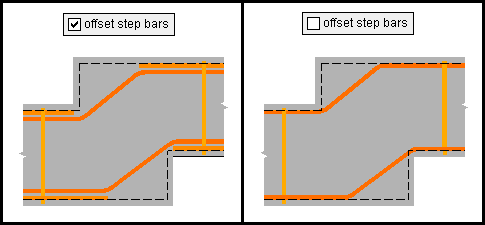
If the box is not checked (
), step bars are shown where they are located in the model.
------ Concrete profile ------

Base dimension type: parameter or value or greater of .
' parameter ' sizes the base by the chosen " Parameter ."
' value ' sizes the base by the " Value " -- a distance that you enter.
' greater of ' sizes the base by either the " Parameter " or the " Value " -- whichever is greater.
Parameter: D or S . The selection you make here determines which parameter is used when the " Base Dimension " type is ' parameter ' or ' greater of ' .
Value: The distance (in the primary dimension " Units " or other units ). The " Value " that you enter here is used when the " Base Dimension " type is ' parameter ' or ' greater of ' .
Run ratio: zero or a positive integer . This determines the slope of the face of the step. If you enter ' 0 ', the face does not slope.
------ Top/Bottom continuous bar ------
 |
|
A Top continuous bar is shown . Options for Bottom continuous bars are identical. |
Extend left bar to: left end or start of slope or slope face cover . This locates the right end of a left continuous bar. Note that the ' start of slope ' is where the slope of the cover begins, not the very bottom corner of the footing.
Additional extension: None or Splice length or Development length or Custom . This option applies when " Extend left bar to " is ' left end ' ; otherwise, the additional extension is ' None ' .
' None ' does not extend the continuous bar beyond the length determined by the " Extend left bar to " option.
' Splice length ' extends the continuous bar by the splice length for continuous rebar of the size used in the continuous footing or grade beam template. That length is determined by the " Horz. in Concrete " splice length distance in the reinforcing bar definition for rebar of that size.
' Development length ' extends the continuous bar by the development length. You may extend it further by entering an " Extension value ." However, the continuous bar cannot extend beyond the cover.
' Custom ' allows you to choose an " Extension value " -- a distance by which the bar is extended. However, the continuous bar cannot extend beyond the cover.
Extension value: A positive distance (in the primary dimension " Units " or other units ). This option applies when the " Additional extension " type is ' Development length ' or ' Custom ' . A continuous bar cannot be extended beyond the concrete cover specified in the continuous footing or grade beam template.
Left hook: none or up or down .
' none ' does not add a hook to the left continuous bar.
' up ' adds an upturned 90° hook to the right continuous bar.
' down ' adds a downturned 90° hook to the right continuous bar.
The hook length for the size of continuous rebar in the continuous footing or grade beam template is used. That length is determined by the end hook " Hook Length (90 degree) " distance in the reinforcing bar definition for rebar of that size.
Extend right bar to: right end or riser cover . This locates the left end of a right continuous bar.
Additional extension: None or Splice length or Development length or Custom . This option applies when " Extend right bar to " is ' right end ' ; otherwise, the additional extension is ' None ' .
' None ' does not extend the continuous bar beyond the length determined by the " Extend right bar to " option.
' Splice length ' extends the continuous bar by the splice length for continuous rebar of the size used in the continuous footing or grade beam template. That length is determined by the " Horz. in Concrete " splice length distance in the reinforcing bar definition for rebar of that size.
' Development length ' extends the continuous bar by the development length. You may extend it further by entering an " Extension value ." However, the continuous bar cannot extend beyond the cover.
' Custom ' allows you to choose an " Extension value " -- a distance by which the bar is extended. However, the continuous bar cannot extend beyond the cover.
Right hook: none or up or down .
' none ' does not add a hook to the right continuous bar.
' up ' adds an upturned 90° hook to the right continuous bar.
' down ' adds a downturned 90° hook to the right continuous bar.
The hook length for the size of continuous rebar in the continuous footing or grade beam template is used. That length is determined by the end hook " Hook Length (90 degree) " distance in the reinforcing bar definition for rebar of that size.
------ Step bar (Top/Bottom) ------
 |
|
Options for single bend step bar shapes . |
The following options apply when the step bar shape has a single bend:
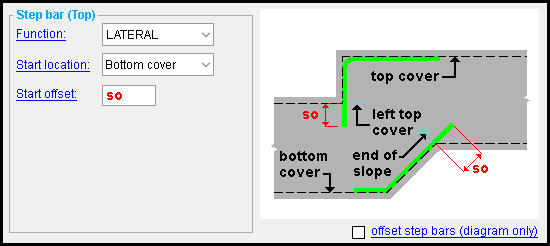
Start location: Bottom cover or Top cover or Left top cover or End of slope .
When the step bar is a top bar, ' Bottom cover ' or ' Left top cover ' may apply. The choice you make indicates the start location of the left (lower) end of the bar.
When the step bar is a bottom bar, ' Top cover ' or ' End of slope ' may apply. The choice you make indicates the start location of the right end of the bar.
Start offset: The distance (in the primary dimension " Units " or other units ) by which the step bar is extended beyond the " Start location ."
 |
|
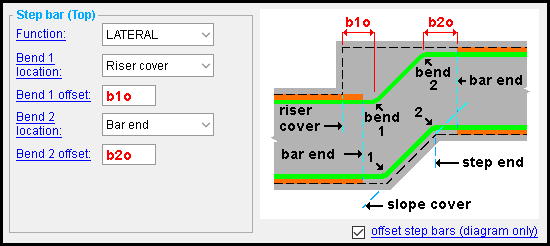
Options for double bend step bar shapes . Note that the step bars are shown offset; otherwise, they would cover the top and bottom continuous bars (shown as orange.) |
The following options apply when the step bar shape has two bends:
Bend 1 location: Bar end or Riser cover or Slope cover . This locates bend 1 of the step bar.
Bend 1 offset: A distance (in the primary dimension " Units " or other units ). This offsets bend 1 of the step bar to the right by the distance entered from the " Bend 1 location. " The options " Bend 1 location " combined with the " Bend 1 offset " sets the left bound for Bend 2 -- it cannot be further to the left than bend 1.
Bend 2 location: Bar end or Riser cover or Step end . The ' Step end ' is where the slope of the cover begins. The ' Bar end ' is the end of the continuous bar -- this is the top continuous bar for a " Step bar (Top) " item, and a bottom continuous bar for a " Step bar (Bottom) " item. Note that bend 2 cannot be placed further to the left than bend 1. For example, bend 2 cannot be moved to the left to meet the ' Riser cover ' when bend 1 is to the right of the cover.
Bend 2 offset: A distance (in the primary dimension " Units " or other units ). This offsets bend 2 of the step bar to the right by the distance entered from the " Bend 2 location ."
------Step bar (Independent) ------
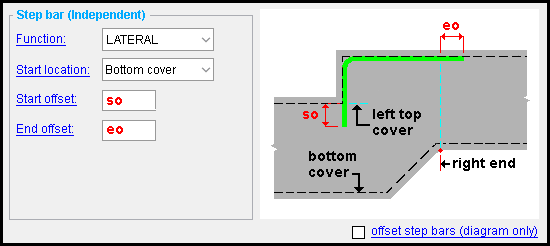
An independent step bar is added when a step bar of the 'Independent' " Type " is chosen and a bent shape is selected.
Start location: Bottom cover or Left top cover . This is the start location of the left (lower) end of the bar.
Start offset: The distance (in the primary dimension " Units " or other units ) by which the step bar is extended beyond the " Start location ."
End offset: A distance (in the primary dimension " Units " or other units ). This is the location of the right end of the bar. If this distance is ' 0 ' , the end extends to the right end of the stepped footing.
------ Nosing bar ------

A nosing bar is added when a step bar of the 'Independent' " Type " is chosen and a nosing bar shape is selected. Nosing bars have only a " Function " option.

Left location: to start of step or to start of slope . This is the location of the furthest tie to the right .
If this box is checked (
If the box is not checked (
Right location: to end of step or to riser cover . This is the location of the furthest tie to the left .
If this box is checked (
If the box is not checked (
------Tie zone ------
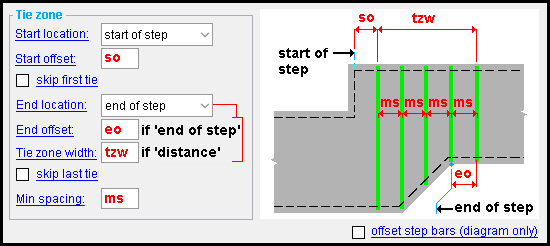
Start location: start of step or end of prev zone . This is the location of the leftmost tie. If the tie zone you are editing is the first (leftmost) tie zone (i.e., " Tie Zone 1 "), the ' end of prev zone ' is the at left end of the stepped footing. Otherwise, it is at the end of the previous tie zone.
Start offset: The positive or negative distance (in the primary dimension " Units " or other units ) by which the zone is offset to the right from its " Start location ." This option applies if the " Start location " is the ' start of step ' ; otherwise, it is disabled ( grayed out ).
skip first tie ![]() or
or ![]() . By skipping a tie, you can prevent ties from doubling and overlapping; for example, when there are adjacent tie zones.
. By skipping a tie, you can prevent ties from doubling and overlapping; for example, when there are adjacent tie zones.
If this box is checked (
If the box is not checked (
End location: end of step or distance . This is the location of the rightmost tie.
' end of step ' allows you to enter an " End offset " from this location.
' distance ' allows you to enter a length for the tie zone. You must also enter a " Tie zone width "
Tip : If the tie zone you are editing is not the first, if the " End location " of the previous tie zone is also ' end of step ' , and you " skip first tie ," no ties will be placed unless you also enter a sufficient positive " End offset ."
End offset: The positive or negative distance (in the primary dimension " Units " or other units ) by which the zone is offset to the right from its " End location ." This option applies when " End location " is ' end of step ' . When " End location " is ' distance ' , the " End offset " option does not appear.
Tie zone width: A positive distance (in the primary dimension " Units " or other units ) by which the zone extends to the right from its " Start location ." This option applies when " End location " is ' distance ' . When " End location " is ' end of step ' , the " Tie zone width " option does not appear.
skip last tie ![]() or
or ![]() . By skipping a tie, you can prevent ties from doubling and overlapping; for example, when there are adjacent tie zones.
. By skipping a tie, you can prevent ties from doubling and overlapping; for example, when there are adjacent tie zones.
If this box is checked (
If the box is not checked (
Min spacing: A distance (in the primary dimension " Units " or other units ). This sets the spacing between ties.
To close/reset the Footing Step Template Editor :
"OK" (or the Enter key) closes the Footing Step Template Editor and reactivates the Footing Step Templates window. The template edited using this window is saved to the Job Settings file in your current Job . To apply template changes to a Footing Step that uses that template in the model, you can to mark for processing that Footing Step then Process and Create Solids .
"Cancel" (or the Esc key or the
"Reset" undoes all changes made to this window since you first opened it. The window remains open.
Also see :
- Footing Step Template Editor (opens from this window)
- Continuous Footing Edit (window for editing Continous Footing steps in Modeling )
- Grade Beam Edit (window for editing Grade Beam steps in Modeling )

