 On Line (ONLN) ( Modeling & Drawing Editor )
Tool summary :
- ONLN stands for "On Line." It is a snap for locating a point along a construction line.
- On Line can also snap to points along a grid line (in Modeling ) or a temporary construction line .
- On Line is one of the Auto point modes for Auto Point .
- When an On Line point is snapped to, the text " On " is printed next to the point location target (
 ).
).
- See the example and the step-by-step instructions .
Also see :
|
- Modeling and the Drawing Editor (where On Line can be found)
- Noticed points and construction lines (can be created with On Line )
- Offset Controls (affect On Line )
- Annotation text ( Display Options in Modeling )
- Annotation text ( Display Options in the Drawing Editor )
- Status line (shows a dimensional constraint entered for second point location)
Example :
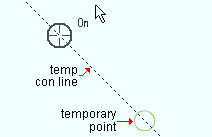
|
For On Line point location, a temporary construction line may be generated at 45 degree increments through a noticed point . |
Note in the above example that the target (
). In other words, the mouse pointer is perpendicular to the construction line at the point that the target snaps to.
Locating a point using On Line :
ONLN stands for On Line and is a Locate option that can be used for point location. It can become operative when Auto point location is on, but you can more easily discern its functionality when no other point locators are active.
1 . Begin this operation in Modeling or the Drawing Editor .
1a : Invoke Construction Line Add or Add Member or Add Material or any other tool that permits the use of On Line as a Locate option.
2 . Various Locate options become active, and the status line prompts you to locate a point.
2a : Select the On Line icon or choose Locate > On LIne or select ' ONLN ' on the Set Location Mode toolbar item or , if you want to use Auto point location, move your mouse pointer near a construction line as described in step 2b.
2b : Place your mouse pointer (
2c : Continue to perform the operation you began in step 1a.
Tip: For second point location in the operation you began in step 1a, you can optionally type in a distance to constrain point location to a radius which is that distance from the first point. The distance you type will be shown in brackets [ ] in the status line .

