Merge Schema into Current Job ( Utility Functions )
About this utility :
- Example 1: Merge Schema adds new schema entries
- Example 2: Error handling of duplicate schema entries
- Example 3: Merge Schema results in new fields on the Edit Properties window
- Example 4: Merge Schema changes the schema file, but not the Custom Properties window
- Step-by-step instructions
Modular or Legacy?
Home > Project Settings > Job or Fabricator Options ." Select the " Home > Project Settings > Job " tab. On that tab, look under the [ Custom Properties ] heading. If you see an option named " Activate Custom Properties ," then a modular flavor was selected at the time when your current Job was created. If there is no " Activate Custom Properties " option under that heading, then a legacy flavor was selected when your current Job was created. Another way to tell if you are in a modulatr-flavor Job is to press the " Properties " button in Modeling . If the Edit Properties window opens , then a modular flavor was selected when your current Job was created. If the Custom Properties window opens , a legacy flavor was selected when your current Job was created. You can Merge Schema from a modular-flavor Job to a legacy-flavor Job or vice-versa.
Also see :
- Copy Job Flavor to Global Flavor (creates a flavor that you can select when creating a new Job)
- Flavor (sets available custom properties at startup of a new Job)
- Edit Schema (to confirm the changes made using this utility)
- Edit Properties (custom property edit window for modular properties)
- Custom Properties (custom property edit window for legacy properties)
- Importing items into an SDS2 Project (index)
page 1 | contents | home > utilities > utility functions > merge >
Example 1: Merge Schema adds new schema entries.
The example assumes that your current Job uses a modular flavor , but these instructions also apply, at least for the most part, to a legacy flavor.
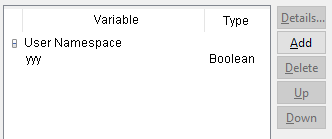
Job_A is your current Job . In it you have a single member schema entry in the " User Namespace " whose " Entry name " (variable) is ' yyy '.
Edit Schema window, Job_A
(before Merge Schema )
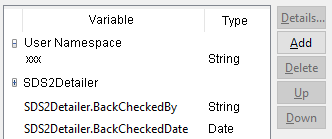
A new schema entry can be added to the " User Namespace " by pressing the " Add " button that is on the Edit Schema window. In Job_B , you have a different member schema entry in the " User Namespace " whose " Entry name " (variable) is ' xxx '. The Job also contains an activated a plugin named SDS2Detailer . If you were to open that Job and go to Home > Project Settings > Job , you would find the following entries on the Edit Schema window for members :
Edit Schema window, Job_B 
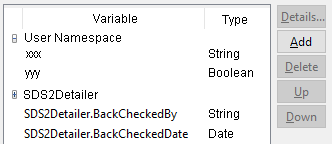
The SDS2Detailer set of modular schema entries is shown on the Edit Schema window because the " SDS2Detailer " plugin is set to ' Active ' at Home > Project Settings > Job > Activate Custom Properties . You use Merge Schema into Current Job to append the member schema from Job_B to the member schema in your current Job ( Job_A ). As a result, the member schema entries on the Edit Schema window for Job A are now as follows:
Edit Schema window, Job_A
(after Merge Schema )
" User Namespace " schema entries and plugin schema entries set up custom properties in the same way, but are distinct in the way that they are stored and in the ways that they can be manipulated on the Edit Schema window. Please note the following:
page 1 | contents | home > utilities > utility functions > merge > | top
Example 2: Error handling of duplicate schema entries.
The example applies regardless of the " Flavor " that was selected when the Job was created.
In Job_1 , your current Job , you have a single material schema entry of the " Type " ' String ', which has the " Entry name " zzz . Another Job, named Job_2 , also has a material schema entry named zzz , but it is the " Type " ' Boolean '. That other Job also has several other material schema entries. You use Merge Schema into Current Job to copy the material schema from Job_2 to your current Job ( Job_1 ). As a result, all schema entries are copied to Job_1 except schema entry zzz . For schema entry zzz , you get the following message:
|
|||||||
What this means: Merge Schema into Current Job does not alter schema entries that are currently maintained in your current Job. If you want to edit schema entries, press " Details... " on the Edit Schema window ( Home > Project Settings > Job ).
page 1 | contents | home > utilities > utility functions > merge schema into current job | top
Example 3: Merge Schema results in new fields on the Custom Properties window.
This example assumes that your current Job uses a modular flavor.
On the MEMBER Edit Properties window, you have a single custom property entry field, which is located under the "
User Namespace " leaf, and whose " Prompt " (field label) is Modeled by .
|
|
|
|
You use Merge Schema into Current Job to append the member schema from a different Job. Since there are two member schema entries in that other Job, two additional fields are added as custom properties for all members in your current Job when the MEMBER Edit Properties window is opened. The " Prompt " (field labels) of these two newly added fields are Date checked and Needs paint .
|
|
|
|
|
|
|
|
|
|
page 1 | contents | home > utilities > utility functions > merge schema into current job | top
Example 4: Merge changes the schema file, but not the Custom Properties window.
This example applies when your current Job uses a legacy flavor . Legacy custom property entry fields are found on the Custom Properties window, not the Edit Properties window.
Job_X is your current Job . When you created that Job, you selected ' ElectronicApproval ' as the " Flavor ." As a result, the Custom Properties window for members has a vertical tab set that is similar to the horizontal tab set shown here:
Scenario: You use Merge Schema into Current Job to append the member schema from a different Job. When you look at the meta/schema/member file in your current Job, you see that it has changed. However, the Custom Properties window still looks exactly like it did before the merge. The reason for this is that, when ' DDLegacy ' or ' ElectronicApproval ' or ' CollaborativeProperties ' is selected as the " Flavor ," the SDS2 software installation program installs Python files named Job.py and Member.py into the custom folder of your current Job. These files create custom property Python dialogs that call variables from the meta/schema/member and meta/schema/job schema files. To change the appearance and functionality of the Custom Properties window for members, you need to change the Python file /custom/Member.py that is stored in your current Job.
The above scenario does not apply to modular flavors . You don't have to mess around with Python scripts when you add new custom properties if your current Job's flavor is a modular flavor.
page 1 | contents | home > utilities > utility functions > merge schema into current job | top
Merge Schema into Current Job lets you add new custom property schema entries to your current Job without your having to manually define them yourself. It does this by appending schema from another Job to your file of the same " Schema type " that is in your current Job . Entries that have already been made to the Edit Properties window will not be affected. However, new fields -- with default entries -- may be added to the Edit Properties window as a result. You can do a Merge Schema into Current Job at any time during the development of a Job, but it is generally best to do it before you begin to build the model. If a model already exits, all items of the " Schema type " will be affected. These instructions assume that your current Job uses a modular flavor , but the instructions still, for the most part, apply if your current Job uses a legacy flavor.
1 . Before using this utility:
1a (optionally count schema entries): In your current Job (the Job that you want to merge new schema entries into), open the Edit Schema window for the " Schema type " that you want to merge. For example, if you want to merge material schema into your current Job, you would click " Material " under the [ Custom Properties ] heading on the " Home > Project Settings > Job " tab of the Setup Job or Fabricator Options window. Count the number of schema entries found on Edit Schema window. Assuming that this operation is successful, the number of these schema entries will increase. Example 1 shows how a before-and-after check.
1b (optionally count custom properties): If you have already added members to your current Job , you can open an edit window (member, material, bolt, hole or weld), then press the " Properties " button on that edit window. On the Edit Properties window that opens, count the number of custom property entry fields that you find. After the Merge Schema has been done, the number of these custom property entry fields will increase. Example 3 shows how this before-and-after check works. Example 4 shows a special case, for Jobs using a legacy flavor, where this sort of check will not work.
1c (optionally check out the Job to merge from): Home > " Change Active Job " to the Job that you want to merge schema from. In that Job, review the Edit Properties window and Edit Schema window for the " Schema type " that you want to merge. Confirm that the schema entries are actually the ones you want to merge. Home > " Change Active Job " back to the Job that you want to merge schema to.
2 . Start the Merge Schema into Current Job utility:
Method 1 : Home > Utilities > Utility Functions . If prompted to do so, enter the " Utility Password " that has been set up for your network. Then, on the Utility Functions menu, click " Merge Schema into Current Job ."
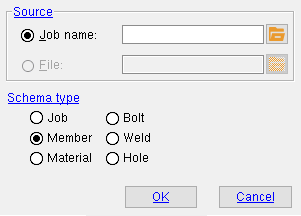
3 . The Merge Schema window opens.
1 . Select the " Source " Job containing the schema entries that you want to merged into your current Job.
2 . Check the " Schema type " that you want new schema entries to be added to in your current Job.
3 . Press the " OK " button.
Source: Job name or a File . Usually ' Job name ' is your best choice, since you will probably find it easier to troubleshoot problems in the GUI interface of that other Job. If you choose ' File ', you should understand both the schema file that you select (or whose path you designate) and the schema file in your current Job that Merge Schema appends entries into.
Schema type: Job or Member or Material or Bolt or Weld or Hole . This sets the schema file (the one in your current Job ) that is to be merged into. If there is no schema file of the selected type in your current Job to merge into, one will be created with the appropriate file name ( job or member or material or bolt or weld or hole ).
| Schema Type | File in Current Job to be Merged Into |
| Job | meta/schemas/ job |
| Member | meta/schemas/ member |
| Material | meta/schemas/ material |
| Bolt | meta/schemas/ bolt |
| Weld | meta/schemas/ weld |
| Hole | meta/schemas/ hole |
Alternative 1 : Press " OK " to merge schema items from the " Source " that you selected into the appropriate meta/schemas/ file in your current Job. Go to step 4.
Alternative 2 : Press " Cancel " to end the Merge Schema into Current Job operation and keep everything as it was before step 2. Do not continue.
4 . One or more of the following occurs:
The schema from the " Source " that you selected is merged into a file that is for the " Schema type " that you selected.
Schema entries in the " Source " which have the same " Entry name " as entries in the schema file you are merging into are not merged . You get a warning message as described in example 2 .
If your current Job did not have a file of the " Schema type " that you selected, such a file is created, and schema entries from the " Source " are merged into it.
If your current Job uses a legacy flavor . Merge Schema may successfully change the schema file, but when you open the Custom Properties window, it appears to be unaffected. This outcome is described in example 4 .
Tip: at Home > Project Settings > Job , open the Edit Schema window for the " Schema type " that you just merged new properties into. There you can adjust the schema entries as needed. For example, you can delete non-modular schema entries that you do not want.
page 1 | contents | home > utilities > utility functions > merge > | top


