The Add/Edit Schema Entry window
|
Options :
New Schema Entry opens when you press " Add " on the Edit Schema window. The " Next " button opens Add/Edit Schema Entry . The new schema entry will be placed in the " User Namespace ."
Add/Edit Schema Entry : " Entry name " and " Type " are read-only.
" Add to member detail " and " Use to split piecemarks " and " Erection View Member Labels " can apply to a member schema entry only. " Add to BOM " can apply to either a member schema entry or a material schema entry. Three of these four options are disabled ( grayed out ) for a plugin schema entry .
These options are a part of the Add/Edit Schema Entry window only if you are adding or editing a member schema entry. They are enabled when "
Add to member detail " is checked. See these instructions .
To add or edit a member schema entry: In the " Home > Project Settings > Job " tab of Setup , click " Member ' to open the Edit Schema window, then press the " Add " button or select a schema entry then press the " Details ... " button.
To open this window :
- Press the " Add " button on the Edit Schema window.
- Press the " Details .... " button on the Edit Schema window.
- Adding a custom-property label to a member detail
Also see :
- Edit Schema (window that this window opens from)
- Edit Properties (window in Modeling that a schema entry propagates to)
- Delete (to delete a schema entry)
Adding a custom-property label to a member detail :
These instructions apply regardless of the " Flavor " that you selected when you created your current Project. They explain how to add a schema entry that propagates a label to a member detail. Be aware that if your current Project, at creation time, was set to use a legacy flavor , you need to make changes to the custom/Member.py file as described in Note 2 of step 5.
1 . Home > Project Settings > Job > Custom Properties > Member Properties .
2 . On the Edit Schema window, press the " Add " button.
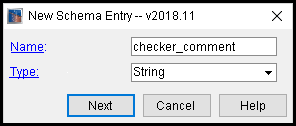
3 . The New Schema Entry window opens.
3a . Type an " Entry name " and choose a " Type ." For most applications, ' String ' is probably the " Type " you want to use. Press the " Next " button to open the Add/Edit Schema Entry window. .
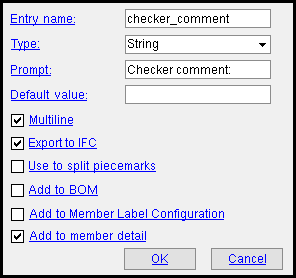
3b . On the Add/Edit Schema Entry window, enter a " Prompt ." Generally speaking, you will want to keep the " Default value " blank. Check the box for "
3c . Press " OK " to close the Add/Edit Schema Entry window and go to step 4.
4 . The schema entry you added should now be listed on the Edit Schema window. Press " OK " to close that window.
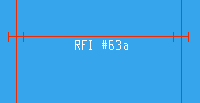
5 . In Modeling , on the Edit Properties window for a particular member that you want the custom-property label to appear on, make an entry to the field that is generated as a result of the schema entry you just made. Be aware that, if all members under a piecemark do not have the same custom property, the custom-property label will list each member number under that piecemark along with its assigned custom property. Click here for an example.
Note 1: If the " Default value " you entered was something other than a null value (such as a blank space for a string entry), then you don't have to open the Edit Properties window. The default value will correlate to the text of the custom-property label at the time you auto detail (step 6).
Note 2: If, when creating your current Job, you selected a legacy flavor , a Python file named Member.py is installed in the custom folder of that Job, and you will have to modify that file before you can use the Custom Properties window to change the custom property assigned to a particular member for the schema entry you just added. To make new schema entries appear as editable custom property fields on the member Custom Properties window, you need to change the custom/Member.py file.
6 . Detail Members to generate the custom-property label. For a ' String ' ' Number ' ' Dimension ' or ' Date ' value type, the label text will match the text entered on the Edit Properties window. For a ' Boolean ' value type, no text is entered to the Edit Properties window, and the label text will be the " Entry name " (if the custom property field is checked on the Edit Properties window).
Note 1: No custom-property label is generated if all of the entries for a custom property assigned to all members under the detailed piecemark are null values. This is desirable, since it prevents the detail from being cluttered with meaningless labels.
Note 2: If members under the same mark have different properties, the custom-property label itemizes the member numbers [in brackets] of the members which have been assigned the different properties.
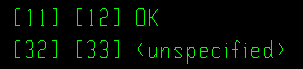

different properties, same piecemark
For the example above, the member numbers [11] and [12] had OK entered as the string , while the equivalent field for member numbers [32] and [33] was left blank.
Options :
Entry name: The name of this schema entry. This name is listed in the " Variable " column on the Edit Schema window. Do not use spaces or special characters (!@#$%^&*+,) in the entry name. Also, do not begin the entry name with a number. The " Name " must be entered on the New Schema Entry window. " Entry name " is read-only on Add/Edit Schema Entry window.
|
Special cases: 1 ) This is the value that is entered to the bill of material if this member or material schema entry has its " Type " set to ' Boolean ' and it is set to " Add to BOM remarks " and the appropriate box is checked (
Type: String or Number or Boolean or Dimension or Date . This option is enabled on the New Schema Entry window. It is read-only on Add/Edit Schema Entry window. Be aware that, if you are adding a new schema entry, where xxx = member or material or hole or bolt or weld , if the schema entry you are adding is part of the xxx schema, then all xxx entities in your current 3D model will be affected. For example, when you press " OK " at the bottom of the Add/Edit Schema Entry window, if you are adding a new member schema entry, a new custom property entry field of the type that is entered here will be added to the version of the Edit Properties window that can be accessed by any and all members in your current Job.
|
|
|
|
|
Prompt: The label you want to give the custom property entry field that this schema entry puts on the Edit Properties window (in Modeling ). If you leave " Prompt " blank, the custom property field will be given the " Entry name ". Unlike the " Entry name ," you can use spaces or special characters in the " Prompt " string.
|
Special case 1: The " Prompt " option is not available on this window if you are editing/reviewing a schema entry from a set of plugin schema entries . It is available -- and editable -- if you are adding or editing a " User Namespace " schema entry.
Special case 2: If "
Default value: The default entry that you want to be made to the custom property entry field that you are creating for the Edit Properties window in Modeling . The entry you make here is validated based on the field's " Type ," which means, for example, that the program does not let you enter letters if the " Type " is set to ' Dimension '.
|
Tips: For the " Type " ' String ' it is usually best to leave " Default value " blank. The same is true for a ' Number ' or ' Dimension '. For a ' Boolean ', best practice is to leave the default to not checked (
).
Multiline: ![]() or
or ![]() . This applies when the " Type " of schema entry you are adding/editing is ' String '. The option is disabled ( grayed out ) for any other " Type " of schema entry.
. This applies when the " Type " of schema entry you are adding/editing is ' String '. The option is disabled ( grayed out ) for any other " Type " of schema entry.
|
|
|
|
|
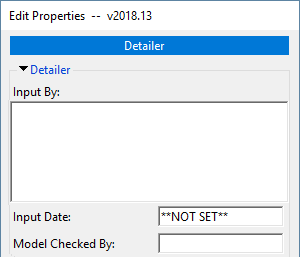
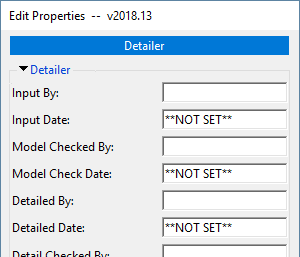
| These screen shots were taken from the MEMBER Edit Properties window. ' SDS2Detailer ' is the plugin that was selected at Home > Project Settings > Job > Activate Custom Properties . | |
If this box is checked (
If the box is not checked (
Export to IFC: ![]() or
or ![]() . This applies to a member schema entry or a material schema entry or a job schema entry . It sets whether custom property entries for this schema entry can or cannot potentially be exported to an IFC file that is subsequently created using Export Model . The Export Model program can optionally turn on or turn off the inclusion of custom properties in an IFC file.
. This applies to a member schema entry or a material schema entry or a job schema entry . It sets whether custom property entries for this schema entry can or cannot potentially be exported to an IFC file that is subsequently created using Export Model . The Export Model program can optionally turn on or turn off the inclusion of custom properties in an IFC file.
Assuming that the Export Model option to " Export custom properties " is turned on at IFC export time:
If this box is checked (
If the box is not checked (
Using Import Model , you can import metadata exported from other programs via IFC files. The Import Model option is called " Import custom property sets " .
Applications: Tekla BimSight, Navisworks and various other programs have the capability to read metadata such as custom properties from IFC files.
Use to split piecemarks: ![]() or
or ![]() . This applies to member schema entries only and is invisible (not available) for entries to material schema, job schema and other schemas. It is disabled ( grayed out ) if a " Model complete date " has been set for any member in your current Job , thus preventing the model complete member from being marked for Create Solids as described below. It is also disabled if any member in your current Job has a frozen piecemark or if you are editing/reviewing a schema entry from a set of plugin schema entries .
. This applies to member schema entries only and is invisible (not available) for entries to material schema, job schema and other schemas. It is disabled ( grayed out ) if a " Model complete date " has been set for any member in your current Job , thus preventing the model complete member from being marked for Create Solids as described below. It is also disabled if any member in your current Job has a frozen piecemark or if you are editing/reviewing a schema entry from a set of plugin schema entries .
|
|
If this box is checked (
If the box is not checked (
Example: Twelve members were originally assigned the member mark B_33. Users changed the default entry of
Please note: Changing the state of " Use to split piecemarks " -- for example, from
Add [property entry] to BOM: ![]() or
or ![]() . This option is available (not invisible or disabled) if you are editing or adding a member schema entry or a material schema entry that is in the " User Namespace " set of schema entries.
. This option is available (not invisible or disabled) if you are editing or adding a member schema entry or a material schema entry that is in the " User Namespace " set of schema entries.
|
If this box is checked (
If the box is not checked (
Schema entry types react in different ways: For any " Type " except ' Boolean ', the value that is entered to the " Remarks " column is the value entered to Edit Properties for the individual member or material. When the schema entry " Type " is ' Boolean ', the value users can enter may be ' Yes ' (checked or true) or ' No ' (not checked or false), and the " Entry name " ( not the value ) is compiled to the " Remarks " column. Example 1: A boolean field with the name and prompt " GALV " adds GALV to the " Remarks " column when " GALV " is checked (
Erection View Member Labels: ![]() or
or ![]() . This option is visible if you are editing or adding a member schema entry .
. This option is visible if you are editing or adding a member schema entry .
|
Example of a custom property member label. Erection View Member Labels setup places this label at the center of the member line and below the member line. |
If this box is checked (
If the box is not checked (
|
|
Add [property entry as label] to member detail: ![]() or
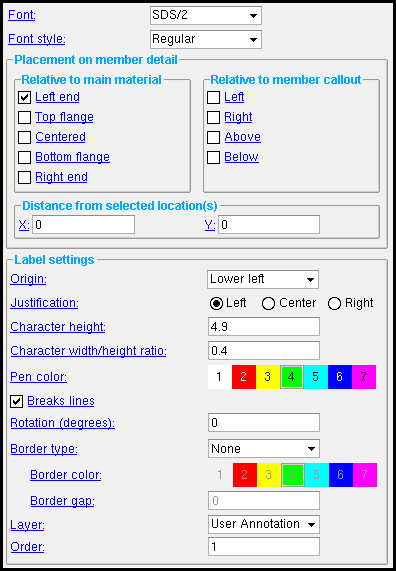
or ![]() . This option is available (not invisible or disabled) if you are editing or adding a member schema entry that is in the " User Namespace " set of schema entries. It adds a label to a member detail the next time you Detail Members . Make sure that you also specify the " Placement relative to main material " and/or the " Placement relative to member callout " -- if you don't, you won't get a label. See the step-by-step instructions .
. This option is available (not invisible or disabled) if you are editing or adding a member schema entry that is in the " User Namespace " set of schema entries. It adds a label to a member detail the next time you Detail Members . Make sure that you also specify the " Placement relative to main material " and/or the " Placement relative to member callout " -- if you don't, you won't get a label. See the step-by-step instructions .
|
|
|
If "
If " |
Label text that is output to the detail depends on the " Type " of the schema entry and the entry that is made to the member Custom Property window. For a ' String ' ' Number ' ' Dimension ' or ' Date ' value type, the label text will match the text entered on the Custom Property window. For a ' Boolean ' value type, no text is entered to the Custom Property window, and the label text will be the " Entry name " (if the custom property is checked on the Custom Property window).
If members under the same mark have different properties, the custom-property label will itemize the member numbers [in brackets] of the members which have been assigned the different properties.
different properties, same mark For the example above, the member numbers [11] and [12] had OK entered as the ' String ', while the equivalent field for member numbers [32] and [33] was left blank. Also see: Adding Custom Properties to Details, v7.3 (YouTube) (
). Be aware that this video was created before the introduction of modular custom properties.
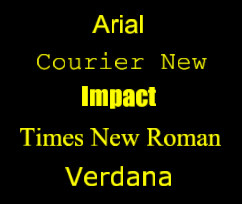
Font: Any font that is listed can be selected when " ![]() Add to member detail " is checked. See the step-by-step instructions .
Add to member detail " is checked. See the step-by-step instructions .
|
For a TrueType font , such as any of those shown here, set the " Character width/height ratio " to ' 0.6 ' to have the font rendered at its native width. |
Be sure to also choose the " Font style " that you want. The " Character height " sets the font size. If you select the ' SDS2 ' font, be aware that the " Pen color " affects the thickness of the font when it is plotted.
Font style: The style (' Bold ' or ' Bold Italic ' or ' Italic ' or ' Regular ') of the selected " Font ." Different fonts may have different styles available to them. This applies when " ![]() Add to member detail " is checked.
Add to member detail " is checked.
Available font styles are listed alphabetically in the font style list box , and the first style that is listed for a particular font is the style that is selected by default. You may, instead of using the default, prefer to choose ' Regular ', which is generally the most popular style for a particular font. ' Regular ' is the only choice that is available for the ' SDS2 ' font. To adjust the stroke thickness of the ' SDS2 ' font, you can change the " Pen color ."
Placement relative to main material: ![]() /
/ ![]() Left end and/or
Left end and/or ![]() /
/ ![]() Top flange and/or
Top flange and/or ![]() /
/ ![]() Centered and/or
Centered and/or ![]() /
/ ![]() Bottom flange and/or
Bottom flange and/or ![]() /
/ ![]() Right end . This applies when "
Right end . This applies when " ![]() Add to member detail " is checked.
Add to member detail " is checked.
|
|||
| This example was created by adding five schema entries, each with a " Type " of ' String ', but with different placements relative to the member detail. On the Edit Properties window for the affected members, the strings Left , Top flange , Right , Centered , and Bottom flange were entered to the appropriate custom properties fields. |
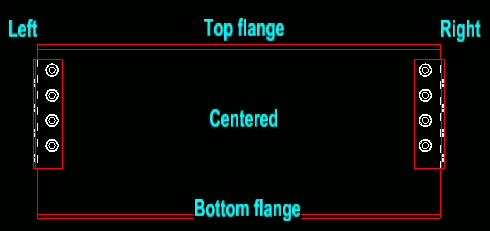
The " X " and " Y " distances from selected locations are 0 for all of the custom-property labels in the above example. See the step-by-step instructions .
Be aware that the " Origin " also affects the custom-property label placement. In the above example, the " Origin " for the Left label is ' Lower right '. All of the other labels have their " Origin " set to ' Lower left '.
If you check boxes for more than one location, then an instance of the custom property label will be placed at each of those locations.
Warning: You must specify a " Placement relative to main material " or a " Placement relative to member callout " if you want Detail Members to be able to generate a custom-property label. If all the boxes are unchecked (
Placement relative to member callout: ![]() /
/ ![]() Left and/or
Left and/or ![]() /
/ ![]() Right and/or
Right and/or ![]() /
/ ![]() Above and/or
Above and/or ![]() /
/ ![]() Below . This applies when "
Below . This applies when " ![]() Add to member detail " is checked.
Add to member detail " is checked.
|
|||
| This example was created by adding five schema entries, each with a " Type " of ' String ', but with different placements relative to the member detail. On the Edit Properties window for the affected members, the strings Left , Above , Below , and Right were entered to the appropriate custom properties fields. |
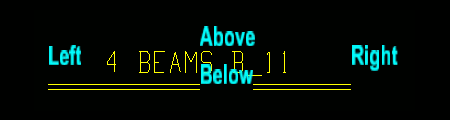
The " X " and " Y " distances from selected locations are 0 for all of the custom-property labels in the above example. See the step-by-step instructions .
Be aware that the " Origin " also affects the label placement. In the above example, the " Origin " for all of the labels is set to ' Lower left '.
If you check boxes for more than one location, then an instance of the custom property label will be placed at each of those locations.
Warning: You must specify a " Placement relative to member callout " or a " Placement relative to main material " if you want Detail Members to be able to generate a custom-property label. If all the boxes are unchecked (
Distance from selected location: This sets the X and Y distance that the custom-property label is to be displaced from its default location. See the step-by-step instructions .
| Default locations (X = 0, Y = 0): | |||
|
|||
| X and Y distances entered for each custom-property label: | |||
|
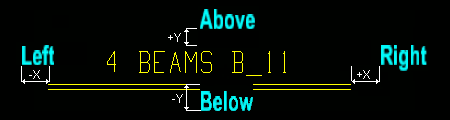
X ' is the distance (in decimal inches) from the default location of the custom-property label's origin to where you want that origin to be located when the member is auto detailed using Detail Members . A positive X distance displaces the label's origin horizontally to the right of its default location. A negative X distance displaces it to the left.
' Y ' is the distance (in decimal inches) from the default position of the label's origin to where you want that origin to be located when the member is auto detailed using Detail Members . A positive Y distance displaces the label's origin vertically above of its default location. A negative X distance displaces it below.
Origin: Lower left or Left center or Upper left or Lower center or Center or Upper center or Lower right or Right center or Upper right . This applies when " ![]() Add to member detail " is checked.
Add to member detail " is checked.
|
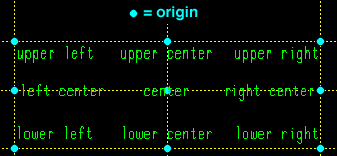
The end point ( o ) of a custom-property label is highlighted along with the label when the label is selected. This point identifies the origin of the label. See the step-by-step instructions .
Examples: To orient the text block so that its origin point is at its lower left, select ' Lower left '. To center the text block over the origin point, select ' Center '.
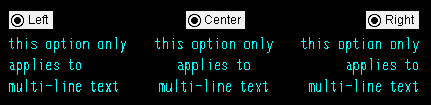
Justification : Left or Center or Right . This applies when multiple lines have been entered to the custom-property label .
|
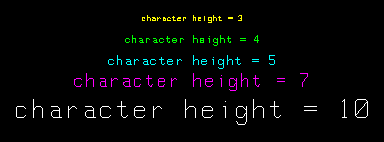
Character height: The height (in millimeters) of letters/numbers that make up the custom-property label . See the step-by-step instructions . This value is independent of the " Drawing scale " of this drawing.
|
Font dependencies: This applies to whatever font is selected as the custom-property label " Font ," regardless of whether that font is a TrueType font or the ' SDS2 ' font.
Character width/height ratio: The width/height of the characters that make up the custom-property label . See the step-by-step instructions .
|
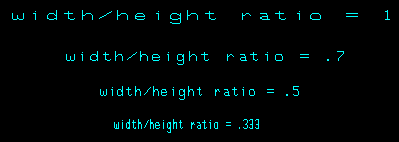
Font dependencies: This applies to whatever font is selected as the custom-property label " Font ," regardless of whether that font is a TrueType font or the ' SDS2 ' font. For a TrueType font, a ratio of ' 0.6 ' renders that font at its native width. A ratio larger than ' 0.6 ' stretches the font. A ratio less than ' 0.6 ' compacts the font. For the ' SDS2 ' font, ' 0.4 ' is the default choice.
Pen color: 1 or 2 or 3 or 4 or 5 or 6 or 7 . This applies when " ![]() Add to member detail " is checked.
Add to member detail " is checked.
|
|
|
The button that is pressed sets the on-screen display color of the custom-property label and, if you are using the 'SDS2 ' font , it sets the printed thickness (though not the displayed thickness) of that font. |
For a TrueType " Font ", this option affects the display color of that font while you are in the Drawing Editor , but does not in any way affect the plotted appearance of the font.
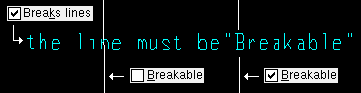
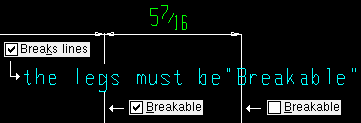
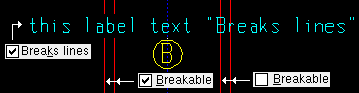
Breaks lines: ![]() or
or ![]() . The setup options " Break material lines at label interference " or " Break dimension lines at label interference " must be checked for this option to apply. Also, "
. The setup options " Break material lines at label interference " or " Break dimension lines at label interference " must be checked for this option to apply. Also, " ![]() Add to member detail " must be checked.
Add to member detail " must be checked.
| Example of a label breaking a line : | |||
|
|||
| A label breaking a dimension leg : | |||
|
|||
| A label breaking a polygon side : | |||
|
If this box is checked (
If the box is not checked (
Rotation (degrees): A positive or negative number from 360 to - 360 degrees. This applies when " ![]() Add to member detail " is checked.
Add to member detail " is checked.
|
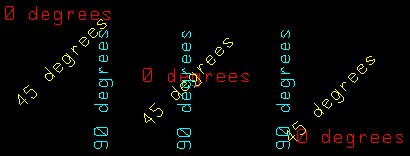
An entry of ' 0 ' (zero degrees) sets the custom-property label to be horizontal. See the step-by-step instructions .
A ' positive number ' of degrees rotates the label counterclockwise from horizontal.
A ' negative (-) number ' of degrees rotates the label clockwise from horizontal.
Border type: None or Rectangle or Cloud . This applies when " ![]() Add to member detail " is checked.
Add to member detail " is checked.
|
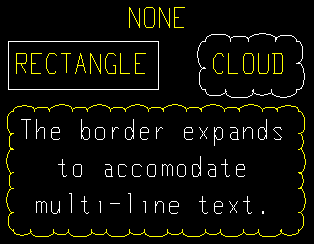
Note: A cloud border and rectangular border is part of the custom-property label , not an object that is distinct from the label. This means, for example, that you cannot select cloud borders with the Selection Filter set to ' Clouds '. Nor can you select a rectangular border with the Selection Filter set to ' Lines '. Unless you Explode the label , the label and its border are always selected together.
Border color: 1 or 2 or 3 or 4 or 5 or 6 or 7 . This applies when " ![]() Add to member detail " is checked.
Add to member detail " is checked.
|
|
| The choice made here sets the thickness of the border (as well as its on-screen display color), based on the settings in Line Weights . |
Border gap: A distance (in the primary dimension " Units "). This applies when " ![]() Add to member detail " is checked. In the example below, the gap is measured using Add Dimension .
Add to member detail " is checked. In the example below, the gap is measured using Add Dimension .
|
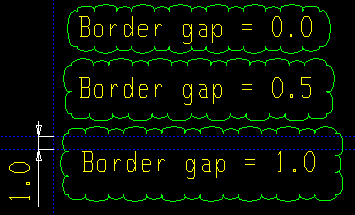
Note: You enter a " Border gap " of ' 0.5 ' inches and your " Drawing scale " is ' 1 ' (Base 12). The actual gap on the printed drawing will be 1/12 x 0.5 = 0.04167 inches. This is different than " Character height ," which sets the actual height of characters in the printed drawing.
Layer: User Annotation or Create New . This is the drawing layer that the custom-property label will be placed on. See the step-by-step instructions .
![]()
User Annotation is a layer that Detail Members creates for every member detail. By default, it is the layer that is selected when a user opens a detail and, unless the user selects a different layer, it is the layer that the user will add drawing annotations to.
Create New instructs Detail Members to create a new layer that is named after the " Entry name ." (" Name " on the New Schema Entry window).
This applies when "
"OK" (or the Enter key) closes the Add/Edit Schema Entry window and saves the schema entry defined on this window to the appropriate type of the schema ( job schema or member schema or material schema or hole schema or bolt schema or weld schema ).
For a modular flavor: The schema entry you have added (or edited) will create (or modify) a field on the Edit Properties window for all items of the schema type ( job or member or material or hole or bolt or weld ).
For a legacy flavor: Newly added schema entries will not show up on the Custom Properties window if the custom property entry fields for that window are generated with a special Python script. To fix this, you need to make adjustments to the Python script. This can happen for Job and member custom properties.. Click here or here for more information.
Note: The type of flavor (modular or legacy) that is used in a Job is established when the " Flavor " is selected at Job-creation time. Once a Job has been created, you cannot change the type of " Flavor " that is used.
Regardless of flavor: The type of schema entry ( job or member or material or etc.) that is added or edited is determined by how you opened the Schema Edit window (from which you opened this window).
"Cancel" closes this window without adding or editing a new schema entry to the schema (job schema or member schema or etc.).

