Job Repositories
- General Overview
- Tips and Tricks
- Related Tools
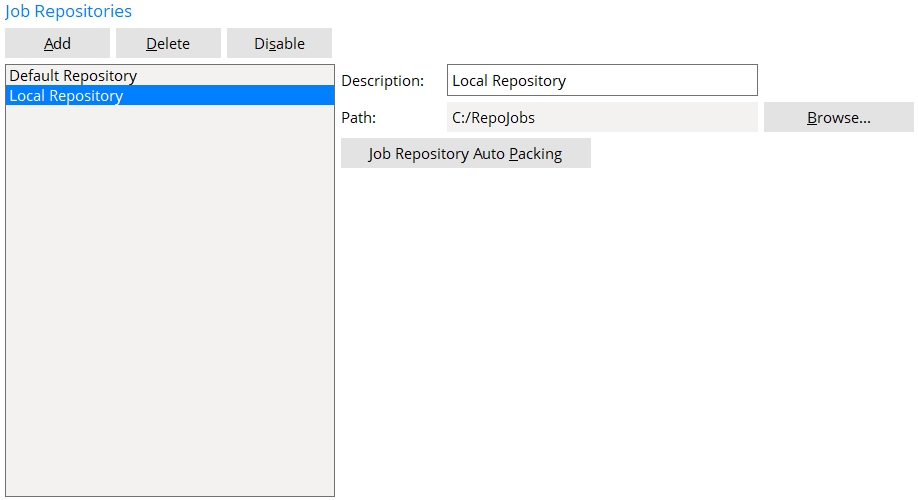
To " Add " a new Job repository :
1. Press the " Add " button.
1a. ' New Repository ' is automatically entered as the " Description. " Type a different " Description " if you so choose. A repository is selected by its " Description " on the Job repository menu.
1b. Enter a path by pressing the " Browse... " button and double-clicking on file folders (
) until you have opened the file folder you want.
2. Do one (1) of the following:
Alternative 1 : Repeat this procedure to designate descriptions for file paths to other Job repositories.
Alternative 2 : Follow the instructions (below) to delete a Job repository from this screen's " Repositories " list, to enable or disable a previously created repository, or to change Auto Pack settings.
Alternative 3 : Press the " OK " button to close this screen. Every " Description " that is on this screen's " Repositories " list that is not disabled will be selectable on the Job repository menu that is used, for example, when you Home > " Change Active Job ."
To " Enable " an existing Job repository :
If a repository is currently disabled , it is not shown on the Job repository menu. This operation enables such a repository. Once enabled, it appears in Job repository menus , and you can Home > " Change Active Job " to jobs contained in it.
1. Select the " Description " of the repository that you want to enable.
2. Press the " Enable " button.
A possibility : If the path does not exist, Job Repositories notifies you of such with an alert dialog. Press " OK ." You cannot enable the repository until you have modified its " Path ."

The repository "xxx" is not accessible from SDS2. 

To " Disable " an existing Job repository :
This operation disables a repository so that it won't appear in a Job repository menu . This may be desirable if, for example, you wish to prevent its jobs from appearing on a selection dialog when you Home > " Change Active Job ." However, its file path is retained in the " Repository " list, so that it can easily be added back to the list if required.
Note : You cannot " Disable " the ' Default Repository ' .
1. Select the " Description " of the repository that you want to disable.
2. Press the " Disable " button.
3. The repository is disabled, and is shown in the list. Do one of the following:
Alternative 1 : Repeat this procedure to disable another Job repository.
Alternative 2 : Press the " OK " button to close this screen. Every " Description " that is on this screen's " Repositories " list that is not disabled will be selectable on the Job repository menu that is used, for example, when you Home > " Change Active Job " or Home > Utilities > Utility Functions > Copy Jobs .
To change " Auto Pack " settings for an existing Job repository :
Performing this operation selects Job repositories and jobs for automatic packing to JFT (Job Fabricator Transfer) files. You can choose which jobs are to be packed and set destinations for those packed files and their logs. The auto pack feature then generates a command string suitable for use in a job scheduler application or on a command line to pack them automatically. Running the command can pack multiple jobs from multiple Job repositories at once.
Warning : The auto pack feature is not a replacement for regular backups.
1. Select the " Description " of the repository containing a job or jobs that you want to auto pack.
2. Press the " Job Repository Auto Packing " button.
3. The Job Repository Auto Packing screen opens. Select one or more of the jobs from the repository that you selected in step 2.

4 . Enter a " Destination Directory " that you want to serve as the folder( ![]() ) into which the .jft file is to be placed, or use the default.
) into which the .jft file is to be placed, or use the default.
The default directory is the folder (
5 . Enter a " Log Directory " that you want to serve as the folder( ![]() ) into which the log file is to be placed, or use the default.
) into which the log file is to be placed, or use the default.
The default directory is the output folder (
6 (optional) . Press the " Pack " button to immediately pack jobs from repository that you selected in step 2, using the settings that you chose in steps 3, 4, and 5. By doing so, you can do a "test run" of the auto pack settings for the repository.
6a : A progress bar illustrates the progress of the packing of each job as it takes place. When the progress bar reaches 100%, the progress bar window will close automatically .
7 . On the Job Repository Auto Packing screen, pressing Copy ( ![]() ) saves the command line string to your operating system's clipboard.
) saves the command line string to your operating system's clipboard.
7a . Click the " OK " button. This closes the Job Repository Auto Packing screen.
8 . Run the command to automatically pack the jobs that have been added to all the repositories in the Job Repositories screen, according to the settings that you provided on the Job Repository Auto Packing screen.
Alternative 1 : Paste the command line string into a Run window or a Command Prompt window, then press enter. This will execute the auto pack command immediately.
Alternative 2 : Paste the command line string into a job scheduler application installed on your workstation (for example, Windows Task Scheduler).
To " Delete " an existing Job repository :
This operation deletes a file path from the " Repository " list so that, for example, you will not be able to Home > " Change Active Job " to a Job in that repository. This operation does not delete the file folder associated with a repository. Any Jobs that were in that file folder before you delete the repository remain in that file folder. Another reason to " Delete " is to remove a repository that is invalid.
Note : You cannot " Delete " the ' Default Repository ' .
1 . Select the " Description " of the repository that you want to remove from the list.
2 : Press the " Delete " button.
3 . The repository is removed from the list. Do one of the following:
Alternative 1 : Repeat the " Add " a new repository procedure described earlier on this page to designate file paths to other directories on your network.
Alternative 2 : Repeat this procedure to delete another Job repository.
Alternative 3 : Press the " OK " button to close this screen. Every " Description " that is on this screen's " Repositories " list that is not disabled will be selectable on the Job repository menu that is used, for example, when you Home > " Change Active Job " or Home > Utilities > Utility Functions > Copy Jobs .
- The Job repository menu lists (in alphabetical order) the " Description " of each Job repository that has been created using this utility.


Job repository menu - A repository " Description " can be changed at any time. Just select the repository name, then type in a new " Description "
- Each " Description " is associated with a unique path to a file folder ( ) wherein Jobs can be stored. The description and path are defined when you " Add " a new repository.
- You cannot " Delete " or " Disable " the ' Default Repository ', which is the jobs folder in the data directory used by your current version of this program. You can, however, change its " Description ."
- Red or yellow exclamation point icons
 or
or 

