 SDS2 Status Transfer ( Home & Modeling )
Tool summary :
Also see :
- Full Transfer (a more powerful alternative)
- StruMIS Transfer (similar to Full Transfer )
- Tekla PowerFab Export (similar to Full Transfer )
page 1 | contents | model -- parametric | exporting (index) | top
To export status and custom property information :
Your current Job should be up to date, with no members marked for processing. The status and custom property information is output to an XML status transfer file.
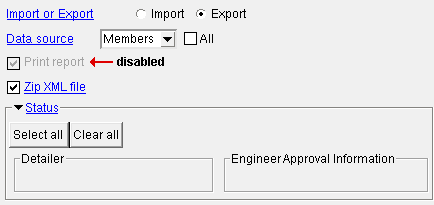
1 . Click the SDS2 Status Transfer icon to open the SDS2 Status Transfer window, which is represented below.

2 . For " Import or Export ," choose '
Export '.
3 . For " Data source ," you can select ' Members ' or ' Sheets '. Exactly the same information about a given member will be output by either selection method. If you select by ' Sheets ', then data will be output for all members on those sheets and, furthermore, for each member that is batched under an individual piecemark on that sheet.
' Members ' with '
All ' not checked results in you being prompted -- after you press " OK " -- to select members from the model.
' Members ' with '
All ' checked results in all members in the model being automatically selected for you.
' Sheets ' with '
All ' not checked results in your selecting from a list of member detail sheets after your press " OK ."
' Sheets ' with '
All ' checked causes all detail sheets to be automatically selected for you.
Note: Regardless of your choice here, the output for all members in the selection will include Drawing Data status for sheets (if they exist) and Member Status Review status and Drawing Data member status and MEMBER Edit Properties settings.
4 . Beneath the " Status " heading, check those boxes for those categories that you want to export. (If your current Job was set to use a legacy flavor, these categories appear under various tabs.)
Tip: Click the " Select all " or " Clear all " buttons to quickly select or deselect all the categories at once.
5 . You can "
Zip XML file " to make the file smaller if its status and custom property information will later be imported using the SDS2 Status Transfer tool. Otherwise, the receiving program must accept data that is compressed into gzip (.gz) files.
6 . Press the " OK " button. Depending on the choices you made in step 3 and whether you are performing this operation in Modeling or from Home , several possibilities may result:
Possibility 1 : If you chose to select by ' Members ' with '
All ' checked, all members in the model will be selected automatically for inclusion in the XML file. A window opens for entering an " Export directory ." By default, the XML status transfer file is exported to the
output folder in the data directory used by your current version of SDS2 software. You can press the " Browse " button to change the location. Press " OK " to output the XML file.
Possibility 2 : If you chose to select by ' Sheets ' with '
All ' checked, all member detail sheets that reside in your current Job will be selected automatically for inclusion in the XML file. A window opens for entering an " Export directory ." By default, the XML status transfer file is exported to the
output folder used by your current version of SDS2 software. You can press the " Browse " button to change the location. Press " OK " to output the XML file.
Possibility 3 : If you selected ' Sheets ' with '
All ' not checked, a selection window listing detail sheets will open. Also on the window is a field for entering the " Export directory " (the folder to which you want the XML file to be output). After selecting the sheets that you want, press " OK " to output the XML file to the location you have specified.
Possibility 4: If you selected ' Members ' with '
All ' not checked and you invoked this tool in Modeling , you will be prompted to select members in the model. After you select the members that you want included in the XML file and press " OK ," a window opens for entering an " Export directory ." By default, the XML status transfer file is exported to the
output folder used by your current version of SDS2 software. You can press the " Browse " button to change the location. Press " OK " to output the XML file.
Possibility 5: If you selected ' Members ' with '
All ' not checked and you activated this tool from Home , you should proceed exactly as you would have for possibility 4, except that you will select the members that you want from a list instead of from the model.
To import status and custom property information:
An XML file (.xml or .xml.gz) containing status and custom property information for your current Job needs to have been output using a procedure similar to the procedure that is outlined above .
Not all data that is in the XML transfer file will necessarily update the model. The Status Transfer program compares each field in the model with its counterpart in the XML transfer file and will, if it determines that the field in the model contains more enriched information, decline to update that field. For example:
Older Dates DO NOT Replace Newer Dates value in file value in model updated Date **NOT SET** YES **NOT SET** Date NO Later Date Earlier Date YES Earlier Date Later Date NO
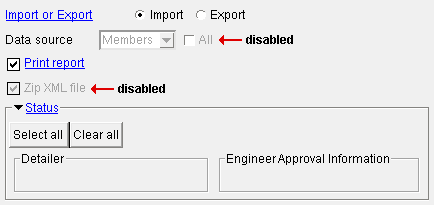
A Value IS NOT Overwritten with a Blank value in file value in model updated value blank YES blank value NO value value YES 1 . Click the SDS2 Status Transfer icon to open the SDS2 Status Transfer window, which is represented below.

2 . For " Import or Export ," choose '
Import '.
3 . You can '
Print report ', if desired. The report will list members and status items that were changed by the update.
If the " Python developer warning level " is set to ' Verbose ', checking '
Print report ' will open a preview of the report in the Output-Request Summary window. In that case, you can optionally " Save ..." or " Print " the report.
Unchecking '
Print report ' prevents a report from being generated.
4 . Beneath the " Status " heading, check those boxes for those categories that you want to import. (If your current Job was set to use a legacy flavor, these categories appear under various tabs.)
5 . A window opens for " Enter import filename ." Press the " Browse " button to select the XML file. After you press " OK " to close the window, the information in the selected XML file will be imported to Member Status Review and to Drawing Data and to MEMBER Edit Properties.
page 1 | contents | model -- parametric | exporting (index) | top


