The Member Status Review window ( Modeling )
Also see :
- Status Display (for displaying member status) (
 )
)
- Update Attributes (to update status for multiple members)
- Status attributes updatable with parametrics (for reviewing/updating status)
- Drawing Data Panel (alternative for reviewing/updating status)
- Items to Copy/Repeat (sets which " Repeat " boxes are checked here by default)
- Analytics (tracks status from the Home )
- Status (changes can be logged)
Step-by-step instructions :
| Tip: To enter today's date where the entry of a date is required, type ' 0 ' to enter ' **NOT SET** ', then press Tab to go to the next field. |
1 . To open the Member Status Review window:
1a : Use Add Member or Edit Member or double-click the member's main material to open the edit window for the member whose status settings you want to set or review.
1b : Press the " Status " button on the bottom of the member edit window.
2 . The Member Status Review window opens.
2a (optional) : If you want to make changes to this window, for most fields you enter a date .
2b (optional) : The " Repeat " box should be checked (
) for those status fields that you want applied to duplicates of this member created using Member Copy or middle-click ( Repeat ) or to members of the same type subsequently Added during a session in Modeling . If the checked-unchecked state of a " Repeat " check box is different than the state set in User and Site Options > Site > " Items to Copy/Repeat ," the field associated with that box is printed in red .
2c (optional) : If you make entries to this window that you do not want, you can press the " Reset " button to undo everything you did since this window originally opened. Go back to step 2a.
Alternative 1 : Press the " Cancel " button to close this window without saving any changes you might have made to it.
Alternative 2 : Press the " OK " button to save your changes and close the window.
Warning : Some settings on this window are more than informational. For example, marking a member as an " Existing member " prevents it from being detailed or appearing on reports.
3 . The Beam / Column / Horizontal Brace / Vertical Brace edit window that you opened this window from again becomes active.
3a : Press the " OK " button on that window in order to apply your changes to the one or multiple members that you are editing. If you are performing an Edit Member operation on a single member, you may then be given the option to apply your changes to all members with the same piecemark.
Note: If you open the Member Status Review window using Add Member , the information you enter is applied to the one member you are adding and to each member of that same type that you subsequently add during the same session in Modeling .
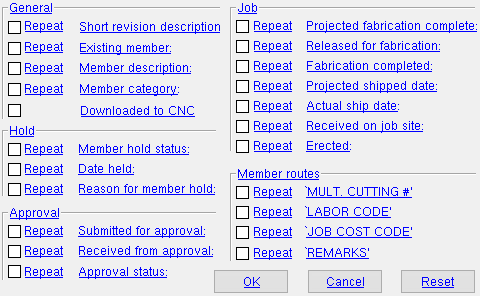
-------- General ---------
| If the " Repeat " box is checked ( |
Short revision description: A short revision description or new revision . Only the most recently applied short revision description is shown here. This description is automatically applied to the revision chart that appears on a detail sheet when the detail is revised.
Each short revision description found on this list box's menu (
) was first entered to the " Short Revision Description " column at Home > Project Settings > Job > Member Revisions .
Select ' New Revision ' to open Home > Project Settings > Job > Member Revisions . After you add a new revision on that window and press " OK ," you can then select the newly added revision on the list box (
The
button opens a complete list of all revision descriptions that have been applied to this member. The SDS2 - Member Revision History window lists not only the most recent " Short Revision Description " (which is shown here) but also the " Long Revision Description " plus a history of all such descriptions that have been assigned.
To get your new short revision description onto a detail sheet's revision chart: You must have done a Place Revision Chart onto the detail sheet or its sheet outline. You need to have done an Increment Sheet Revisions for the sheet on which this member is placed -- you do not have to do this every time, but this must have been done the first time. When you Detail Members , select this member and check the box for " Detail with revisions ."
A special case: A group member does not store revision information. Consequently, the " Short revision description " and " History " button do not appear on the version of this window that opens for a group member.
Status Update: Revision
Status Display: General status options > Revision
CIS/2 Import: Assign member revision
Sheet revisions: revision chart on a detail sheet
Status Report by XXX: Revision level
Other Reports: Member Revisions by Member , Report of Members in Selected Revisions
Parametric member module: mem1.RevisionLevel
Event log setup: Status
' Yes ' marks this member as an existing member. Existing members are members that you want to exist in the 3D model but are not to be fabricated. Automatic connections can be generated on members framing into existing members. Members that are marked as existing can undergo Process and Create Solids but cannot be Detailed , nor will they or any of their submaterials be included on any reports that have to do with cataloging or ordering materials for fabrication purposes. If a bolt is on an existing member and does not bolt to a non-existing member, it will be excluded from reports. The material marks of existing member materials have an e prefix. A special case: If an existing member is part of a group member , it will be detailed, but not included in the bill of material.
' No ' permits this member to be automatically detailed and to appear on reports.
Example: If you want to include in your model members that have already exist at the construction site (and therefore do not need to be fabricated), then check this box.
Also see: Existing member materials .
Hide Items: Existing
Status Update: Existing member
Status Display: General status options > Existing Member
Parametric member module: mem1.IsExisting
Report Writer: Member.Conditions.IsExisting
Report Writer: MemberMaterial.Bolt.IsOnNonexisting
Advanced Selection: m.IsExisting
Parametric module: m.IsExisting
Member description: Any text string of up to 22 characters. Check the " Repeat " box next to this field to apply the entered string to similar members subsequently generated -- otherwise the default entry for those subsequently generated members will be whatever Home > Project Settings > Fabricator > Piecemarking > Member Descriptions > " Default Description " applies to this member type.
To enter a member description: You can either type in a string of up to 22 characters, or select a description from the combo box (
Effect on Detail Members : After the member is auto detailed , the description entered here will appear on the callouts on member details , in the " Drawing description " in the Drawing Data Panel, and in the " Description " field in line 1 on the member's bill of material.
Drawing Data Panel: Drawing description
Status Display: Member status > Member description
Update Attributes: Member description
Parametric member module: mem1.TypeDescription
Report Writer: Member.MemberDescription or Member.MiscMemberDescription
Advanced Selection: m.MemberDescription
Parametric module: m.MemberDescription
Member category: Any definition from Home > Project Settings > Fabricator > Category Settings . Check the " Repeat " box next to this field to apply the entered category to similar, subsequently generated members -- otherwise the default entry for those subsequently generated members will be line 1 of the Category Settings window.
To enter a category: Press the "file cabinet" browse button (
) and double-click any member category that is on the list.
Status Update: Category
Status Display: Member status > Category
Status Report by XXX: Category
Hide Items: Category
Parametric member module: mem1.Category
Report Writer: Member.CategoryDescription
Advanced Selection: m.CategoryDescription
Parametric module: m.CategoryDescription
If this box is checked (
If the box is not checked (
), this member is not marked as CNC downloaded. Unless a user has manually unchecked this box (or used Update Attributes to uncheck it), this indicates that a CNC download file has not yet been generated for this member's main material.
Status Display: Search > CNC downloaded
Status Update: CNC downloaded
User and Site Options: Site > Hide items that have been downloaded from CNC selection menu
General Information: CNC Downloaded (similar information, but for material)
------- Hold --------
Member hold status: Held or Not held . Holding a member is usually interpreted as meaning holding a member's detail from release to the shop. Check the " Repeat " box next to this field to hold similar, subsequently generated members -- otherwise the default entry for those subsequently generated members will be ' Not held '.
|
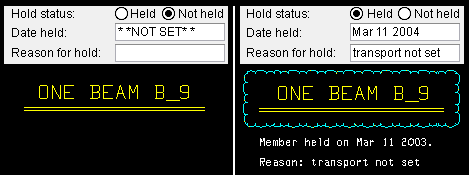
If ' Held ' is selected here, a cloud will be drawn around the callout on the member detail the next time you Detail the affected member. If a date has been entered to " Date held " and a reason has been entered to " Reason for member hold ," that date and reason will also appear on the drawing.
Selecting ' Not held ' and Detailing this member removes the cloud and annotations from the member detail.
Status Update: Member hold status
Status Display: General status options > Hold status
Status Report by XXX: Member hold status
Parametric member module: mem1.MarkedForHold
Report Writer: Member.MarkedForHold
Advanced Selection: m.MarkedForHold
Parametric module: m.MarkedForHold
Event log setup: Status
Date held: **NOT SET** or the month day year . You can enter a date here.
Effect on Detail Members : If the " Member hold status " is set to ' Held ', the date entered here will appear on this member's detail as the hold date the next time you Detail Members . The date will be reported on the member detail as illustrated above .
Status Update: Date held
Status Display: General status options > Hold status
Status Report by XXX: Member hold status
Parametric member module: mem1.DateMemberWasHeld
Report Writer: Member.DateMemberWasHeld
Advanced Selection: m.DateMemberWasHeld
Parametric module: m.DateMemberWasHeld
Reason for member hold: Any text string (up to 29 characters) describing the reason for holding a member. Valid reasons might be that materials are not available for fabrication or the engineer has specified that the member be held.
Effect on member details: After the next time you Detail Members , the entry made here will be called out on this member's detail as the reason for the hold if the " Member hold status " is currently set to ' Held '.
Status Update: Reason for hold
Status Display: General status options > Reason for hold
Status Report by XXX: Member hold status
Parametric member module: mem1.DescriptionOfHold
Report Writer: Member.DescriptionOfHold
Advanced Selection: m.DescriptionOfHold
Parametric module: m.DescriptionOfHold
Submitted for approval: **NOT SET** or the month day year (see entering dates ). The exact meaning of " Submitted for approval " is open for interpretation. Generally a ' month day year ' may be interpreted as the date when drawings or a model or design calculations pertaining to this member were sent to the engineer in responsible charge for approval. Check the " Repeat " box next to this field to apply the entered date to similar, subsequently generated members -- otherwise the default entry for those subsequently generated members will be ' **NOT SET** '.
Status Update: Submitted for approval
Status Display: Approval and modeling > Submitted for approval
Status Report by XXX: Submitted for approval
Parametric member module: mem1.DateSentForApproval
Report Writer: Member.DateSentForApproval
Advanced Selection: m.DateSentForApproval
Parametric module: m.DateSentForApproval
Event log setup: Status
Received from approval: **NOT SET** or the month day year (see entering dates ). The exact meaning of " Received from approval " is open for interpretation. Generally this status setting indicates whether or not documents or design calculations that pertain to this member have been returned from approval after having been reviewed. Check the " Repeat " box next to this field to apply the entered date to similar, subsequently generated members -- otherwise the default entry for those subsequently generated members will be ' **NOT SET** '.
Status Update: Received from approval
Status Display: Approval and modeling > Received from approval
Status Report by XXX: Received from approval
Parametric member module: mem1.DateReceivedApproval
Report Writer: Member.DateReceivedApproval
Advanced Selection: m.DateReceivedApproval
Parametric module: m.DateReceivedApproval
Event log setup: Status
Approval status: Approved or Rejected or Revise and resubmit or Approved as noted or Not reviewed .
Status Update: Approval status
Status Display: Approval and modeling > Approval status
Status Report by XXX: Approval status
Parametric member module: mem1.ApprovalStatus
Report Writer: Member.ApprovalStatus
Advanced Selection: m.ApprovalStatus
Parametric module: m.ApprovalStatus
Event log setup: Status
------- Job --------
Projected fabrication complete: **NOT SET** or the month day year (see entering dates ) that fabrication of this member is projected to be completed in the shop. This might, for example, be the deadline for fabricating all members in the sequence that this member is in. Check the " Repeat " box next to this field to apply the entered date to similar, subsequently generated members -- otherwise the default entry for those subsequently generated members will be ' **NOT SET** '.
Status Update: Projected fabrication complete
Status Display: Fabrication status > Projected for fabrication
Status Report by XXX: Projected for fabrication
Parametric member module: mem1.ProjectedDateToShop
Report Writer: Member.PojectedDateToShop
Advanced Selection: m.ProjectedDateToShop
Parametric module: m.ProjectedDateToShop
Event log setup: Status
Released for fabrication: **NOT SET** or the month day year (see entering dates ) that the detail of this member was sent to the shop (released for fabrication). Check the " Repeat " box next to this field to apply the entered date to similar, subsequently generated members -- otherwise the default entry for those subsequently generated members will be ' **NOT SET** '.
Status Update: Released for fabrication
Status Display: Fabrication status > Released for fabrication
Status Report by XXX: Released for fabrication
Parametric member module: mem1.ActualDateToShop
Report Writer: Member.ActualDateToShop
Event log setup: Status
Fabrication completed: **NOT SET** or the month day year (see entering dates ) that fabrication of the member was completed. Check the " Repeat " box next to this field to apply the entered date to similar, subsequently generated members -- otherwise the default entry for those subsequently generated members will be ' **NOT SET** '.
Status Update: Fabrication completed
Status Display: Fabrication status > Completed fabrication
Status Report by XXX: Fabrication complete
Parametric member module: mem1.DateFabricationCompleted
Report Writer: Member.DateFabricationCompleted
Advanced Selection: m.DateFabricationCompleted
Parametric module: m.DateFabricationCompleted
Event log setup: Status
Projected shipped date: **NOT SET** or the month day year (see entering dates ) that the member is scheduled to be shipped to the construction site. Check the " Repeat " box next to this field to apply the entered date to similar, subsequently generated members -- otherwise the default entry for those subsequently generated members will be ' **NOT SET** '.
Status Update: Projected shipped date
Status Display: Shipping and erection status > Shipping projected
Status Report by XXX: Projected to ship
Parametric member module: mem1.ProjectedDateToShip
Report Writer: Member.ProjectDateToShip
Advanced Selection: m.ProjectedDateToShip
Parametric module: m.ProjectedDateToShip
Event log setup: Status
Actual ship date: **NOT SET** or the month day year (see entering dates ) that the member was shipped to the construction site. Check the " Repeat " box next to this field to apply the entered date to similar, subsequently generated members -- otherwise the default entry for those subsequently generated members will be ' **NOT SET** '.
Status Update: Actual ship date
Status Display: Shipping and erection status > Shipping actual
Status Report by XXX: Actually shipped
Parametric member module: mem1.ActualDateShipped
Report Writer: Member.ActualDateShipped
Advanced Selection: m.ActualDateShipped
Parametric module: m.ActualDateShipped
Event log setup: Status
Received on job site: **NOT SET** or the month day year (see entering dates ) that the contractor received the member at the construction site. Check the " Repeat " box next to this field to apply the entered date to similar, subsequently generated members -- otherwise the default entry for those subsequently generated members will be ' **NOT SET** '.
Status Update: Received on job site
Status Display: Shipping and erection status > At job site
Status Report by XXX: Received at jobsite
Parametric member module: mem1.DateReceivedAtJobsite
Report Writer: Member.DateReceivedAtJobSite
Advanced Selection: m.DateReceivedAtJobsite
Parametric module: m.DateReceivedAtJobsite
Event log setup: Status
Erected: **NOT SET** or the month day year (see entering dates ) that the member was incorporated into the structure being built. Check the " Repeat " box next to this field to apply the entered date to similar, subsequently generated members -- otherwise the default entry for those subsequently generated members will be ' **NOT SET** '.
Status Update: Erected
Status Display: Shipping and erection status > Erected
Status Report by XXX: Erected
Parametric member module: mem1.DateErected
Report Writer: Member.DateErected
Advanced Selection: m.DateErected
Parametric module: m.DateErected
Event log setup: Status
-------- Member routes --------
'Mult. Cutting #' or ' ... ': Any definition from the User Routing Settings window for routing configuration #1 . The default name for this routing configuration is ' Mult. Cutting # '. Check the " Repeat " box next to this field to apply the entered definition to similar, subsequently generated members -- otherwise the default entry made here is the entry to line 1 for this configuration (tab) on the User Routing Settings window.
To enter a definition: Press the "file cabinet" browse button (
Status Update: Route...
Status Display: Member status > Member route...
Parametric member module: mem1.Route1Description
Report Writer: Member.Route1Description
Advanced Selection: m.Route1Description
Parametric module: m.Route1Description
'Labor Code' or ' ... ': Same as above , except that here you can enter definitions set up for user routing configuration 2 . The default name for this routing configuration is ' Labor Code '.
The configuration 2 routing definition that you apply to this member will be entered (during auto detailing ) to line 1 of the " Labor Code " column on the member bill of material.
Parametric member module: mem1.Route2Description
Report Writer: Member.Route2Description
Advanced Selection: m.Route2Description
Parametric module: m.Route2Description
'Job Cost Code or ' ... ': Same as above , except that here you can enter definitions set up for user routing configuration 3 . The default name for this routing configuration is ' Job Cost Code '.
The configuration 3 routing definition that you apply to this member will be entered (during auto detailing ) to line 1 of the " Job Cost Code " column on the member bill of material.
Parametric member module: mem1.Route3Description
Report Writer: Member.Route3Description
Advanced Selection: m.Route3Description
Parametric module: m.Route3Description
'Remarks' or ' ... ': Same as above , except that here you can enter definitions set up for user routing configuration 4 . The default name for this routing configuration is ' Remarks '.
The configuration 4 routing definition that you apply to this member will be entered (during auto detailing ) to line 1 of the " Remarks " column on the member bill of material.
Parametric member module: mem1.Route4Description
Report Writer: Member.Route4Description
Advanced Selection: m.Route4Description
Parametric module: m.Route4Description
To close this window :
![]()
![]()
![]()
"OK" (or the Enter key) closes this window and reactivates the member edit window (e.g. Beam Edit window or etc.) from which this window was opened.
If, after you press " OK " here, you press " Cancel " on the member edit window, any status changes you made on this window will not be applied.
If you apply a status change to a single member and get the " Do you want to change all ... " dialog when you press " OK " on the member edit window, then pressing " Yes " on that dialog applies your status change to all members with the same mark.
"Cancel" (or the Esc key) closes this window without saving any changes.
" Cancel " does not undo the addition of a ' New Revision ' to the menu for " Short revision description ." However, it does make that menu revert back to its original selection.
"Reset" undoes all changes made to this window since you first opened it. The window remains open.
" Reset " does not undo the addition of a ' New Revision ' to the menu for " Short revision description ." However, it does make that menu revert back to its original selection.

