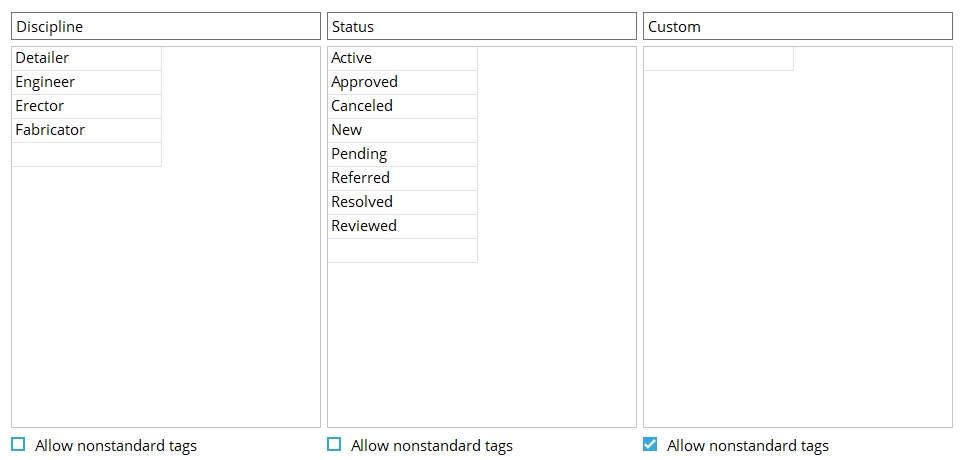
Predefined Note Tags
- General Overview
- Tips and Tricks
- Related Tools

Discipline is the default name of the leftmost column of tags on this screen. You can change this name if you like. Similarly, you can add or delete or edit the tags that appear in this column.
Example: Suppose you are an independent detailer who uses notes to communicate with the fabricator you are working for. You don't use notes to communicate with anybody else involved in the project. You might, therefore, want only two tags in this column: Fabricator and Detailer. The Detailer tag would be applied to notes written by you. The Fabricator tag would be applied to notes written by the fabricator. You could then choose to view, in the Note Viewer, only those notes written by the fabricator, or only those written by you.
Also see: Any tag entered on this screen can be selected as the Discipline tag for a particular note (xxx) on that note's Edit Note xxx window.
Status is the default name of the middle column of tags on this screen. You can delete, edit or change the tags if you like, and you can even change the name of this column.
Example: You don't like the name Status for this column because you think it might be confused with Status Display. You change the column head to "Detailer" and replace all of the tags that are entered to that column with the names Wallace and Charlie and Sue -- the names of the detailers that will be working on the project. This will help you to sort notes by the person who authored them when you are in the Note Viewer.
Note: The tags in this column have absolutely nothing to do Status or Edit Properties. You might think that they pertain to other SDS2 status settings, but they don't.
Also see: Any tag entered on this screen can be selected as the Status tag for a particular note (xxx) on that note's Edit Note xxx window.
Custom is a blank column for adding any note you choose. As with the other columns, you can change this columns name or add or edit any tags that are in it.
Also see: Any tag entered on this screen can be selected as the Custom tag for a particular note (xxx) on that note's Edit Note xxx window.
Allow nonstandard tags: ![]() or
or ![]() . You can find three instances of this check box option, one each under the three columns Discipline and Status and Custom.
. You can find three instances of this check box option, one each under the three columns Discipline and Status and Custom.
If this box is checked (
) for a particular column, then users can add new tags of that class while adding/editing a note on the Edit Note xxx window in Modeling See Discipline, Status and Custom.
If the box is not checked (
), the users can only use tags that are in setup (on this screen). This will help keep the number of tags down. If you have setup password protected, it will also prevent unauthorized users from creating any new tags of their own.


|
|
OK (or the Enter key) closes this screen and applies the settings.
Cancel (or the Esc key) closes this screen without saving any changes.
Reset undoes all changes made to this screen since you first opened it. The screen remains open.
- Notes (topic)
- Add Note
- Edit Note xxx
- Note Viewer
 or
or 


