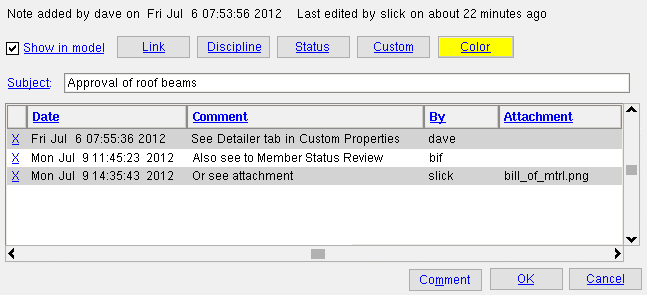
 The Edit Note xxx window (xxx = the " ID " number of the note)
To open this window :
- Add Note to Model (opens this window)
- In the model, double-click a note ("
 Notes " must be displayed)
- Double-click a note in the Note Viewer
Also see :
- Notes (topic)
- Notes ( Display Options )
- Predefined Note Tags ( Home > Project Settings > Job )
- Copy Notes (related tool)
- Move Notes (related tool)
- Notes in Edit Properties (unrelated -- a different kind of note)
Tags, links, etc :
If this box is checked (
), the note will be shown in Modeling when "
Notes " in Display Options is checked and a view in which the note resides is Open .
If the box is not checked (
), the note cannot be shown in the model. To view the note, you will need to use the Note Viewer . The " Type " of note which cannot be shown in the model (because this box is not checked) is referred to as a ' Project ' note.
"Link" may read Member 32 or something similar. If the note is already linked to a member, this button does not read " Link ," but instead shows the member number of that member.
|
To link to a member, click this button to open a list of members in your current Job . From that list, choose the one (1) member that you want the note to be linked to.
Why link to a member? A note that is linked to a member is, in the Note Viewer , the " Type " referred to as a ' Member ' note, and you can filter members by their " Type ." If you move a member with a member note, the note will move with that member. If you delete the member, the note is also deleted.
Discipline may read Detailer or Engineer or etc. , depending on which tag is selected. If no tag is selected, the header for the " Discipline " column at Home > Project Settings > Job > Predefined Note Tags will be shown. If multiple tags are selected, ellipses ( ... ) will be used after the name of the first selected tag to designate that other tags are also selected.
To select multiple tags, hold down the Shift key or the Ctrl key. Holding down the Ctrl key and clicking already selected tags deselects those tags. If no tags are selected, the header for the " Discipline " column at Home > Project Settings > Job > Predefined Note Tags will be shown.
To enter your own tag: If the box for "
Allow nonstandard tags " is checked under the " Discipline " column at Home > Project Settings > Job > Predefined Note Tags , you can type in a tag that is not listed in that setup window.
Status may read Active or Approved or Cancelled or etc. , depending on which tag is selected. If no tag is selected, the header for the " Status " column at Home > Project Settings > Job > Predefined Note Tags will be shown. If multiple tags are selected, ellipses ( ... ) will be used after the name of the first selected tag to designate that other tags are also selected.
To select multiple tags, hold down the Shift key or the Ctrl key. Holding down the Ctrl key and clicking already selected tags deselects those tags. If no tags are selected, the header for the " Status " column in setup will be shown.
To enter your own tag: If the box for "
Allow nonstandard tags " is checked under the " Status " column at Home > Project Settings > Job > Predefined Note Tags , you can type in a tag that is not listed in that setup window.
Note: The tags that you can apply to a note here have absolutely nothing to do Status or Edit Properties . You might think that they pertain to other SDS2 status settings, but they don't.
Custom may read Custom or etc. Since, by default, no tags are entered to the " Custom " column at Home > Project Settings > Job > Predefined Note Tags , the header of the " Custom " column is shown here by default. If a tag has been selected, then that tag is shown instead of the default. If multiple tags are selected, ellipses ( ... ) are used after the name of the first selected tag to designate that other tags are also selected.
To select multiple tags, hold down the Shift key or the Ctrl key. Holding down the Ctrl key and clicking already selected tags deselects those tags. If no tags are selected, the header for the " Custom " column at Home > Project Settings > Job > Predefined Note Tags will be shown.
To enter your own tag: If the box for "
Allow nonstandard tags " is checked under the " Custom " column at Home > Project Settings > Job > Predefined Note Tags , you can type in an entry that is not listed in that setup window.
"Color" shows you the current color of the note and lets you change that color.
To make an entry: Click this button to launch your operating system's color picker. Consult your operating system's documentation for more information. Different operating systems have different color pickers. After you have chosen a different color, the " Color " button will change colors to match your choice.
page 1 | contents | model | top
User-entered information :
Subject: You can type any string of characters to serve as the " Subject ."

|
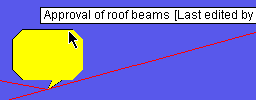
The tool tip ( balloon description ) for a note shows the note's " Subject ." |
| The tool tip also shows by whom the note was last edited, and the date & time when it was last edited. | |
The " Subject " is usually the first information that somebody looks at when reading a note. You should write your " Subject " to be brief and clear. The " Subject " is prominently displayed in the " Subject " column in the Note Viewer and also appears in the tool tip ( balloon description ) that may be shown when the note is hovered.
----------------------------------------------------------------------
X: Can be used to delete a comment .
To delete a comment, click the " X " to the left of the comment, or you can right-click on the comment and choose " Delete Comment ." The comment will disappear. If you then press " OK " to close this window, the comment will be removed permanently. On the other hand, if you close this window by pressing " Cancel ," the deleted comment will reappear when this window is opened again.
Date: The date and time that the comment was added.
To add this information: Press the " Comment " button. The " Date " will be added automatically.
To change the date and time, type over the old date/time.
Comment: Any string of characters can be written. You may prefer to add a .txt file or .pdf file or graphics file as an " Attachment " instead of writing a lengthy comment, since comments must be manually scrolled one line at a time and, therefore, are difficult to read.
To add a comment: Press the " Comment " button. A new line, including " Date " and " By " information, will be added. Type the " Comment " string that you want.
To change the comment, type over that part of the original comment which you want to change.
By: The login name of the person who added the comment.
To add your login name: Press the " Comment " button. Your login name will be added automatically.
To change the name, type over the old name.
Attachment: Blank or the file name or the path of the attachment to the note . Attachments can be text files, or PDF files, or spread sheets, or graphics files. Before you can add an attachment, you need to have added a " Comment ."
|

|
|
opens after you select the file for attachment |
To add an attachment, click the space under the " Attachment " column that corresponds to the comment you want to add the attachment to. You will be prompted to select the file that you want to add. You will then get a dialog like that shown above. Press the " Yes " or " No, link ... " button.
Should you copy or link? If your current Job is used only within your local network, you can safely link to the file (by pressing the " No, link to the file " button). Everybody within your local network will be able to read it. You may, however, wish to protect the linked file from being written to by others. If the attachment is for a party outside of your local network, you should press the " Yes " button since, otherwise, the link will be broken as soon as you transfer the Job to that other network. A file that is stored in your current Job (because you pressed " Yes ") is placed in the
notes folder.
To view the attachment, simply double-click its file name or path, or you can right-click on the comment and choose " View ." For the example shown at the top of this page, you would double-click " bill_of_mtrl.png ". Your operating system will then open the double-clicked file with the appropriate application, or prompt you to choose an application.
To detach an attachment, click the " X " to the right of the attachment's file name (or its path, if it is linked). Alternatively, you can right-click and choose " Detach ." For this deletion to be permanent, you need to press " OK ."
Tip: Depending on your custom property " Flavor ," you may be able to send attachments using the Attachment Tool .
page 1 | contents | model | top
"Comment" automatically adds a comment. The comment might be added in order to also add an " Attachment ," or a comment can be added without an attachment. Multiple comments can be added to a note .
The comment's " Date " and " By " information will be filled out automatically.
The " Comment " string must be typed in manually.
The adding of an " Attachment " is optional.
"OK" (or the Enter key) closes this window and makes permanent any changes that you to it.
For example, if you pressed the " X " to delete an attachmen t, or if you pressed the " X " to delete a comment , or if you edited the " Comment ," your changes will become permanent when you press " OK ."
"Cancel" closes this window without saving the changes you made to it.


