The Arc Edit window ( Drawing Editor )
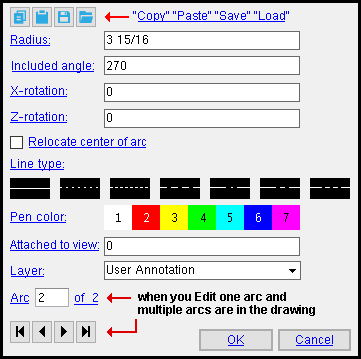
Settings on this window are read-only if you are editing an arc that is not on a comment layer and your current drawing is not a crane placement drawing . If your current drawing is a crane placement drawing, you can add or edit objects on non-comment layers as well as on comment layers. Instructions on this page assume you are NOT in a crane placement drawing.
- To open this window:
- Arc Add ***
- Arc Add Center, Start, End ***
- Arc Add Center, Start, Angle (
 ) ***
) *** - Arc Add Continuous ***
- Arc Add 3 Point ***
- Arc Add Ellipse (
 ) ***
) *** - Arc Edit (including multiple ) or double-click an arc
- Arc Edit All
- For operations marked *** , User and Site Options > Drawings > "
 : Always show Arc Edit window " must be checked for this window to open.
Also see :
- Linetype (sets default dash pattern & color for Add Arc )
- Grayed out fields (indicate mixed entries or that the field is disabled)
- Multi Items Edit (related window)
 " Copy " " Paste " " Save " " Open " buttons :
page 1 | contents | objects > arcs > | objects -- arcs | top
------ Settings ------
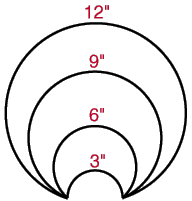
Radius: The distance (in the primary dimension " Units " or in other units ) between the center of the arc and any point on its perimeter. If you are adding an arc, the distance reported here will be the minimal radius required to create an arc that is a half-circle.
|
| These four arcs have start and end points in the same locations but different radiuses, which are noted above each arc. |
Note: Changing the " Radius " but not changing the " Included angle " results in the included angle being recalculated after you press " OK ."
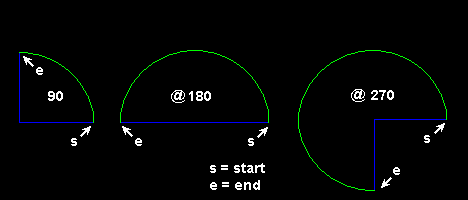
Included angle: The angle (> 0 and < 360 degrees) made at the intersection at the center of the arc's circle by radii frorm the start and end points of the arc. If, in your current drawing, you hover the arc with your mouse pointer ( ![]() ), these two radii are depicted as blue lines.
), these two radii are depicted as blue lines.
|
|||
| The start point of an arc is the point on the arc that is clockwise from all other points on the arc. The end point of an arc is the point on the arc that is most counterclockwise from all other points on the arc. |
Changing the " Include angle " moves the end point. The start point remains anchored.
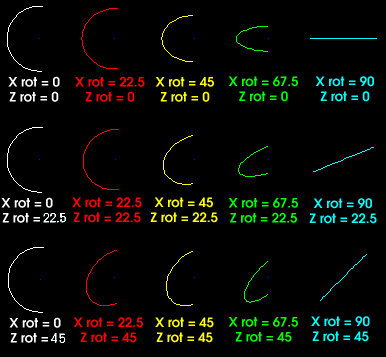
X rotation: The positive or negative number of degrees of X axis rotation ( 90 to -89.9999 ) that the arc you are adding or editing is to be rotated with respect to the X screen axis .
|
' 0 ' (zero) means no X-axis rotation of the arc.
A ' positive or negative number ' of degrees flattens an arc.
Z rotation: The positive or negative number of degrees of Z axis rotation ( 90 to -90 ) that the arc you are adding or editing is to be rotated with respect to the Z screen axis .
|
' 0 ' (zero) means no Z rotation of the arc. A ' positive number ' of degrees rotates the arc clockwise. A ' negative number ' of degrees rotates the arc counterclockwise.
Relocate center of arc: ![]() or
or ![]() . This option is disabled (grayed out) if you are editing multiple arcs or the arc is not on a comment layer .. If the one arc is on a comment layer, this option lets you change the " Radius " and " Included angle " of that arc by relocating the arc's center point in your current drawing. The start and end points of the arc do not change when you relocate it's center.
. This option is disabled (grayed out) if you are editing multiple arcs or the arc is not on a comment layer .. If the one arc is on a comment layer, this option lets you change the " Radius " and " Included angle " of that arc by relocating the arc's center point in your current drawing. The start and end points of the arc do not change when you relocate it's center.
|
|
|
bindings |

|
| These four arcs have start and end points in the same locations but different centers. The radius of each arc is noted above it. |
If you check this box (
) then press " OK " to close this window, Locate- Pan -Return mouse bindings become active along with various Locate options, and you are prompted to relocate the center of the arc When you re-open this window after left-click ( Locate ) to reposition the arc's center, you will find that the arc's " Radius " and " Included angle " have changed, and that this option is no longer checked.
This box is not checked (
) when this window opens.
Line type: No button is pressed if you are editing multiple arcs that have different dash patterns.
|
|
| The button that is pressed sets the line type (dash pattern) of the arc you are adding or editing. |
Pen color: 1 or 2 or 3 or 4 or 5 or 6 or 7 . No button is pressed if you are editing multiple arcs that have different pen numbers.
|
|
| The selected button sets the printing pen number (and on-screen display color) of the arc. Line Weights assigns a particular thickness to each " Pen color ." |
Attached to view: A number designating the view that this arc is attached to. This applies mainly to member details , since member details are likely to show more views than submaterial details , the only other type of drawing on which you might find multiple views. For instance, a column detail may have a view of face A, face B and face C. It may also have various section views (Section A-A, Section B-B, Section C-C). All graphical objects that are in a particular view are assigned the same number.
Assigning the correct number to an object (line, weld symbol, label, etc.) provides maximum compatibility when the comment layer you add that object to is viewed or printed in a full-featured SDS2 program .
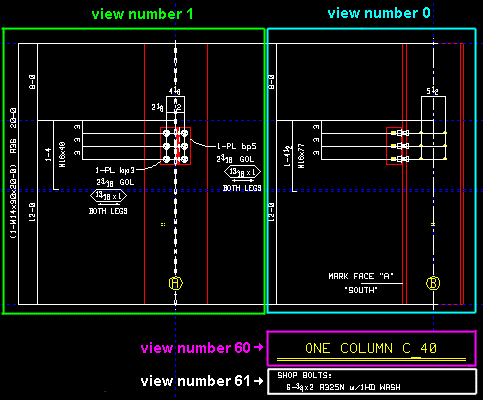
To show a view's number, you can add the X-Y-Z Display to your toolbar.

In the Drawing Editor , the X-Y-Z Display shows the view number that the point location target (
) is over.
Layer: A drawing layer (any layer given a " Name ") in your current drawing. This is the drawing layer that the arc you are adding or editing will be drawn on after you press " OK " to close this window. If that layer happens to be a hidden layer (not marked " Show "), the arc will disappear after the first Redraw .
![]()
Assuming that your current drawing is NOT a crane placement drawing :
• If the layer listed here is a non-comment layer, options on this window are read-only.
• If this window is editable, you can only select a comment layer from the list box's selection menu (
).
• For an Add Arc operation, the default selection (
) will be a comment layer that is automatically created for you. Or, if you so choose, you can select a comment layer on the layer selection tool before you begin the add operation. For an Arc Edit operation, the default selection is the layer that the arc is currently on.
For Arc Edit operations only :
Arc _ of __ (not applicable to Add Arc or multiple edit or arcs on non-comment layers) : The number of the one arc you are editing and the total count of all arcs in your current drawing. You can use the VCR buttons to select a different arc on a comment layer and edit it while still on this window. When an arc on a shown layer is selected, it is displayed in green (cyan if its actual color is green). The selected arc must be on a shown layer for it to be shown.
|
|
| VCR buttons (first-previous-next-last) for selecting an arc to edit. |
Note: If you change one arc, then select a different arc number, the first arc remains changed even if you press " Cancel " on this window.
page 1 | contents | objects > arcs > | objects -- arcs | top
Possibility #1:
Press the " OK " button if this window is for review only
(if you are editing an arc that is not on a comment layer ).
Possibility #2:
If you are adding or editing an arc on a comment layer ,
the bottom of this window will show the following buttons:
![]()
![]()
"OK" (or the Enter key) closes this window and completes the Add Arc or Arc Edit operation.
Defaults: When you press " OK ," the settings on this window -- except mixed entries -- become the default settings for the next arc you Add during this session of the Drawing Editor . Even if all you do is double-click an arc that is on a comment layer and press " OK " without making any changes on this window, this window's settings become the defaults for the next-added arc ( exceptions: " Pen color " & " Line type " if you changed the Edit Palette in the meantime). The settings on this window do not become the defaults for new arcs if you press " Cancel " to close this window (unless you used the " Arc _ of __ " widget).
"Cancel" (or the Esc key or the ![]() button) closes this window without saving any of the changes made to it. In the case of an Arc Edit operation where you have changed more than one arc, " Cancel " only applies to the arc currently selected in the " Arc _ of __ " widget.
button) closes this window without saving any of the changes made to it. In the case of an Arc Edit operation where you have changed more than one arc, " Cancel " only applies to the arc currently selected in the " Arc _ of __ " widget.
Tip 1: Although " Cancel " does not cancel changes made to more than one arc, Undo (after you have closed this window) does undo all changes made using this window.
Tip 2: If you double-click an arc that is on a comment layer just to review it and don't want to set the defaults for to-be-added arcs, the best way to close this window is to press " Cancel. "
page 1 | contents | objects > arcs > | objects -- arcs | top
