 Bill of Material Editor ( Drawing Editor )
Tool summary :
- See (on this page):
- Step-by-step instructions
- Columns that may appear in the bill editor, relevance to line 1
Piece Mark Unit Quantity Total Quantity Unit Weight Total Weight Description - Columns that may appear in the bill editor
Also see :
- Bill of Material Layout (sets columns shown in bill editor)
- Automatic detailing (updates a bill in a full-featured SDS2 program )
page 1 | contents | objects > bill of material > | bill of material | top
 Step-by-step instructions :
The following instructions apply to all types of Drawing Editor drawings except submaterial details (for which the bill editor is not available):
1 . Open the bill editor using any one (1) of the following methods:
Method 1 : Click the Bill of Material Editor icon. The icon can be taken from the group named ' Objects -- Bill of Material ' and placed on a toolbar (classic) or the ribbon (lightning).
Method 2 : If " Drawing Editor layout style " is ' Classic ', you can use the menu system to choose Objects > Bill of Material > Review Bill .
Method 3, 4 or 5 : Bill of Material Editor can also be invoked using a keyboard shortcut , the context menu , or a mode . For the ' Lightning ' layout style, configuration of the interface is done using Customize Interface .
How many and what columns appear in the bill editor depends on the choices made to Fabricator Setup > Bill of Material Layout .
If you are viewing a system-generated member detail , be aware that although the bill of material was originally generated automatically, it may have since been manually modified by the user of a full-featured SDS2 program .
If you are viewing a sheet, any information in the bill editor has been entered by a user of a full-featured SDS2 program . This information compiles into the top of the bill of material , and therefore is plotted before information that is compiled from individual drawings that are placed on that sheet.
If you are viewing a sheet outline with a bill of material , the information in the bill editor is compiled at the top of each bill of material on each sheet that is created using that sheet outline.
3 . When you are done reviewing the bill of material, press the " OK " button to exit.
page 1 | contents | objects > bill of material > | bill of material | top
 Columns that may appear in the bill editor, relevance to line 1 :
An unique characteristic of a bill of material for a system-generated member detail is the first line (line 1), which tells information about the members that have been assigned the piecemark that identifies the particular member detail and its bill of material. The lines following line 1 relay information about the submaterials that make up those members with that piecemark.
"Piece Mark" in line 1: The member piecemark (click here ) that identifies each of the members that are described in this member detail and on this bill of material.
Member mark in the bill editor: 
Member mark in the detail callout: 
"Unit Quantity" in line 1: By default, this cell is left blank because a member's " Unit Quantity " is always going to be 1 or the same as the " Total Quantity ," depending on how you want to define it. Users of a full-featured SDS2 program can, however, manually enter a " Unit Quantity " to line 1. No other lines in the bill will be affected by an entry that the user makes to this cell.
"Total Quantity" in line 1: The total number of members . This quantity is also reported on the callout on the member detail and in the " Quantity " field on the Drawing Data window.
| Before changing the member total: |

|
| After changing the member total: |

|
Relations with other fields in this bill: The " Total Quantity " on line 1 (the number of members) times the " Unit Quantity " reported on subsequent lines (the number of individual submaterials) equals the " Total Quantity " of those individual submaterials reported on those subsequent lines.
"Unit Weight" in line 1: The total weight of one member . This weight is calculated from the total weight of all submaterials making up a single member.
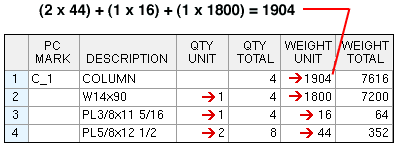
Setup considerations: How bill weight is calculated depends on whether the choice made to the setup option " Shop bill weight based on " is ' Volume ' or ' Length '. Whether the weight is in pounds or kilograms depends on whether you are using imperial or metric dimensioning.
"Total Weight" in line 1: The " Unit Weight " of a single member times the " Total Quantity " of members. The " Total Weight " of the member (as reported in line 1) is also the combined " Total Weight " of all submaterials (as reported in subsequent lines).
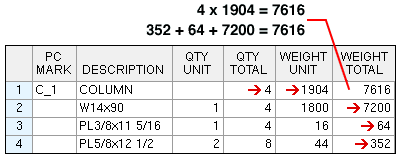
Setup considerations: How bill weight is calculated depends on whether the choice made to the setup option " Shop bill weight based on " is ' Volume ' or ' Length '. Whether the weight is in pounds or kilograms depends on whether you are using imperial or metric dimensioning.
"Description" in line 1: The member type of the member. This description is also reported on the " Mtrl Description " field on the Drawing Data window and on the detail callout. In the example below, the user of a full-featured SDS2 program changed COLUMN to COLON.
| Description in the bill editor: |

|
| Description in the detail callout: |
|
|
| Description in the Drawing Data window: |
|
|
Also see: Home > Project Settings > Fabricator > Piecemarking > Member Descriptions sets the default entry made here when auto detailing of members is done in a full-featured SDS2 program .
page 1 | contents | objects > bill of material > | bill of material | top
 Columns that may appear in the bill editor :
The lines below line 1 on a bill of material for a system-generated member detail relay information about the submaterials that make up the members that have the member piecemark.
Unit Quantity: The total number of pieces of this material required to fabricate a single member.
| Cells that are related to unit quantity: |

|
Relations with other fields in this bill: The " Unit Quantity " entered here directly relates to the " Total Quantity " and " Total Weight " of the material and also to the " Unit Weight " and " Total Weight " in the line 1.
Setup: A " Unit Quantity " column appears here, in the bill editor, only if a " Print Order " or " Report 1 or 2 or 3 Order " has been entered to " Unit Quantity " in Bill of Material Layout in setup.
Total Quantity: ( Unit Quantity ) x ( Total Quantity in line 1). This is the total number (count) of the pieces required to fabricate the " Total Quantity " of members with this same piecemark.
Setup: A " Total Quantity " column appears here, in the bill editor, only if a " Print Order " or " Report 1 or 2 or 3 Order " has been entered to " Total Quantity " in Bill of Material Layout in setup.
Description: For a submaterial, the section size of the piece.
| A particular material description: |

|
| A different material description: |

|
Relations to other fields in this bill: The " Description " (section size) and " Length " of a submaterial are used to calculate that material's volume and " Unit Weight " and " Total Weight ." The " Description " cell in line 1 does not record the section size.
Setup: A " Description " column appears here, in the bill editor, only if a " Print Order " or " Report 1 or 2 or 3 Order " has been entered to " Description " in Bill of Material Layout in setup.
Length: The distance (in the primary dimension " Units " or other units ) along the X material axis of the submaterial.
| Calculated weights depend on material length: |

|
Relations to other fields in this bill: This field directly relates to the material's " Unit Weight " and " Total Weight ." " Unit Weight " and " Total Weight " in line 1.
Setup: A " Length " column appears here, in the bill editor, only if a " Print Order " or " Report 1 or 2 or 3 Order " has been entered to " Length " in Bill of Material Layout in setup.
Unit Weight: ( Unit Quantity ) x ( Description weight/length) x ( Length ). The unit weight is in pounds or kilograms depending on the primary dimension " Units ."
Relations with other fields in this bill: The " Unit Weight " entered here directly relates to the material's " Total Weight " and also to the " Unit Weight " and " Total Weight " reported in line 1.
Setup: How bill weight is calculated depends on whether the choice made to the setup option " Shop bill weight based on " is ' Volume ' or ' Length '. A " Unit Weight " column appears here, in the bill editor, only if a " Print Order " or " Report 1 or 2 or 3 Order " has been entered to " Unit Weight " in Bill of Material Layout in setup.
Total Weight: ( Unit Weight ) x ( Unit Quantity ) x ( Total Quantity in line 1). The total weight is in pounds or kilograms depending on the primary dimensioning " Units " that are selected.
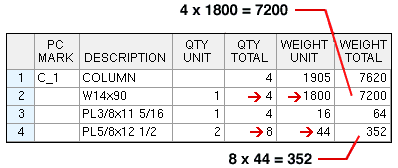
Setup: How bill weight is calculated depends on whether the choice made to the setup option " Shop bill weight based on " is ' Volume ' or ' Length '. Whether the weight is in pounds or kilograms depends on whether you are using imperial or metric dimensioning. A " Total Weight " column appears here, in the bill editor, only if a " Print Order " or " Report 1 or 2 or 3 Order " has been entered to " Total Weight " in Bill of Material Layout in setup.
Remarks: This column may contain various information from different sources . It may be blank in the bill editor, even though it is filled out with information in the physical bill of material . Washer information and camber can populate this column automatically. If " Steel Grade " and/or " Mult. Cutting # " and/or " Labor Code " and/or " Job Cost Code " and/or " Advance mill # " are set to ' Merge ' on the Bill of Material Layout window, they are automatically entered into the " Remarks " column on the physical bill of material , but they appear in separate columns next to the " Remarks " column here, in the bill editor, to facilitate editing. Users of a full-featured SDS2 program may choose to manually type in remarks to this column.
|
entries to " Labor Code " and " Job Cost Code "
are printed in the " Remarks " column |

|
Setup: A " Remarks " column appears here, in the bill editor, only if a " Print Order " or " Report 1 or 2 or 3 Order " has been entered to " Remarks " in Bill of Material Layout in setup.This is true even if other fields have been set to ' Merge ' to the " Remarks " column.
Washers: The number of washers required for each field bolt or shop bolt may be noted in the " Remarks " column. FL = a flat washer. HD = a hardened washer. BVL = a bevel washer. PL = a plate washer. LD = a load washer.
Nuts: If a bolt has more than one nut, that extra nut is normally listed in the " Remarks " column on the same line that the bolt is listed.
Minor Mark: The material's submaterial piecemark (click here for more information). Since submaterials are named after their submaterial mark, this is also, by default, the name of the submaterial detail.
| w5 is the material mark for W14 x 90 |

|
Setup: This column appears here, in the bill editor, if a " Print Order " or " Report 1 or 2 or 3 Order " has been entered to " Piece Mark " on the Bill of Material Layout window in setup. It also appears (but is plotted into the " Piece Mark " column) if the category " Minor Mark " on the Bill of Material Layout window is set to ' Merge '.
Steel Grade: The steel grade of the material.
| the steel grade for W14 x 90 is A992 |

|
Setup: This column appears here, in the bill editor, if a " Print Order " or " Report 1 or 2 or 3 Order " has been entered to " Steel Grade " on the Bill of Material Layout window in setup. This column also appears here (but is plotted in the " Remarks " column) if the category " Steel Grade " on the Bill of Material Layout window is set to ' Merge ' and the " Remarks " column has been given a print order.
Mult. Cutting #: Any user-entered definition from User Routing Configuration #1 that has been applied to the material. The Mult Cutting Number may be a maximum of 12 characters in length.
| definitions from user routing configuration 1 |

|
Setup: This column appears here, in the bill editor, if a " Print Order " or " Report 1 or 2 or 3 Order " has been entered to " Mult. Cutting # " on the Bill of Material Layout setup window. This column also appears here (but is plotted in the " Remarks " column) if the category " Mult. Cutting # " on the Bill of Material Layout window is set to ' Merge ' and the " Remarks " column has been given a print order.
Labor Code: Any user-entered definition from User Routing Configuration #2 that has been applied to the material. The " Labor code " as defined in Bill of Material Layout may be no longer than 12 characters in length.
| definitions from user routing configuration 2 |

|
Setup: This column appears here, in the bill editor, if a " Print Order " or " Report 1 or 2 or 3 Order " has been entered to " Labor Code " on the Bill of Material Layout setup window. This column also appears here (but is plotted in the " Remarks " column) if the category " Labor Code " on the Bill of Material Layout window is set to ' Merge ' and the " Remarks " column has been given a print order.
Job Cost Code: Any user-entered definition from User Routing Configuration #3 that has been applied to the material. The Job Cost Code as defined in Bill of Material Layout may be no longer than 12 characters in length.
| definitions from user routing configuration 3 |

|
Setup: This column appears here, in the bill editor, if a " Print Order " or " Report 1 or 2 or 3 Order " has been entered to " Job Cost Code " on the Bill of Material Layout setup window. This column also appears here (but is plotted in the " Remarks " column) if the category " Job Cost Code " on the Bill of Material Layout window is set to ' Merge ' and the " Remarks " column has been given a print order.
Sequence: The sequence ( alpha-numeric ) of the members being referenced in the bill of material.
Please note: Members that are in different sequences may be assigned the same piecemark when the setup option " Break major marks apart by " is set to something other than ' Sequence ' or ' Zone '. This column tells you what sequences have been assigned to the members. For instance, if three different sequences have been assigned, they are all listed.
Also note: The " Sequence " column appears separate from other bill columns in the bill editor, whereas on the plotted bill (and the physical bill of material ) the column appears in the " Plot Order " set in Bill of Material Layout . " Sequence " and " Sequence Quantity " are separate to make using the bill of material editor easier.
Setup: A " Sequence " column appears here, in the bill editor, when " Sequence Quantity " and/or " Sequence " has been set to be printed. However, if no print order has been entered to " Sequence " in Bill of Material Layout , this column does not appear in a physical bill of material .
Sequence Quantity: The number (count) of members that have been assigned the sequence reported in the " Sequence " column.
Relations with other fields in this bill: The quantities in individual sequences listed in this column added together equal the " Total Quantity " of members reported in line 1.
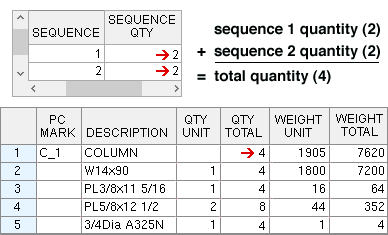
Please note that the " Sequence Quantity " column appears separate from other bill columns in the bill of material editor, whereas on the plotted bill (and the physical bill of material ) the column appear in the " Plot Order " set in Bill of Material Layout . " Sequence Number " and " Sequence Quantity " are separate to make using the bill of material editor easier.
Setup: A " Sequence Quantity " column appears here, in the bill editor, IF " Sequence Number " and/or " Sequence Quantity " is set to be printed. However, if no " Print Order " is entered to " Sequence Quantity " in Bill of Material Layout , this column does not appear in the physical bill of material .
Advance Mill #: The ABM ID ( page-line or system ID).

|
| In this example, only the member main material has been assigned an ABM page-line. |
Setup: A " Advance mill # " column appears here, in the bill editor, only if a " Print Order " or " Report 1 or 2 or 3 Order " has been entered to " Advance mill # " in Bill of Material Layout . The " Advance mill " number column appears next to " Sequence Number " and " Sequence Quantity " in the bill editor if members exist in more than one sequence in the model.
Unit Surface Area: The surface area of the individual piece (or member, on line 1) is reported in square feet or square meters depending on the primary dimension " Units ."

|
| The calculated value of 150.8 is based on adding up the stored values that users of a full-featured SDS2 program can see when they right-click in a cell, not on the reported values of 1.4 and 145.3 that are shown in this example. |
For a member (line 1), the unit surface area that is reported is equal to the combined surface areas of all submaterials which make up that member. The program does not subtract surfaces that are face-to-face with the member main material.
For a submaterial, the unit surface area that is reported is for that one material only. The unit quantity of that material (its quantity on the member) is irrelevant.
Setup: A " Unit Surface Area " column appears here, in the bill editor, if a " Plot Order " or " Report 1 or 2 or 3 Order " has been entered to " Unit Surface Area " in Bill of Material Layout in setup. The column also appears here (but is plotted in the " Remarks " column) if " Unit Surface Area " is set to ' Merge ' and the " Remarks " column has been set to be printed or included on a report.
Total Surface Area: The combined surface area in square feet or square meters depending on the primary dimension " Units ."
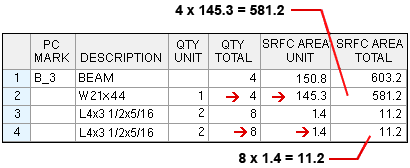
For a member (line 1) , this is the combined surface areas of the submaterials required to fabricate all shipping members that are assigned the same major mark.
For a submaterial, this is the combined surface areas of the total quantity of materials referenced in a particular line in the bill of material.
Custom property: Columns of various user-defined names may appear in the bill editor. These columns may contain custom property data that has been entered, in Modeling , to the Edit Properties window for members or material.
For a member custom property, the data associated with the custom property will be compiled into line 1 of the bill.
For a material custom property, the data associated with the custom property will be compiled to lines subsequent to line 1 of the bill.
Setup: The name of this column is set per Home > Project Settings > Fabricator > Bill of Material Layout . The ability to define a custom property column becomes available to Bill of Material Layout only if a member or material custom property schema has been properly set up in a full-featured SDS2 program .
page 1 | contents | objects > bill of material > | bill of material | top