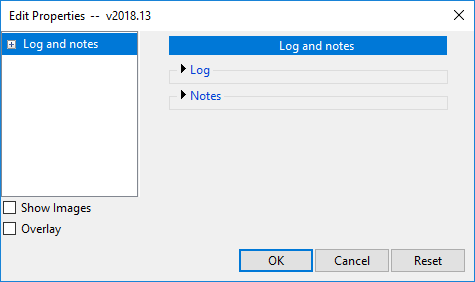
The Edit Properties window ( editable )
- The Edit Properties window can be opened in your current Job only if the " Flavor " that was selected at the time your current Job was created was a modular flavor. For legacy custom properties, the Custom Properties window -- not this window -- is the window that opens.
- The window is populated with custom properties for members or materials or your current Job -- click here .
- Most options on this window are editable in an SDS2 review station . Options for members whose schema entries are set to "
 Use to split piecemarks " or " Add to Erection View Member Labels " are not editable.
- See (on this page):
Also see :
|
- Activate Custom Properties ( Home > Project Settings > Job -- adds/removes leaves containing properties to this window)
- Event Logging Setup (applies to the "
 Log ")
- Entries made in Edit Properties can be tracked using the Report Writer :
| Data class | Path in Report Writer |
| current Job | CurrentLocation.JobCustomProperties |
| member | Member.CustomProperties |
| material | MemberMaterial.Material.CustomProperties |
- Status Display can color code, mask or isolate members or materials for which custom properties have been entered:
| Data class | In Status Display , choose: |
| member | Member status > Member custom property |
| material | Material status > Material custom property |
- Python scripts can be created to read member or material or Job custom properties:
# Prints the entry to the member property named 'Painted'.
    from member import MemberLocate, MemberProperties
    from param import ClearSelection
    mem = MemberLocate("Select a member")
    mem_prop = MemberProperties(mem)
    print(mem_prop['Painted'])
    ClearSelection()
# Prints the entry to the material property named 'GALV'. from mtrl_list import MtrlLocate, MtrlProperties mtrl = MtrlLocate("Select a material", "Single") mtrl_prop = MtrlProperties(mtrl) print(mtrl_prop['GALV'])# Prints entries to Job properties named 'Architect', 'EOR'. from job import JobProperties job_prop = JobProperties() # no argument, current Job print("Architect: ", job_prop['Architect']) print("Engineer: ", job_prop['EOR'])
Help from SDS2 Detailing: member | material | job
- Python scripts can be created to edit member or material or Job custom properties:
# Enters "John Doe" to member property "modeled_by".
from member import MemberLocate, MemberPropertySet
from param import ClearSelection
mem1 = MemberLocate("Select a member")
MemberPropertySet(mem1, "modeled_by", "John Doe")
ClearSelection()
# "modeled_by" must be a member property for this to work
# Enters "True" to boolean material property "GALV". from mtrl_list import MtrlLocate, MtrlPropertySet mtrl = MtrlLocate("Select a material", "Single") MtrlPropertySet(mtrl, "GALV", "True") # "GALV" must be a material property for this to work# Enters "Sparky Silvershoes" to Job property "EOR". from job import JobPropertySet JobPropertySet("EOR", "Sparky Silvershoes") # "EOR" must be a Job property for this to work
Help from SDS2 Detailing: member | material | job
- Advanced Selection can be used to select members, materials, etc. with custom properties:
# Selects members with John Doe entered to "modeled_by".
m.CustomProperties["modeled_by"] == "John Doe"
# Selects members with 1 1/4 entered to "parametric_offset". m.CustomProperties["parametric_offset"] == 1.25# Selects materials checked for "GALV". mt.CustomProperties["GALV"] == True
Help from SDS2 Detailing: Dictionary
To open the Edit Properties window :
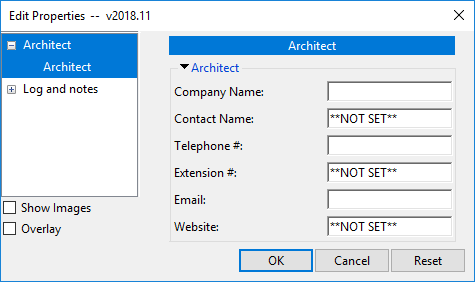
Edit Properties for your current Job (shows job custom properties):
|
In this example of the Edit Properties window, job custom properties are shown under an
" |
Opening Edit Properties for job custom properties:
Method 1 : The Edit Properties window for your current Job opens at Home > Project Settings > Job > Job Property Settings .
Edit Properties for members and group members (shows member custom properties):
|
The Edit Properties window in this example shows member properties which were added to it by activating the ' SDS2Detailer ' plugin in Activate Custom Properties ( Home > Project Settings > Job ). |
|
|
Opening Edit Properties to edit/review member custom properties:
Method 1 : Review multiple members (of the same type) or review one member . Press the " Properties " button at the bottom of any of the following windows: Beam Review , Column Review , Horizontal Brace Review , Vertical Brace Review , Joist Review , Girt (Legacy) Review , Purlin Review , [Legacy] Miscellaneous Member Review , Stair Review .
Method 2 : This window opens directly when you do a multi-member edit with different types of members selected. For example, the window opens when you select a group of beams and columns, then right-click ( Menu ) and choose " Edit " on the context menu .
Method 3 : Use Model > Member > Properties to open this window for one or multiple members. The advantage of this method is that it opens this window directly, without your first having to open the member window.
Note: New custom properties and revised defaults for existing custom properties can be specified for members and group members by using the Edit Schema window that opens when you Home > Project Settings > Job > Custom Properties > Member Properties . Also, member custom property plugins can be turned on and off in Activate Custom Properties ( Home > Project Settings > Job > Custom Properties > ).
Opening Edit Properties to edit/review member custom properties for group members:
Method 1 : In Modeling , open the Group Member window, then press the " Properties " button on that window. This window -- Edit Properties -- opens.
Method 2 : Use Model > Group Member > Properties to open this window for one or multiple group members.
Note: The properties that you set using the above-listed methods for opening this window affect the group member only -- they do not affect submembers.
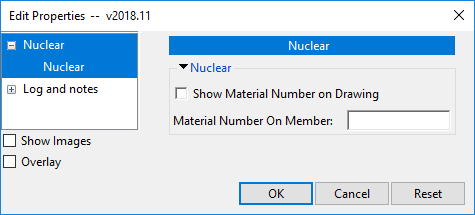
Edit Properties for materials (shows material custom properties):
|
This Edit Properties window shows material properties that were added to it by activating the ' SDS2Nuclear ' plugin in Activate Custom Properties ( Home > Project Settings > Job ). |
Opening Edit Properties to see material custom properties:
Method 1 : Do a multi-material edit or edit one material . Press the " Properties " button at the bottom of the General Information window, which can be opened from any of the material edit windows.
Method 2 : Use Model > Material > Properties to open this window ( Edit Properties ) for one or multiple selected materials.
Note: New material custom properties and revised defaults for existing material custom properties can be specified using the Edit Schema window that opens when you Home > Project Settings > Job > Custom Properties > Material Prioperties . Also, material custom property plugins can be turned on and off in Activate Custom Properties ( Home > Project Settings > Job > Custom Properties > ).
Edit Properties for bolts (shows bolt custom peroperties):
Opening the Edit Properties window to edit/review bolt custom properties:
Method 1 : Use Model > Bolt > Properties to open this window ( Edit Properties ) for one or multiple selected bolts.
Note: New bolt custom properties and revised defaults for existing bolt custom properties can be specified using the Edit Schema window that opens when you Home > Project Settings > Job > Custom Properties > Bolt Properties .
Edit Properties for holes (shows hole custom properties):
Opening the Edit Properties window to edit/review hole custom properties:
Method 1 : Use Model > Hole > Properties to open this window ( Edit Properties ) for one or multiple selected holes.
Note: New hole custom properties and revised defaults for existing hole custom properties can be specified using the Edit Schema window that opens when you Home > Project Settings > Job > Custom Properties > Hole Properties .
Edit Properties for welds (shows weld custom properties):
Opening the Edit Properties window to edit/review weld custom properties:
Method 1 : Use Model > Weld > Properties to open this window ( Edit Properties ) for one or multiple selected welds.
Note: New hole custom properties and revised defaults for existing hole custom properties can be specified using the Edit Schema window that opens when you Home > Project Settings > Job > Custom Properties > Weld Properties .
Custom properties appear on this window under a "
|
In this " |
No custom properties appear on this window if they have not been added to a "
|
An Edit Properties window that has no leaves containing custom propertties. Notice that the window still has leaves for " |
This window is populated with custom properties under a leaf named "
|
This window is populated with custom properties from a plugin if a plugin of the appropriate " Type " was activated using Activate Custom Properties at Home > Project Settings > Job or by using the Merge Schema into Current Job utility.
|
|
For example, a leaf named " |
|
Classes of events that can be logged are Job events, member events, material events, bolt events, weld events, hole events. See Event Logging Setup for more information on what information is logged.
The Event Logging Setup window turns event logging on/off for your entire site.
Once an event has been logged, it stays logged. Event Logging Setup does not erase a log.
Events that are logged include the date of the event ( 2007-02-05 ), military time-GMT offset ( 14:08:55-0600 ), SDS2 software version ( 7.101 ), log-in name of the person who made the change ( dave ), and the event ( Member processed ).
Logged events can be tracked in the report writer:
Data class Path in Report Writer current Job CurrentLocation.JobCustomProperties.Log member Member.CustomProperties.Log material MemberMaterial.Material.CustomProperties.Log Python scripts can be created to read the member, material or Job event log. Click these links to SDS2 Detailing help -- member | material | job -- for more in-depth parametric documentation.
# Prints the event log of the member that the user selects.
from member import MemberLocate, MemberProperties
from param import ClearSelection
mem1 = MemberLocate("Select a member")
mem_log = MemberProperties(mem1)
print(mem_log['Log'])
ClearSelection()
# Prints the log of the material that the user selects. from mtrl_list import MtrlLocate, MtrlProperties mtrl = MtrlLocate("Select a material", "Single") material_log = MtrlProperties(mtrl) print(material_log['Log'])# Prints the event log of your current Job. from job import JobProperties job_log = JobProperties() # no argument, current Job print(job_log['Log'])
Type in any notes that you want applied to the items that you are reviewing. If you are reviewing multiple members or materials, any note you enter here will be applied to each of those members or materials.
Press the " Time Stamp " button to automatically stamp the date and time of a note.
|
||||||||
Notes can be tracked in the Report Writer :
| Data class | Path in Report Writer |
| current Job | CurrentLocation.JobCustomProperties.Notes |
| member | Member.CustomProperties.Notes |
| material | MemberMaterial.Material.CustomProperties.Notes |
Status Display can color code, mask or isolate members or materials for which notes have been entered:
| Data class | In Status Display , choose: |
| member | Member status > Member notes |
| material | Material status > Material notes |
Python scripts can be created to read notes for the member, material or Job. Click these links to SDS2 Detailing help -- member | material | job -- for more in-depth parametric documentation.
# Prints the user notes of the member that the user selects.
from member import MemberLocate, MemberProperties
from param import ClearSelection
mem = MemberLocate("Select a member")
mem_note = MemberProperties(mem)
print(mem_note['Notes'])
ClearSelection()
# Prints the user notes of the material that the user selects. from mtrl_list import MtrlLocate, MtrlProperties mtrl = MtrlLocate("Select a material", "Single") mtrl_note = MtrlProperties(mtrl) print(mtrl_note['Notes'])# Prints the user notes of your current Job. from job import JobProperties job_note = JobProperties() # no argument, current Job print(job_note['Notes'])Python scripts can be created to write notes for the member or material or Job. Click these links to SDS2 Detailing help -- member | material | job -- for more in-depth parametric documentation,
# Writes a "Note" for the member that the user selects.
from member import MemberLocate, MemberPropertySet
from param import ClearSelection
mem1 = MemberLocate("Select a member")
MemberPropertySet(mem1, "Notes", "Refer to RFI 32")
ClearSelection()
# Writes a "Note" for the material that the user selects. from mtrl_list import MtrlLocate, MtrlPropertySet mtrl = MtrlLocate("Select a material", "Single") MtrlPropertySet(mtrl, "Notes", "ABM page-line 14-2")# Writes a "Note" for the current Job. from job import JobPropertySet JobPropertySet("Notes", "Note RFIs 22, 32, 43.")
To close Edit Properties :


"Save" (or the Enter key) closes the Edit Properties window and saves the settings on it to your current Job .
"Cancel" (or the Esc key) closes this window without saving any changes that you have made.
"Reset" undoes all changes made to settings on this window since you first opened it. The window remains open.