ABM Workflow
| YouTube video: Some important new features in the v2020 ABM .
|
The SDS2 ABM gives users the ability to track material through multiple ABM revisions and throughout the life cycle of an SDS2 Project. You can control from the model at the member and material level which materials you want to include in the ABM. The workflow presented here, on this help page, assumes that you are in a newly created Project or in a Project for which an ABM has not yet been created. This is just one possible workflow.
- In Modeling , choose Reports > ABM Report to open the ABM Report window. This window contains all the ABM tools that you need in one location.
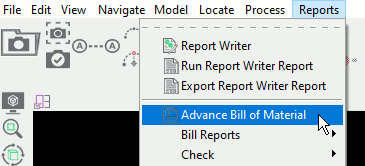
This illustration shows you how to access the ABM Reports window in Modeling when the layout style is ' Classic .' You can get to that same window from Home or the Drawing Editor . You can also launch the window using a toolbar icon or keyboard shortcut. - On the ABM Report window, press the " ABM Qualifiers " button. On the ABM Qualifiers window, set the member types and material types to cover the majority of the materials in your current Project that you want to track using the ABM. These qualifiers set "
 ABM " check boxes to be automatically checked on member and material windows at the time those members and materials are added to the model. You can change the state of " ABM " check boxes from
  to
to  or vice-versa on member and material edit windows in the model.
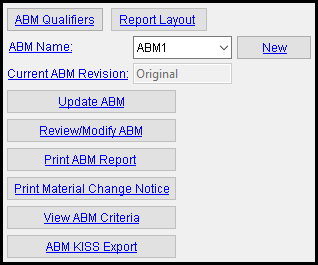
When an ABM has not yet been created, the only buttons that are enabled on the ABM Report window are " ABM Qualifiers ," " Report Layout " and " New ." Best practice is to set the " ABM Qualifiers " before adding members to the model.
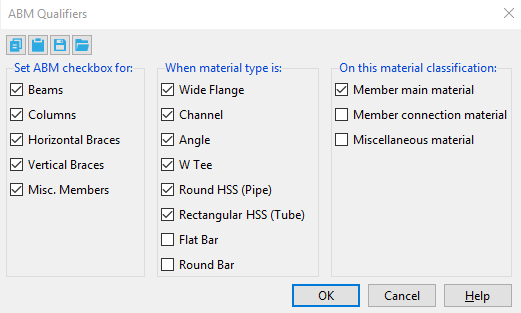
The actual ABM Qualifiers window has many more qualifiers available than those shown here. - Close the ABM Report window. Best practice is to not create an ABM until members have been added to the model. This does not mean that all members need to be added. You might want to create an ABM at the end of a sequence being modeled or when you are ready to generate a preliminary ABM or partial ABM. Steps 7-9 explains how to create an ABM.
- Add members in the model. Back in step 2, the ABM Qualifiers window was set to add ABM information to, among other items, the main material of wide flange columns. Consequently, if you open the window of a newly added wide flange column, you will find information like the following:

When ABM Qualifiers apply to a member, the "  ABM " check box is checked automatically.

The " ID " is set to ' N/A ' because an ABM has not yet been generated.

Switching " Length " to ' Point to Point ' with "  Auto" checked sets the length to the WP to WP distance.

You can uncheck "  Auto " to manually type a length that you want.

Pressing the note icon (
 ) lets you add a note for the " ABM Note " column in the ABM report. For example, a finish note, part #, etc.
- Now suppose that you add a member that the preset ABM Qualifiers does not automatically qualify to be included in the ABM.

When ABM Qualifiers do not apply to a member, the "  ABM " check box is unchecked (off).

Checking the "  ABM " check box qualifies the member's main material for the ABM.
- Member main material is the only type of material that can be ABM qualified from a member edit window. All other materials can only be ABM qualified from their material windows.

On a material window, you can qualify a material for the ABM in the same way you can do so for a member. - Once the members are added to the model to satisfy the needs of the first run of an ABM, choose Reports > Advanced Bill of Material to open the ABM Report window. Then press the " New " button. The Create a New ABM File window opens. Give the new ABM a name, then press " OK ."

ABM Report Name First Pg Last Pg ABM_1 1 28 ABM_2 29 58 


In this example, a new ABM named "ABM1" is being created. If more than one ABM had been created for this example, each of those files would be listed (and selectable). - After you give the ABM a name and press " OK " to close the Create a New ABM File window, the ABM Report Criteria window opens.
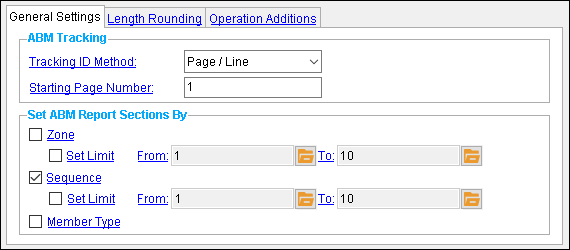
The " General Settings " tab sets the zones and sequences to be included in the ABM. A new ABM might be set to begin with a " Starting page number " that is greater than the last page in the previous ABM. 
" Length Rounding " rules set ABM rounding per member type and main material type. The rules are applied from top to bottom, with no more than one rule applied to any one material. Rules that are more specific than ' All Member Types ' and/or ' All Material Types ' should be placed at the top. 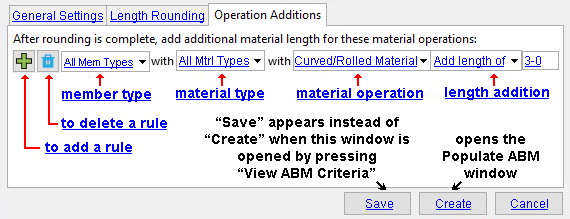
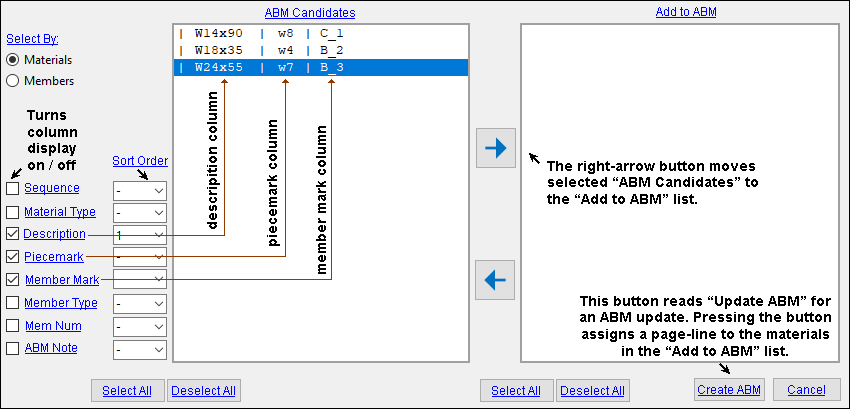
The " Operation Additions " tab can be used to add additional length to the rounded value to accommodate special operations such as rolling. - Pressing " Create " in the previous step launches the Populate ABM window, which allows you to pick the materials that you want to " Add to ABM " from the list of " ABM Candidates ." The candidates list includes all the materials in the model that have their "
 ABM " check box turned on (checked) on their respective member and/or material edit windows. Any materials that do not move to the " Add to ABM " list remain as " ABM Candidates " that you can be added to the ABM later, when you " Update ABM ." If you want all " ABM Candidates " to be added to the ABM, simply press " Select All " then click the right-arrow button. When all of the items that you want to be included in the ABM are in the right column, press " Create ABM ."

Before " Create ABM " was pressed in this step, the " ID " of this material was not yet populated, and no entry was made to " ABM ."

After " Create ABM ," " ABM " is ' ABM1 ', " ID " is ' 2-2 ', " Length " is ' 20-0 ' -- all of which information would appear on page 2, line 21 of a printed ABM1 Advanced Bill of Material Report ..
- Pressing the " Report Layout " button opens the ABM Report Layout window. On this window, you can set the formatting for Advanced Bill of Material Reports and ABM Drop/Add Reports . If you change to a different " ABM Name ," this same formatting will be applied when you " Print ABM Report ." The choices made on the ABM Report Layout window also sets the layout that is applied to the Review/Modify ABM window discussed in step 11.
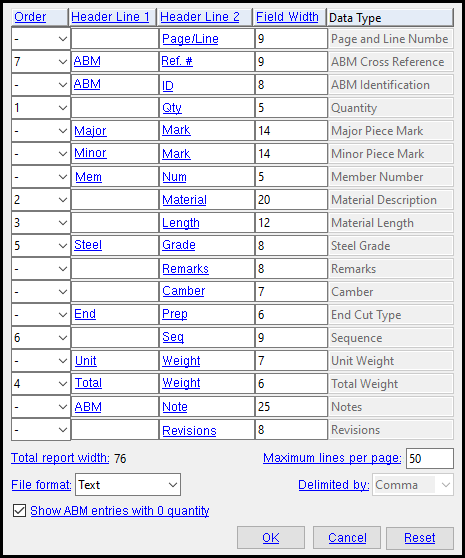
ABM Report Layout window settings are stored with your current Fabricator . If you want these settings to be applied when you print or edit an ABM, you need to make sure that this Fabricator is still your current Fabricator.
You can change to a different Fabricator at Home .
- Pressing the " Review/Modify ABM " button opens the Review/Modify ABM window, which pertains to the currently selected " ABM Name ." Notice that the layout of this window is governed by the ABM Report Layout that was set in step 10. Note that you can press " Print " on this window to print the report. Note also that you can output a Microsoft Excel Open XML Format Spreadsheet file by pressing the " Export xlsx File " button.
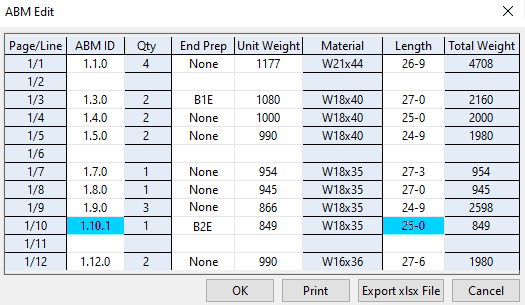
White cells can be edited. Cells are changed to the User and Site Options > Drawings > " Bill of material preserved color " when they are edited.
Right-click in cell with a user-modified value and choose " Revert cell " to bring back the original value.
- ABM revision workflow is beyond the scope of this introduction. Here is a video that shows how additional changes to a model can be recorded to an updated ABM.
YouTube video: Materials are modified in the model to demonstrate how those material changes are tracked in the next ABM update .
contents | abm report | top


