 ABM Report (data from the 3D model)
Tool summary :
|
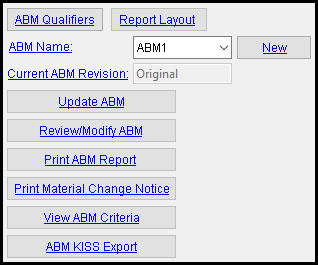
" ABM Qualifiers " and " Report Layout " open setup windows. Once you have created an ABM (by pressing " New "), the name of that file is entered to " ABM Name ." To understand this window in the context of project development, see ABM Workflow . |
- To open this window:
Method 1 : Click the ABM Report icon, which is pictured above.
Method 2 : Home > Reports > System Reports > " Advanced Bill of Material ."
Also see :
- ABM Workflow (topic)
- ADVANCED BILL OF MATERIAL (a downloadable HOW/2 .pdf file)
- Utility Functions > Delete Project Items > ABM (to delete an ABM)
- Show ABM reference on balloon descriptions ( User and Site Options > Modeling > )
- Home > Project Settings > Job > Event Logging Setup (provides options for ABM event logging)
" ABM Qualifiers " is a button that opens the ABM Qualifiers setup window. That window sets which newly added materials are automatically qualified for inclusion in an ABM. Settings applied to the ABM Qualifiers window are for your current Fabricator . Changing to a different Fabricator changes to a different ABM Qualifiers window that may have different settings. Since the choices you make to ABM Qualifiers apply to materials as they are added, you should set up this window before you add members in Modeling . Changing the qualifiers after modeling has already begun does not update material that has already been added.
Also see: ABM Workflow (topic).
" Report Layout " is a button that opens the ABM Report Layout setup window. With the exception of the " Maximum lines per page " option on that window, options on ABM Report Layout window affect the appearance of an ABM report but do not affect the ABM data that is stored under a particular " ABM Name ."
ABM Name: The file name of your current ABM.
|
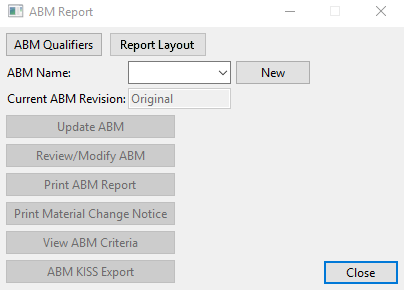
The " ABM Name " that is selected sets the ABM that will be acted upon when you press " Update ABM " or " Review/Modify ABM " or " Print ABM Report " or " Print Material Change Notice " or " View ABM Criteria " or " ABM Kiss Export ." In this example, no " ABM Name " is selected and, consequently, the six large buttons beneath " ABM Name " are disabled ( grayed out ). |
To select an " ABM Name ," you can press the " New " button or select an ABM name in the list box .
Member and material windows: ABM
Material General Information window: File name
" New " is a button that opens a window that lets you select an existing ABM or create a new ABM. The new or newly selected file then becomes the entry to " ABM Name " -- your current ABM.
| YouTube video: Creating the first new ABM in a project . |
If you press " New " to create a new ABM after having already created an ABM, the following dialog opens:
|
"Yes" preserves the pages and lines that have been previously assigned to materials.
"No" permits new pages and lines to be assigned to the new ABM.
Using the " New " button to create a new ABM:
1 . After you press " New ," the Create a New ABM File window opens. Enter the name of the new ABM that you want to create, then press " OK ."
|
The Create a New ABM File window. |
2 . The ABM Report Criteria window opens. Make appropriate choices to that window, then press the " Create " button. Be aware that the " View ABM Criteria " can later be used to review the choices you made to the window, but cannot be used to alter choices other than the " Zone " or " Sequence " or " Member Type " sorting.
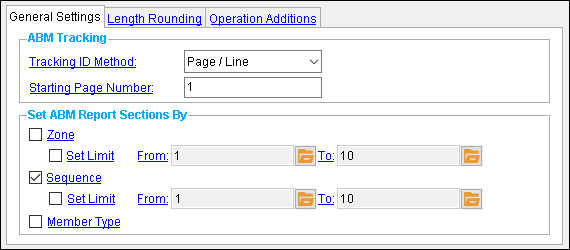
The ABM Report Criteria window's " General Settings " tab sets the zones and sequences to be included in the ABM. A new ABM might be set to begin with a " Starting page number " that is greater than the last page in the previous ABM.
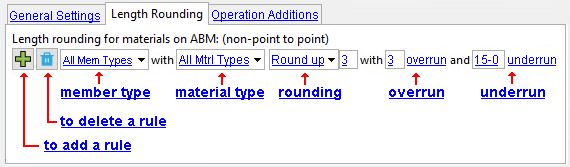
The " Length Rounding " tab sets rounding for member types with particular main material types. Rules are applied from top to bottom, with no more than one rule applied to any one material. Rules whose scope is more specific than, for example ' All Member Types ', should be at the front.
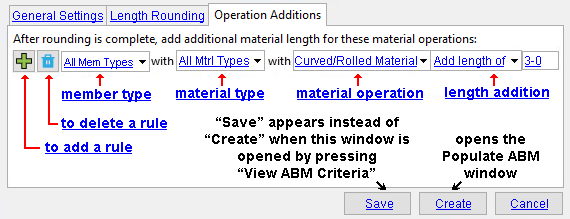
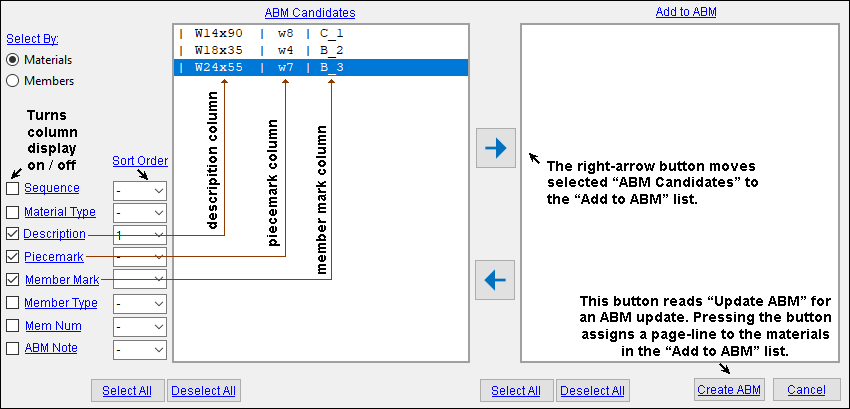
The " Operation Additions " tab can be used to add additional length to the rounded value to accommodate special operations such as rolling. 3 . The Populate ABM window opens. It allows you to pick which material to include in the ABM from a list of material candidates. The " ABM Candidates " list on the left includes all the materials from the model that have their "
ABM " check box turned on (checked) on their respective member and/or material edit windows. Any materials that do not move to the " Add to ABM " list remain as " ABM Candidates " that you can add to the ABM any time it is updated. If you want all " ABM Candidates " to be added to the ABM, simply press " Select All " then press the right-arrow button. When all of the items that you want to be included in the ABM are in the " Add to ABM " column, press the " Create ABM " button.
4 . The " ABM Name " that is shown on this window ( ABM Report ) is now the name that you entered to " Enter ABM file name if creating a new file " in step 1.
Current ABM Revision: Original or 1 or 2 or etc. may be reported as the most recent revision of " ABM Name ." If you change to a different " ABM Name ," a different " Current ABM Revision " may be reported. " Current ABM Revision " provides read-only information.
' Original ' indicates that " ABM Name " has never been updated. The current ABM is still revision number 0.
' 1 ' indicates that " ABM Name " has been updated one time. Updating is done by pressing the " Update ABM " button.
' 2 ' indicates that " ABM Name " has been updated two times.
Related buttons on this window: When you " Review / Modify ABM " or " ABM Kiss Export ," the data you manipulate or output is the " Current ABM Revision " of the ABM whose " ABM Name " is reported above. When you " Print ABM " and select the revision that is listed here, the current ABM's Advanced Bill of Material Report is output. Doing a " Print Material Change Notice " lets you select two different revisions to compare via an ABM Add/Drop Report .
" Update ABM " is a button that operates on the ABM that is the selected " ABM Name ." Each time you update, the Populate ABM window opens, and when you press " Update ABM " on that Populate ABM window the " Current ABM Revision " is incremented to the next higher digit. For example, Original becomes ABM revision 1 . When you update again, revision 1 becomes revision 2 . Under each revision number, the ABM stores material data that reflects the state of the 3D model at the time of the update.
|
" Review / Modify ABM " is a button that opens the ABM Edit window. That window lets you review and modify the " Current ABM Revision " of the ABM that is the selected " ABM Name ." The current version of an ABM is its most recent version. If you modify entries made to the ABM Edit window, your modifications will be applied the next time that you " Update ABM ."
|
|
" Print ABM Report " is a button that opens the Print ABM Report window. Before pressing this button, confirm that the " ABM Name " is the ABM that you want this report to be based on.
|
|
The Print ABM Report window tells you how many revisions have been created for the ABM that is the selected " ABM Name ." You can " Print " a report or " Export xlsx File " that is based on the revision that you select. Click here for more information. |
" Print Material Change Notice " is a button that opens the Print Material Change Notice window. Before pressing this button, confirm that the " ABM Name " is the ABM that you want this report to be based on.
|
|
The selections made on this Print ABM Change Notice window would generate an ABM Add/Drop Report that outputs the differences between the Original ABM and revision 2 . Click here for more information. | ||||||||||||||||||||
" View ABM Criteria " is a button that operates on the ABM that is selected for " ABM Name ." It opens a version of the ABM Report Criteria window that is partially read-only. The only options that you can change on that version of the window are " Zone " and " Sequence " and " Member type ." Changes you make will be applied the next time you " Update ABM ."
" ABM KISS Report " is a button that operates on the ABM that is selected for " ABM Name ." It opens the KISS Export window, which has options for directing the output of a .kss file that, by default, is named after the selected " ABM Name ."
|
This window directs the output of the to-be-exported .kss file and lets you rename that file and the folder that contains it. Click here for more information. | ||||||||||||||||||

