Submaterial Annotations and Dimensioning ( Detail Submaterial > press " Settings ")
This window configures automatic detailing for those submaterial(s) that you selected before you pressed " Settings " to open this window. The settings that you specify on this window will be saved with this window's associated submaterial(s) when you press " OK ."
- Tip: Press the " Defaults " button if you want to overwrite these settings with choices made in the " Submaterials " section in Home > Project Settings > Fabricator > Annotation and Dimensioning Defaults .
To open this window :
- Detail Submaterial, press "Settings"
- Window auto opens, step 3 , if User and Site Options > Drawings > "
 Always show ... "
 - Submaterial detail (topic)
- Options applied during detailing (topic)
- Annotation and Dimensioning Defaults, Submaterials ( Fabricator Setup )
- Default submaterial detail scale ( General Presentation )
- Drawing List Panel (used in the Drawing Editor to open submaterial details)
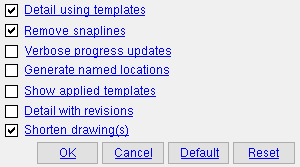
The Submaterial Annotations and Dimensioning window
|
||||
| By default, using the out-of-the-box templates that are provided, detailing with or without templates generally produces the same results. To customize automatic detailing to deliver a desired content and appearance in a drawing, you can use custom templates. |
If this box is checked (
fabs folder in your current Job . Any setup overrides ( Settings > Drawing Settings ) that have been specified for a drawing that was selected to undergo detailing will be applied at this time. You also have the options, on this window, for " Remove snaplines ," " Verbose progress updates " and " Show applied templates ."
If the box is not checked (
), submaterial detailing will be done without reference to the special instructions that are provided in templates.
Templates used for submaterial detailing are, as mentioned above, stored in your current Job's
Fabricator Setup: Home > Project Settings > Fabricator > Annotation and Dimensioning Defaults > " Submaterials " sets the choice (
Remove snaplines: ![]() or
or ![]() . Snaplines are construction lines that are generated, for positioning purposes, during auto detailing.
. Snaplines are construction lines that are generated, for positioning purposes, during auto detailing.
|
If this box is checked (
If the box is not checked (
Fabricator Setup: Home > Project Settings > Fabricator > Annotation and Dimensioning Defaults > " Submaterials " sets the choice (
Verbose progress updates: ![]() or
or ![]() . This applies when you choose to "
. This applies when you choose to " ![]() Detail using templates ." Having verbose progress updates can sometimes help you to locate and troubleshoot potential template problems.
Detail using templates ." Having verbose progress updates can sometimes help you to locate and troubleshoot potential template problems.
|
Since " RefToNearestHole |
If this box is checked (
If the box is not checked (
Fabricator Setup: Home > Project Settings > Fabricator > Annotation and Dimensioning Defaults > " Submaterials " sets the choice (
Generate named locations: ![]() or
or ![]() . This applies when you auto detail without templates ("
. This applies when you auto detail without templates (" ![]() Detail using templates "). Submaterial details generated using templates always include named locations .
Detail using templates "). Submaterial details generated using templates always include named locations .
If this box is checked (
If the box is not checked (
Fabricator Setup: Home > Project Settings > Fabricator > Annotation and Dimensioning Defaults > " Submaterials " sets the choice (

|
| A label which names the templates that have been applied to a submaterial detail. |
If this box is checked (
If the box is not checked (
Fabricator Setup: Home > Project Settings > Fabricator > Annotation and Dimensioning Defaults > " Submaterials " sets the choice (
Detail with revisions: ![]() or
or ![]() . This applies if you selected submaterials that have already been placed on gather sheets. A revision chart is not required for you to get revision information. That information can be maintained in the Sheet Revision Chart Editor without a revision chart. Also, automatic clouding of revision changes can be done without a revision chart.
. This applies if you selected submaterials that have already been placed on gather sheets. A revision chart is not required for you to get revision information. That information can be maintained in the Sheet Revision Chart Editor without a revision chart. Also, automatic clouding of revision changes can be done without a revision chart.
|
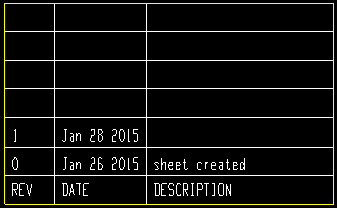
In step 4 of the Detail Submaterial procedure, you will get a message like this one if one of the submaterials you detail is on a sheet with revision information. | |||||||
|
This revision chart was automatically updated during automatic detailing. Submaterial detailing incremented "REV" and the "DATE" because the box for " Locked... " was checked in the revision editor for the sheet that the submaterial being detailed was on. |

|
" |
If this box is checked (
If the box is not checked (
Steps for automatic revision tracking (one possible procedure):
Cycle 1 1 . " 2 . Create a new sheet outline and Revision Chart > Place a revision chart onto it. 3 . Create a new gather sheet using the sheet outline you created. 4 . Detail a submaterial and Sheet Items > Add it to the gather sheet that uses the outline you created. 5 . On the new gather sheet, Objects > Revision Chart > Edit , enter the chart's first line and set it to " 6 . Make a change in Modeling that will affect the resulting submaterial. 7 . detail the submaterial again, and this time check the box for " 8 . On the gather sheet, you will find that auto detailing clouded the changes to the submaterial detail and added a new revision and date to the revision chart. Cycle 2 9 . Objects > Revision Chart > Edit the entry that auto detailing made in step 7 above. Set the chart to " 10 . Make a change in Modeling that will affect the resulting submaterial. 11 . detail the submaterial again, and this time check the box for " 12 . On the gather sheet, you will find that auto detailing clouded the changes to the submaterial detail and added a new revision and date to the revision chart. Note: If "

delta symbol with a ? inside
Warning : If you don't enter a number or letter to the "REV" cell in the first line of the Sheet Revision Chart Editor before you " Detail with revisions ," submaterial detailing won't know if it needs to increment the revision using a letter such as A or a number such as 1. The delta symbol will be a "?" instead of a letter or a number. See step 5 in the procedure above.Fabricator Setup: Home > Project Settings > Fabricator > Annotation and Dimensioning Defaults > " Submaterials " sets the choice (
|
Alternative 1 : Press " Yes " to shorten the submaterial details. Tip: If you choose this option, you should Unshorten each submaterials detail before adding annotations to it, then Shorten the submaterial detail manually before you save it.
Alternative 2 : Press " No " to generate submaterial details that are unshortened. Tip: If you choose this option, you should then implement a procedure where you open each submaterial detail, make any graphical changes you want, then Shorten the submaterial detail manually prior to using Sheet Item Add to place it on a sheet or in another drawing.
Standard procedures: Before adding dimensions to a submaterial detail whose material has been shortened, you may need to Unshorten it to ensure that the newly added dimensions correctly measure the distances between points. It is also desirable to Unshorten prior to measuring with the Ruler or adding construction lines using BSCL . This is especially true if the submaterial is a member main material. If a submaterial is unshortened, you should Shorten it prior to adding it to another drawing or sheet using Sheet Item Add .
Tip: If you want your submaterial details to look like they did in SDS2 versions prior to v7.2xx, you should choose "Yes."
Fabricator Setup: Home > Project Settings > Fabricator > Annotation and Dimensioning Defaults > " Submaterials " sets the choice (
To close the Submaterial Annotations and Dimensioning window :
![]()
![]()
![]()
![]()
"OK" closes this window. Go to step 2 of Detail Submaterial . In step 2, you choose the submaterial(s) that you want to detail. The settings that you specified on this window will, when you press " OK ," be stored with whichever submaterial(s) you selected before opening this window. This means that when you press the " Settings " button for a previously generated drawing, the settings shown on this window will likely be the settings that were used to generate that drawing.
"Cancel" closes this window and ends the Detail Submaterial operation. No submaterial details will be generated.
"Reset" undoes all changes made to this window since you first opened it. The window remains open.
"Default" populates this window with the default settings specified in the " Submaterials " section in Home > Project Settings > Fabricator > Annotation and Dimensioning Defaults . The window remains open.

