The Lift Information window ( Modeling )
To open this window :
- Check/Assign Member Lift (the window opens in step 6 )
- Check/Assign Load Lift (the window opens in step 5 )
- Check/Assign Multi Lift (the window opens in step 5 )
- Manage Lifts (select a lift, then press the " View " button)
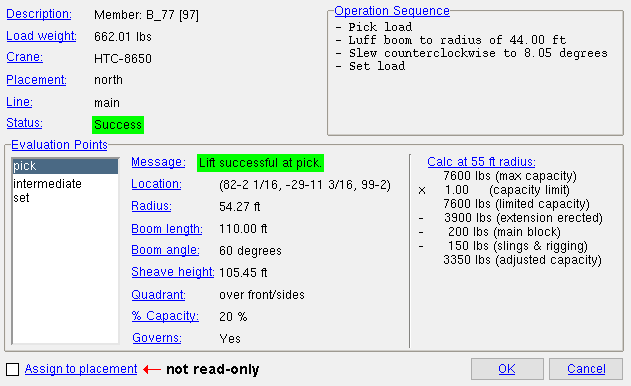
Description: The identity of the lift.
For a lift of one member ( member lift ), this identity is "Member: Member piecemark , [member number] ." For example, Member: B_77, [97] as shown above .
For a group member lift ( member lift ), this identity is "Group Member: [group member number]." For example, Group Member: GM_94 [1] .
For an "Assembly" ( member lift ), this identity is "Assembly: member piecemark , [member number] ...," where each member that is part of the "Assembly" is listed. For example: Assembly: 11B1 [92], 39B1 [91] .
For a user-defined lift ( load lift ), this identity is "User-defined: Description ." For example, User-defined: Decking .
For a multi-lift ( multi-lift ), this identity is "Multi-lift: member piecemark , [member number] ...," where each member that is part of the multi-lift is listed. For example: Multi-lift: 3782 [35] - 3481 [34] - 7681 [26] -7781 [25] .
Load weight: The weight of the item (or items) to be lifted.
If the " Load weight " is less than the " Adjusted capacity calculation " for the pick point or intermediate points or set point (whichever " Governs ") and the crane is able to reach both the pick point and the set point, then the " Status " of this lift is Success .
For a lift of one member ( member lift ), this is the actual weight of the member in the model. The weight includes the member main material plus all attached connection material.
For a group member lift ( member lift ), this is the actual weight of all component members (submembers) of the group member.
For an "Assembly" ( member lift ), this is the combined weight of the members being lifted.
For a user-defined lift ( load lift ), this is the " Load weight " specified on the User-defined lift window.
For a multi-lift ( multi-lift ), this is the combined weight of the members being lifted.
For a tower crane, this is the " Name " that was given to the crane when it was added to the model or last edited.
For a crawler crane, this is the " Name " that was given to the crane when it was added to the model or last edited.
For a truck crane, this is the " Name " that was given to the crane when it was added to the model or last edited.
Placement: The name of the crane placement associated with the lift whose " Status " is evaluated on this window.
For a member lift , this is the placement that was selected (in step 1 or 3) of a Check/Assign Member Lift operation, or of an Assign Member Lifts operation, or of a Managed Lifts operation.
For a load lift , this is the placement that was selected (in step 1 or 3) of a Check/Assign Load Lift operation, or of a Managed Lifts operation.
For a multi-lift , this is the placement that was selected (in step 1 or 3) of a Check/Assign Multi Lift operation, or of a Managed Lifts operation.
Line: Whip Line or Main Line or Luffing or etc. The line that is used for the lift.
Status: Success or Success (critical) or Failure .
Success (green) indicates that the " Adjusted capacity calculation " for the pick point or intermediate points or set point that " Governs " is greater than the " Load weight " and that the pick and set points are within reach of the crane. Since ' Success ' for a lift means that the pick point and intermediate and set point components of the lift can be performed, the " message " for the pick point is " Lift was successful at the pick " and the " message " for the set point is " Lift was successful at the set ."
Success (critical) indicates that the lift is a success (as documented above) and that the " % Capacity " for the pick point and/or set point and/or intermediate is higher than a percentage value such as 75% or 80%. The exact percentage at which a crane's lift is considered to be critical is dependent on the crane.
Failure (red) indicates the lift is a failure at the pick point and/or set point and/or an intermediate location. A failure " message " appears for the pick point and/or the set point. The failure message can help you identify the reason for the failure and find an alternative way to achieve the lift.
----- Operation Sequence -----
|
Example of an " Operation Sequence ." |
The " Operation Sequence " describes, in sequential order, the parts of a lift. The " Slew direction " ( Lift Configuration window) as well as the " Boom length " and the " Location " of the pick and set points can affect the " Operation Sequence ."
|
1 . Select an evaluation point. 2 . The " Percent capacity ," " Adjusted capacity calculation " and related information will be reported for the evaluation point that you selected. |
Note: ' Intermediate ' may be listed as one of the " Evaluation Points " only if the " Quadrant " of the crane is not a ' 360 degree rating '.
Lift was successful at pick / intermediate / set These messages indicate that the lift is safe at the " Evaluation Point " indicated in the message. If the banner is orange, the lift is a critical lift. or
Lift was successful at pick / intermediate / set
Lift radius at pick These messages indicate that a lift failure has occurred because the " Radius " at the pick or intermediate or set point is too far from or too close to the center of rotation of the crane to be reached by the crane.
Lift radius at intermediate
Lift radius at set
Lift height at pick These messages indicate that a lift failure has occurred because the Z coordinate (elevation) " Location " is higher than the crane's " Sheave height " with its " Min. dist from sheave to hook " subtracted -- too high for the crane to reach.
Lift height at intermediate
Lift height at set Possible fixes : You may be able to move the " Location " closer to the crane, thus increasing the " Sheave height ." For a tower crane, increasing the " Mast height " may fix this problem.
Stability/strength capacity at pick These messages indicate that the " Load weight " exceeds the " Adjusted capacity calculation " at the pick or intermediate or set point.
Stability/strength capacity at intermediate
Stability/strengthcapacity at set
A possible fix : If the problem is at the pick point, you may be able to move the pick point " Location " closer to the crane, thus decreasing the " Radius " and making the load easier to lift. The " Location " is set per the " Pick location " for the individual member lift or load lift (user-defined lifts) or multi-lift .
Hoist capacity at pick These messages indicate that the hoist is not strong enough to lift the load at the " Evaluation Point " indicated in the message.
Hoist capacity at intermediate
Hoistcapacity at set
Possible fixes : For a truck crane, increase the number of " Parts of line " on the Truck Crane window. For a crawler crane, increase the number of " Parts of line " on the Crawler Crane window. For a tower crane, change the " Reeving mode " on the Tower Crane window.
Location: The X, Y, Z global coordinate of the " Pick " point or the " Set " point.
For ' Pick ', this is the " Pick location " for the individual member lift or load lift (user-defined lift) or multi-lift .
For ' Intermediate ', no location is reported.
For ' Set ', the reported X, Y, Z location is the top of the load at the center of mass. The center of mass is used to determine the X, Y global coordinates of the set point. The Z coordinate is the highest point on the load. The entry made to " Vertical distance from hook to top of load " also helps to define the set point " Location ."
Radius: The horizontal distance (in feet or meters, depending on the primary dimension " Units ") from the center of rotation of the crane to the load hook while the crane is loaded and the load hook is in vertical alignment with the pick point or set point. The " Radius " is reported when the selection for " Evaluation Points " is ' Pick ' or ' Intermediate ' or ' Set '.
For ' Pick ', this is the horizontal distance to the pick point " Location ." If the pick point " Radius " is larger than the crane's reach or too close to the crane, you get the failure message " Lift radius at pick ."
For ' Intermediate ', the radius will generally be between that of the " Pick " point and the " Set " point. For example, the reported intermediate value might be equal to the lesser of the pick and set point radius values. If the intermediate " Radius " is larger than the crane's reach, you get the failure message " Lift radius at intermediate ."
For ' Set ', this is the horizontal distance to the set point " Location ." If the set point " Radius " is larger than the crane's reach or too close to the crane, you get the failure message " Lift radius at set ."
Boom length: This applies when the crane is a truck crane or a crawler crane with a telescopic boom. If the " Boom length " is not long enough to allow the crane to reach the pick point or set point, the lift will fail. The choice made to " Hydraulic boom length " on this lift's Lift Configuration window directly affects the boom length shown here.
Boom angle: The number of degrees from horizontal that the boom of a crawler crane or truck crane is positioned in order to achieve the lift at the selected " Evaluation point ." This setting applies to mobile cranes only, not to tower cranes. For a mobile crane, the " Boom angle ," together with the " Radius " are used to calculate the " Sheave height ."
A perfectly horizontal boom is at a " Boom angle " of 0°.
A perfectly vertical boom is at a " Boom angle " of 90°.
Sheave height: A distance ( feet or meters , depending on the primary dimension " Units "). If the " Sheave height " (with the lift's " Min. dist from sheave to hook " subtracted) is not high enough, you may get one of the following failure messages: " Lift height at pick " or " Lift height at set ."
For a tower crane, this is the " Mast height ."
For a crawler crane or truck crane, the " Sheave height " depends on the " Location " of the lift point or pick point and is calculated based on the " Radius " and the " Boom angle ."
Quadrant: 360 degree rating or over front/sides or over rear or other quadrants . A " Quadrant " will not be reported for a tower crane . A truck crane's quadrants are defined under " Working Areas " on the Truck Crane Specification window. A crawler crane's quadrants are defined under " Working Areas " on the Crawler Crane Specification window.

|
A symbol like this one may be shown in the model when a crane has different lifting quadrants. |
A ' 360 degree ' rating means that the crane has the same strength and stability rating for 360 degrees of turning. For such a crane, the same load chart will be used for all 360 degrees, and you will not be able to select ' Intermediate ' as one of the " Evaluation points "
' over front/sides ' or ' over rear ' may be reported on, for example, a truck crane that uses a different load chart for its rear end as opposed to its front and sides. " Choose footing orientation " sets where the truck crane's rear end is positioned. For such a truck crane, ' Intermediate ' will be a selectable option for " Evaluation points " if the crane requires a load chart for the ' Intermediate ' quadrant that is different than the load chart required for the pick point and set point.
' other quadrants ' may also be defined for a truck crane or crawler crane. It all depends on the choices made to " Working Areas " on the Truck Crane Specification window or to " Working Areas " on the Crawler Crane Specification window.
% Capacity: The percentage of the crane's capacity that is the weight of the load. This percentage is calculated by dividing the " Load weight " by the results you would get for the " Adjusted capacity calculation "; the result of that division is rounded up to the nearest hundredth, then that rounded result is multiplied by 100 to give you the percentage value. Since the " Capacity limit " specified for the load directly affects the " Adjusted capacity calculation ," it also directly affects the " % Capacity " that is reported here.
' N/A ' means not applicable and indicates that the " Adjusted capacity calculation " was not performed because the lift already failed for another reason, such as the lift radius or height at the pick or set point.
1% to xx% indicates that the lift is successful and non-critical. xx is a fixed percentage such as 75% or 80% or some other percentage that depends on the crane.
xx% to 100% indicates that the lift is a critical lift. The percentage xx , at which a crane's lift becomes critical, is dependent on the crane.
over 100% indicates that the lift fails.
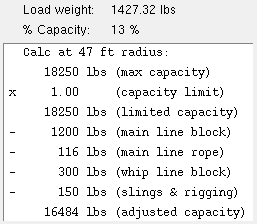
Example 1 : 1427.32 ( load weight ) / 16484 ( adjusted capacity ) = 0.0865882. After rounding and multiplying by 100, the result is the reported percentage value: 9%.
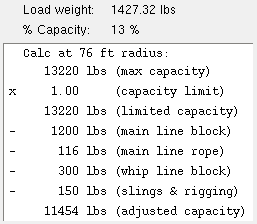
Example 2 : 1427.32 ( load weight ) / 11454 ( adjusted capacity ) = 0.12461324. After rounding up and multiplying by 100, the result is the reported percentage value: 13%.
Governs: Yes or No . Only one (1) of the " Evaluation points " (' Set ' or ' Pick ' or ' Intermediate ') will govern (be set to ' Yes ').
In the example above , the ' Pick ' point governs (reads ' Yes ') because the " Adjusted capacity calculation " is less for the ' Pick ' point than it is for the ' Set ' point.
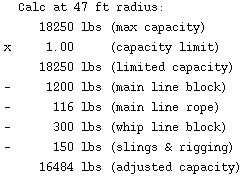
Adjusted capacity calculation: A calc at x radius is provided for the selected " Evaluation point " (' Pick ' or ' Intermediate ' or ' Set '.). The radius is determined by rounding up the " Radius ."
|
The "( adjusted capacity )" that is calculated in this example is 16484 lbs. So long as the " Load weight " is less than 16484 lbs and the crane is able to reach the load, the " message " reported will be " Lift was successful at ... " |
(max capacity) is the maximum capacity of the crane at the specified radius.
(capacity limit) is the " Capacity limit " specified for this lift on its Lift Configuration window.
(limited capacity) is the " (max capacity) " multiplied by the " (capacity limit) ."
Deductions such as " (main line block) " " (main line rope) " " (whip line block) " " (slings & rigging) " are subtracted from the " (limited capacity) " to determine the final result. Options such as " Misc. additional weight " and " Counterweight " and " Hoist Line Options " on the individual lift's Lift Configuration window set the values of the individual deductions.
(adjusted capacity) is the final result of this calculation. If the " (adjusted capacity) " is less than the " Load weight ," the " message " reported will be the failure message " Stability/strength capacity at pick point " or " Stability/strength capacity at set point ."
Assign to placement: ![]() or
or ![]() . This does not apply to a Managed Lifts " Edit " operation.
. This does not apply to a Managed Lifts " Edit " operation.
If this box is checked (
), the lift that you defined for the Check/Assign Member Lift or Check/Assign Load Lift or Check/Assign Multi Lift operation that you used to open this window will be assigned to the placement that you selected at the beginning of that operation if you press " OK " on this window.
If the box is not checked (
), the lift will not be assigned to the placement.
To close the Lift Information window:
![]()
![]()
"OK" closes the Lift Information window and logs your changes. If you checked the box for "
"Cancel" closes the window without making any changes.

