The Tower Crane window ( Modeling )
-
Add Tower Crane (a related page)
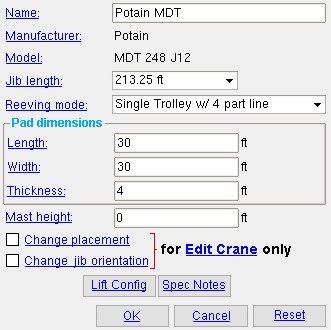
This window opens when you Add Tower Crane . It also opens for Edit Crane if the crane being edited is a tower crane.
Licensing: Cranes require a license. Without that license, crane options are not available in SDS2.
Also see :
- Edit Crane (to edit a crane after it has been added)
- Add Tower Crane (a related page)
- Cranes and crane placements (topic)
page 1 | contents | model > crane > | cranes | cranes (index) | add tower crane
| Tower Crane |
Name: The name that you want to give this crane. For example, type in the manufacturer and model of the crane.
The name you enter here will be referenced in the balloon description that appears when you hover this crane with your mouse pointer (
) in the model.
If, in the model, you hover the crane with your mouse pointer (
) and then right-click ( Menu ) and choose " Edit Other " or " Select Other ", you will see this name listed as a selectable item for edit or selection.
The name entered here is referenced on the Lift Configuration window for this crane. It is also referenced on the Lift Information window for each lift that is performed using this crane.
The name also appears on reports related to this crane.
Manufacturer: Read only . The manufacturer's name is the tower crane specification that you selected in step 2 , when you added the crane. The name is filled out automatically.
Model: Read only . The model name is the tower crane specification that you selected in step 2 , when you added the crane. The name is filled out automatically.
Jib length: Various standard jib lengths can be selected. This affects the reach radius of the crane and member liftability. The " Radius " of a lift is reported on the Lift Information window for both the pick point and the set point.
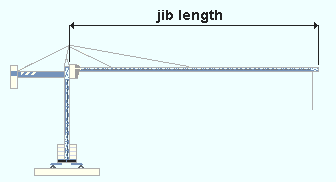
The jib lengths that are listed here depend on the " JIb lengths " that are specified for the tower crane specification that you selected in step 2 .
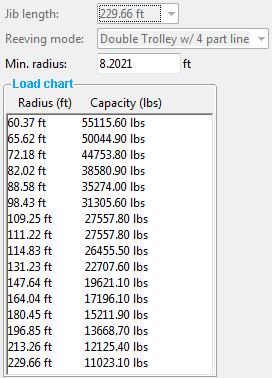
Reeving mode: Single w/ 2 part line or Single Trolley w/ 2 part line or Single Trolley w/ 4 part line or Double Trolley w/ 2 part line or Double Trolley w/ 4 part line .
|
Changing the " Reeving mode " changes the load chart that is used for evaluating loads. This example of a load chart came by double-clicking on a " Configuration " on the Tower Crane Specification window. |
Which reeving modes and how many reeving modes are available to you for a particular crane depends on the tower crane specification that you selected in step 2 . Some crane specifications may have only a single " Reeving mode ", others may have multiple reeving modes.
The failure message " Hoist capacity at ... " on the Lift Information window is a possible indication that the reeving mode is insufficient to lift a load.
page 1 | contents | model > crane > | cranes | cranes (index) | add tower crane | top
----- Pad dimensions -----
Length: A distance (in feet or meters, depending on the primary dimension " Units "). This distance defines the pad dimension that rotation of the footing is done with respect to in step 6 of adding a tower crane. By default, if the footing is not rotated, this dimension is horizontal in a plan view.
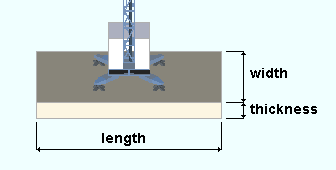
Width: A distance (in feet or meters, depending on the primary dimension " Units "). By default, if the footing is not rotated, this dimension is vertical in a plan view.
Thickness: A distance (in feet or meters, depending on the primary dimension " Units "). The distance is measured parallel with the global Z axis . In a plan view, this distance is perpendicular to the view.
page 1 | contents | model > crane > | cranes | cranes (index) | add tower crane | top
----- Other -----
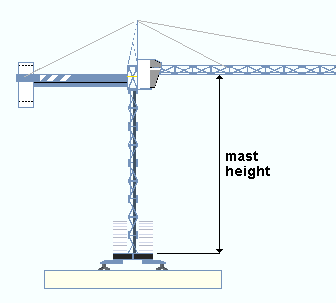
Mast height: A distance (in feet or meters, depending on the primary dimension " Units "). This sets the limit for the height to which members can be lifted, and it therefore affects the range in which the crane can lift members.
Change placement: ![]() or
or ![]() . This applies when this window opens for an Edit Crane operation. This option does not appear on this window for an Add Crane operation, and it does not affect Lift Information . It only affects where the crane is shown in the model.
. This applies when this window opens for an Edit Crane operation. This option does not appear on this window for an Add Crane operation, and it does not affect Lift Information . It only affects where the crane is shown in the model.
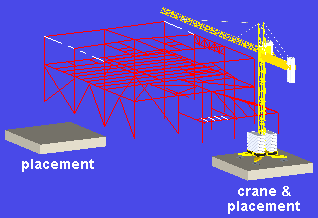
|
The tower crane in this example has two placements . You could move that crane to its other placement. Doing so would not affect Lift Information since lifts are assigned to placements, not to cranes. |
If this box is checked (
), you will be prompted, in the status line , after you press " OK " to close this window, to select the crane placement that you want to move the crane to. The crane will then move so that it is centered over that placement.
If the box is not checked (
), the crane will remain positioned where it is at after you press " OK ".
Change jib orientation: ![]() or
or ![]() . This applies to Edit Crane operations only. The option does not appear for Add Tower Crane operations.
. This applies to Edit Crane operations only. The option does not appear for Add Tower Crane operations.
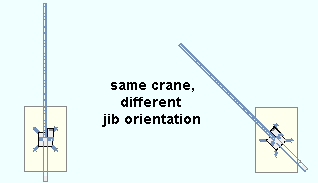
|
Jib orientation affects the appearance of the crane only. It does not affect its functionality. To get to the pick points and set points reported in the Lift Information , the jib is free to rotate 360°, regardless of the choice you make here. |
If this box is checked (
), you will be prompted, in the status line , after you press " OK " to close this window, to " Choose jib orientation ". Move your mouse pointer (
) so that the point location target (
) snaps to any point along an axis that you want the jib to be oriented with respect to, then left-click ( Locate ).
If the box is not checked (
), the current jib orientation will be retained.
![]() opens the Lift Configuration window.
opens the Lift Configuration window.
|
The version of the Lift Configuration window that appears when you press this button does not have any "
AUTO " buttons. This is because the crane sets the defaults for the placement configuration(s), which in turn sets the defaults for individual lift configurations. Placement configurations and individual lift configurations does have "
AUTO " buttons.
![]() opens a window with information from the developer of the crane specification that you selected in step 2 . The information might, for example, be a manufacturer's source reference for that specification. You can enter " Spec Notes " text for a particular specification by pressing the " Notes " button on the Tower Crane Specification window.
opens a window with information from the developer of the crane specification that you selected in step 2 . The information might, for example, be a manufacturer's source reference for that specification. You can enter " Spec Notes " text for a particular specification by pressing the " Notes " button on the Tower Crane Specification window.
page 1 | contents | model > crane > | cranes | cranes (index) | add tower crane | top
![]()
![]()
![]()
"OK" closes the Tower Crane window and applies any changes you have made on it.
For an Add Tower Crane operation, see the instructions beginning with step 5 . Not all of the instructions may apply since what happens after this window closes depends on choices that you made on this window.
For an Edit Crane operation, see the instructions beginning with step 5 .
"Cancel" closes the Tower Crane window without applying any of the changes you made to it.
"Reset" undoes any changes made to the Tower Crane window since you first opened it.
Exception: " Reset " does not undo changes made by pressing the " Lift Config " button to open the Lift Configuration window for the crane. It only undoes changes to those settings that are immediately visible on the Crane Placement window.
page 1 | contents | model > crane > | cranes | cranes (index) | add tower crane | top


