Truck Crane window ( Modeling )
- Add Truck Crane (a related page)
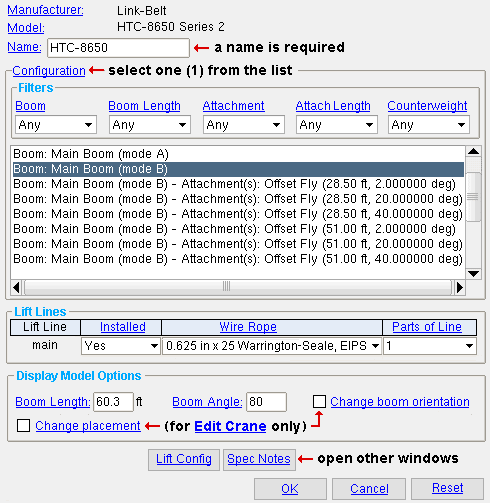
This window opens when you Add Truck Crane . It also opens for Edit Crane if the crane being edited is a truck crane. You are required to select a " Configuration " when adding a new truck crane. The " Lift Lines " information pertains to the " Configuration " that you select.
Also see :
- Edit Crane (to way to open this window)
- Add Truck Crane (a related page)
- Cranes and crane placements (topic)
| Truck Crane |
Manufacturer: Read only . The manufacturer's name is filled out automatically based on the truck crane specification that you selected in step 2 , when you added the crane.
Model: Read only . The model name is filled out automatically based on the truck crane specification that you selected in step 2 , when you added the crane.
Name: The name that you want to give this crane. For example, you might name the crane after the crane's manufacturer and model.
The name you enter here will be referenced in the balloon description that appears when you hover this crane with your mouse pointer (
) in the model.
If, in the model, you hover the crane with your mouse pointer (
On the Lift Configuration window, this is the " Crane " for which a lift is being evaluated.
----- Configuration -----
Select the one (1) configuration that you want to apply to this crane. Settings for the lift line associated with that configuration can be found under the " Lift lines " heading.
|
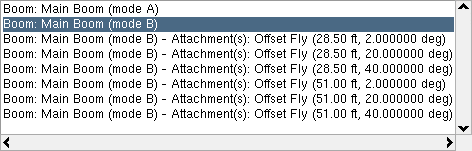
| The configurations list. Which configurations are listed depends on the truck crane specification that you selected in step 2 and the choices that you have made for the Filters . Selecting ' Any ' for all of the Filters lists all configurations that can be shown on the list. |
| ----- Filters -----
(used to narrow or expand the configurations list ) (setting all filters to ' Any ' completely expands the list) |
|
Boom ( a filter ): Any or a specific boom type .
|
|
|
Attachment ( a filter ): Any or a specific attachment type .
|
|
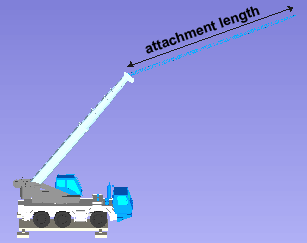
Attachment length ( a filter ): Any or a specific length .
|
|
Counterweight ( a filter ): Any or a specific weight .
|
----- Lift Lines -----
Instructions: Select a " Configuration ." For any configuration that has ' Yes ' selected for " Installed ," make sure that the correct information is entered for " Wire Rope " and " Parts of Line ."
' Yes ' indicates that the selected " Configuration " is installed on the crane or will be installed for certain lifts.
' No ' indicates that the " Configuration " is not installed and will not be installed during the course of the project.
Wire Rope: 0.875 in EIPS or etc .
The wire ropes that are listed here depend on the " Wire Ropes " that are specified for the truck crane specification that you selected in step 2 .
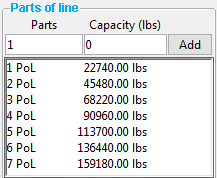
Parts of Line: 1 or 2 or 3 or 4 or etc .
|
Increasing the number of the parts of line increases the hoist capacity. Capacity specifications like these can be shown (and edited) on the Truck Crane Specification window for a particular line for a particular boom tip. |
The failure message " Hoist capacity at ... " on the Lift Information window is a possible indication that the number of parts of line are insufficient to lift a load.
----- Display Model Options -----
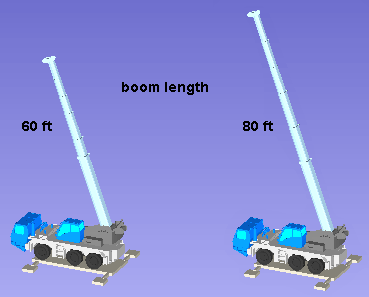
Boom length: The boom length that is entered here does not affect Lift Information . It only affects how the crane's boom is drawn in the model.
|
Boom length affects the appearance of the truck crane in the model only. The actual " Boom length " for various " Evaluation Points " is reported on the Lift Information window for a particular lift. |
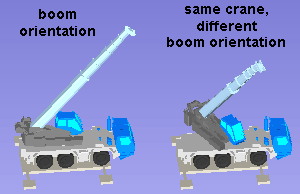
Change boom orientation: This applies to Edit Crane operations only. The option does not appear for Add Truck Crane operations. The boom orientation does not affect Lift Information . It only affects how the crane's boom is drawn in the model.
|
Boom orientation affects a crane's appearance, not its functionality. For purposes of acquiring Lift Information , a crane's boom is assumed to be able to rotate as needed, independent of the choice you make here. |
If this box is checked (
), you will be prompted, in the status line , after you press " OK " to close this window, to " Choose boom orientation ." Move your mouse pointer (
) snaps to any point along an axis that you want the boom to be oriented with respect to, then left-click ( Locate ).
If the box is not checked (
), the current boom orientation will be retained.
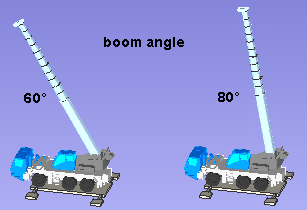
Boom angle: A number of degrees . This does not affect Lift Information . It only affects the way that the crane is drawn in the model.
|
Boom angle affects a crane's appearance in the model only. The actual " Boom angle " for various " Evaluation Points " is reported on the Lift Information window for a particular lift. |
Change placement: ![]() or
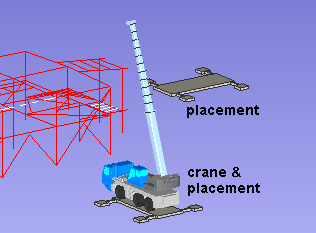
or ![]() . This applies when this window opens for an Edit Crane operation. This option does not appear on this window for an Add Crane operation. It appears only if you are editing a crane which has more than one placement assigned to it.
. This applies when this window opens for an Edit Crane operation. This option does not appear on this window for an Add Crane operation. It appears only if you are editing a crane which has more than one placement assigned to it.
|
Since the truck crane in this example has two placements , you could check the box for " |
If this box is checked (
If the box is not checked (
![]() opens the Lift Configuration window.
opens the Lift Configuration window.
|
The version of the Lift Configuration window that appears when you press this button does not have any "
![]() opens a window with information from the developer of the truck crane specification that you selected in step 2 . The information might, for example, be a manufacturer's source reference for that specification. You can enter " Spec Notes " text for a particular specification by pressing the " Notes " button on the Truck Crane Specification window.
opens a window with information from the developer of the truck crane specification that you selected in step 2 . The information might, for example, be a manufacturer's source reference for that specification. You can enter " Spec Notes " text for a particular specification by pressing the " Notes " button on the Truck Crane Specification window.
![]() To close this window :
To close this window :
![]()
![]()
![]()
"OK" closes the Truck Crane window and applies any changes you have made on it.
For an Add Truck Crane operation, see the instructions beginning with step 5 . Not all of the instructions may apply since what happens after this window closes depends on choices that you made on this window.
For an Edit Truck Crane operation, see the instructions beginning with step 5 .
"Cancel" closes the Truck Crane window without applying any of the changes you made to it.
"Reset" undoes any changes made to the Truck Crane window since you first opened it.
Exception: " Reset " does not undo changes made by pressing the " Lift Config " button to open the Lift Configuration window for the crane. It only undoes changes to those settings that are immediately visible on the Crane Placement window.

