 Edit Crane Placement ( Modeling )
Tool summary :
The options " Change footing orientation " and " Change furthest laydown point " appear for Edit Crane Placement operations only.
- While all settings on the Crane Placement window are unique to the one crane placement you are adding or editing, the " Lift Config " button opens a different window that lets you apply default settings that can be overridden by editing an individual managed lift that is associated with this crane placement.
Also see :
- Cranes and crane placements (topic)
Edit Crane Placement (step-by-step instructions)
You need to be in a Modeling view where the crane placement is visible. You must do either step 1 (preselection) or step 3a (in-tool selection) to perform this operation.
1 (optional) : Select the crane placement you want. There's multiple ways to do this. Note that if you use method three (double-click) or method 4, you skip steps 2 and 3.
|
|
|
Select Items mouse bindings |
▸ Move your mouse pointer (
) so that it hovers the crane placement that you want. If User and Site Options > Modeling > " Show balloon description " is turned on, the program will identify the crane placement's " Placement name ." Left-click ( Select ) to select the placement. Go to step 2.
▸ Move your mouse pointer (
▸ Hover the crane placement with your mouse pointer (
▸ Hover the crane placement with your mouse pointer (
2 (if you skipped step 1 or used methods 1 or 2) : Invoke Edit Crane Placement using any one (1) of the following methods:
▸ Click the Edit Crane Placement icon. The icon can be taken from the group named ' Model -- Cranes ' and placed on the ribbon.
▸ Edit Crane Placement can also be configured to be invoked using a keyboard shortcut , the context menu , or a mode . For the lightning interface, this configuration is done using Customize Interface .
3 . Skip this step if you already selected a crane placement in step 1.
|
|
|
Select One Item mouse bindings |
3a (if you didn't preselect a crane placement) : The status line prompts you to use Select One Item mode options to " Locate crane placement ." Left-click ( Select ) the crane placement that you want.
4 . The Crane Placement window opens. On it are the settings for the crane placement that you selected in step 1a or step 3a. Make any changes you want to the window, then ...
Alternative 1 : Press the " OK " button to continue. Go to step 5
Alternative 2 : Press the " Cancel " button to end this operation without changing the crane placement.
5 . If you choose to " Select location " or " Select location with locked elevation " or " Change footing orientation " and/or " Change furthest laydown point ," you will be prompted to locate points in the model. Once you have located those points, your changes to the crane placement will become permanent.
|
|
|
mouse bindings |
Note: If you are prompted to locate a point and you decline to do so by doing a right-click ( Return ) or hitting the Esc key, you will end this operation without changing the crane placement.
A special case: If, in step 4, you pressed the " Lift Config " button and then made changes on the Lift Configuration window for this crane placement, or if you changed the " Placement location ," your changes may affect the " Status " of lifts, and a window like the following may open:
|
"All" removes all lifts that have been assigned to the placement that you just edited. To add new lifts, you can use Assign Member Lifts or related tools.
"Failed" removes only those lifts that have failed due to the changes you made in step 4 .
"Close" simply closes this window, keeping intact the changes you made to the crane placement. Since the performance of lifts may have changed as a result, you may want to use Manage Lifts to review the lifts for the affected crane placement.
| Crane Placement |
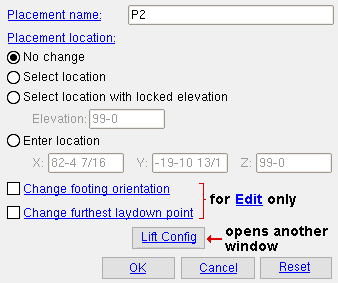
Placement name: The name that you want to give this crane placement. For example, type the name used for the first crane placement assigned to a particular crane, followed by the number 2 to designate that this is the second crane placement for that crane.
The name you enter here will be referenced in the balloon description that appears when you hover this crane placement with your mouse pointer (
If, in the model, you hover the crane placement with your mouse pointer (
On the Status Display window, you can select a placement name for Shipping and erection status > Member lift assignment in order to display members assigned to be lifted at that placement.
On the edit windows of members that have been assigned to be lifted at a particular crane placement, the name of that crane placement is reported as the " Lift assignment ."
The name will also appear on reports with information related to this crane placement.
Placement location: ![]() No change or
No change or ![]() Select location or
Select location or ![]() Select location with locked elevation or
Select location with locked elevation or ![]() Enter location . Each crane placement has a single exact point that matches its " Placement location ."
Enter location . Each crane placement has a single exact point that matches its " Placement location ."
|
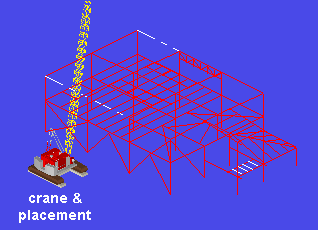
If you were to move the crane placement in this example, the crawler crane that is attached to it would also move. Regardless of whether or not a crane is attached, changing the " Placement location " does affect the Lift Information of lifts in that placement -- see the warning below. |
'
No change ' keeps the " Placement location " where it is at if you are doing an Edit Crane Placement . The option does not appear for Add Crane Placement operations.
'
) snaps to the point you want, then left-click ( Locate ).
'
'
Changing the placement location will affect the performance of lifts that are assigned to the placement you are currently editing. You will get this warning if you change the placement location. The performance of lifts are evaluated in the Lift Information .
Change footing orientation: ![]() or
or ![]() . This applies to Edit Crane Placement operations only.
. This applies to Edit Crane Placement operations only.

|
Changing the footing orientation of a placement does not affect the Lift Information of any of the lifts in that placement. |

|
If this box is checked (
), you will be prompted, in the status line , after you press " OK " to close this window, to " Choose footing location ." Move your mouse pointer (
If the box is not checked (
), the current footing orientation of the crane placement will be retained.
Change furthest laydown point: ![]() or
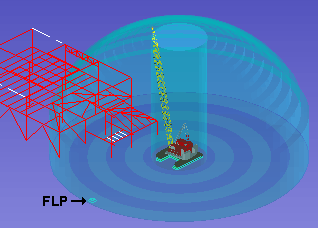
or ![]() . This applies to Edit Crane Placement operations only. The furthest laydown point is used as the pick point when Show Liftable Members evaluates liftability at the pick point. The changed laydown point will become the default pick point " Location " for any member lift or load lift (user-defined lift) or multi-lift that you later assign to this placement.
. This applies to Edit Crane Placement operations only. The furthest laydown point is used as the pick point when Show Liftable Members evaluates liftability at the pick point. The changed laydown point will become the default pick point " Location " for any member lift or load lift (user-defined lift) or multi-lift that you later assign to this placement.
|
When a crane placement is selected, the furthest laydown point for that placement is identified with a |
If this box is checked (
If the box is not checked (
Changing the furthest laydown point may affect the results you get using Show Liftable Members . The furthest laydown point is used as the pick point when that tool evaluates liftability.
![]() opens the Lift Configuration window for this crane placement.
opens the Lift Configuration window for this crane placement.
|
The version of the Lift Configuration window that opens from this window (for this crane placement) will have default settings ("
Similarly, any settings that you apply to the Lift Configuration window for this crane placement become the default Lift Configuration settings for individual lifts that are associated with this crane placement.
Changing settings on the Lift Configuration window for this crane placement can affect the performance of individual lifts that are assigned to the placement. You will get this warning if you change the Lift Configuration settings.
![]()
![]()
![]()
"OK" closes the Crane Placement window and applies the changes you made to it.
If this window was opened for an Add Tower Crane operation, continue to step 5 .
For an Add Crawler Crane operation, continue to step 5 .
For an Add Crane Placement operation, continue to step 4 (if applicable) or step 5 .
For an Edit Crane Placement operation, you may receive additional prompting to locate points in the model if you checked the box for "
"Cancel" closes the Crane Placement window without applying any of the changes you made to it.
It ends an Add Tower Crane or Add Crawler Crane or Add Truck Crane operation without adding the crane or its crane placement.
It ends an Add Crane Placement operation without adding the crane placement.
It ends an Edit Crane Placement operation without making any changes.
"Reset" undoes any changes made to the Crane Placement window since you first opened it.
Exception: " Reset " does not undo changes made by pressing the " Lift Config " button to open the Lift Configuration window for the crane placement. It only undoes changes to those settings that are immediately visible on the Crane Placement window.

