The Rotate Material window
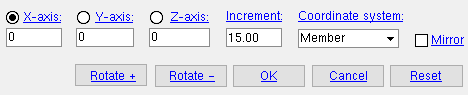
- The Rotate Material window lets you rotate a material around an axis drawn through its origin point and thus change that material's orientation in the 3D model.
- Select the " Coordinate system " that you want.
- Select the axis (
 " X " or " Y " or " Z ") that you want to rotate around.
- Enter a number (of degrees) to " Increment ."
- Press the " Rotate + " or " Rotate - " button to rotate the material.
- Repeat steps 2, 3 & 4 for different axes until the material is rotated as you want it to be. Press the " OK " button to close this window and save your changes to the 3D model.
- An alternative procedure: Instead of doing the above, you can enter a number (of degrees) into the " X " or " Y " or " Z " field, then Tab out of the field to cause the material to rotate around that axis.
- Tip: Press the " Reset " button if you want the material to revert back to its original rotation.
- To open this window:
- Add Material
- Rotate Material
- Add Miscellaneous Member (if the miscellaneous member is legacy)
- Add Assembly (optionally can use screen coordinates )
- Add Assembly as a Legacy Miscellaneous Member
- Paste From Clipboard
Also see :
- Material reference point (axes rotated around originate at this point)
- Global axes (a type of axis that material can rotate around)
- Member axes (a type of axis that material can rotate around)
- Material axes (a type of axis that material can rotate around)
- Screen axes (assemblies can be rotated around)
add material | add miscellaneous member | rotate material | top
------ Settings ------
| Note that the to-be-rotated material and its reference point ( origin ) is shown on screen along with the axes associated with the selected " Coordinate system ." Options on this window can be used to rotate material around axes that originate at the material's reference point. |
![]() X or
X or ![]() Y or
Y or ![]() Z: The number of degrees of rotation around the particular axes. Validation allows an entry between +/-.001 and +/-180. When you first open this window (or press " Reset "), these fields show the current rotation of the material. You can change this rotation by entering a different a number of degrees, or you can select (
Z: The number of degrees of rotation around the particular axes. Validation allows an entry between +/-.001 and +/-180. When you first open this window (or press " Reset "), these fields show the current rotation of the material. You can change this rotation by entering a different a number of degrees, or you can select ( ![]() ) one axis to rotate around, then follow the step-by-step instructions . Please note the following:
) one axis to rotate around, then follow the step-by-step instructions . Please note the following:
For the " Global " or " Member " coordinate systems, the material rotates to a position defined by the number you enter (the material will rotate the number of degrees you enter if the original setting was zero). You can recreate a material's rotation at any point by entering the amount of " X " " Y " and " Z " rotation that was reported at that point -- even if you have exited this window in the meantime.
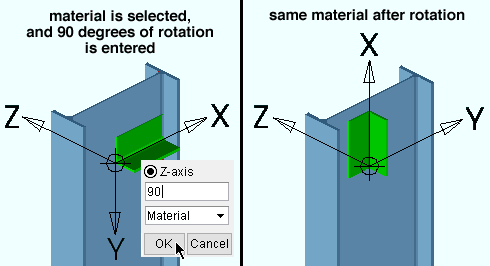
If " Material " is the selected coordinate system, the material rotates the number of degrees that you enter as the " X " or " Y " or " Z " rotation. However, for this coordinate system, the rotation reported at any time in the " X ," " Y " or " Z " fields cannot necessarily be recreated by entering the same numbers at a later time.
For Add Assembly operations, " Screen " is, by default, the selected coordinate system.
Increment: Any number of degrees between .001 and 180. User and Site Options > Modeling > " Rotation increment " sets the default for this field.
The material rotates this number of degrees around the selected axis (" X " or " Y " or " Z ") when the " Rotate + " or " Rotate - " button is pressed. Increments of thousandths of a degree are allowed.
For more details, see the step-by-step instructions .
Coordinate system: Screen ( optional for assemblies ) or Global or Member or Material . Select the coordinate system that you are comfortable using. The reported " X " and " Y " and " Z " values update as the coordinate system is changed. The X-Y-Z axes that are drawn through the material's origin also change as the " Coordinate system " is changed.
' Screen ' is optional for Add Assembly operations only. Selecting this option lets you rotate the assembly around screen axes . See the step-by-step instructions .
' Global ' causes global axes to be drawn on screen through the material's origin . See the step-by-step instructions .
|
||||||||||||||||
| The axes boxes show how global axes look as you go from view to view. | ||||||||||||||||


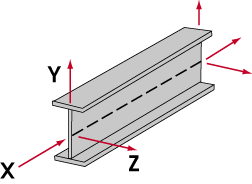
' Member ' causes member axes to be drawn on screen through the material's origin . See the step-by-step instructions .
|
| Member axes for a legacy miscellaneous member . These axes would be drawn along the top flange on a beam. |
' Material ' causes material axes to be shown on screen. For this " Coordinate system ," the rotation reported at any time in the " X ," " Y " or " Z " fields cannot necessarily be recreated by entering the same numbers at a later time. See the step-by-step instructions .
|
| X, Y and Z material axes move with the material as the material is rotated. |
Mirror: ![]() or
or ![]() . Mirroring is done based on the material's location when this window was originally opened. For best results when mirroring, press the " Reset " button, then mirror the material, then rotate the material.
. Mirroring is done based on the material's location when this window was originally opened. For best results when mirroring, press the " Reset " button, then mirror the material, then rotate the material.
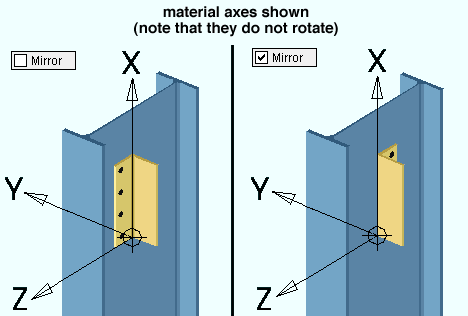
When this box is checked (
), the material (along with any holes added to it) will be mirrored across a plane through the origin reference point and parallel to its X and Y material axis (perpendicular to its Z axis).
When the box is not checked (
), the material will not be mirrored.
add material | add miscellaneous member | rotate material | top
Rotate buttons (see the step-by-step instructions ) :
![]()
" Rotate + " rotates the material counterclockwise around the selected axis (" X " or " Y " or " Z "). The material will be rotated the number of degrees that are entered to the " Increment " field.
" Rotate - " rotates the material clockwise around the selected axis.
add material | add miscellaneous member | rotate material | top
To close this window :
"OK" (or the Enter key) closes this window and applies the rotation settings that are shown on it.
If the " Coordinate system " is ' Member ' or ' Material ' and you later use Rotate Material to open this window again, you will find that amount of rotation reported for " X ," " Y " or " Z " to be the same as when this window closed.
"Cancel" (or the Esc key or the ![]() button) keeps the material rotated as it was before this operation began.
button) keeps the material rotated as it was before this operation began.
For Rotate Material or Add Assembly , " Cancel " ends the operation.
For Add Miscellaneous Member or Add Material operation, " Cancel " sends you back to the work point location step(s) of that operation.
"Reset" undoes any rotation that has been applied to the material on this window, thus reverting the material back to its original rotation.
add material | add miscellaneous member | rotate material | top

