 Add Material ( Modeling > F3 )
Tool summary :
- Adds a submaterial to a member. Select a member before activating the tool, or be prompted to select a member afterwards.
- The Material Type Selection window opens so that you can select the type of material that you want.
- Work point layout is based on the material you select. For most materials, locating two work points at the same place gets you a cross-section. Locating two points at different places defines the longitudinal axis (length) of the material. When two points are located from left to right (see example ), the material is below the workline.
- The first point that you locate is the material's left end and the pivot point around which the material is subsequently rotated.
- Add Material does not make a member graphical . Also, the material is preserved as part of the member even if that member later undergoes Process and Create Solids .
- Material cannot be added to a member that has its " Model completed " date set or to a non-miscellaneous member that is marked for process .
- If you are adding material that already exists in your current Job, consider using Material Copy or Add Assembly instead of Add Material . Or you can place "existing material" using Add Material . Material can also be added using Run Parametric .
- When you add a material to a member, the material becomes a submaterial of that member. Consequently, the material is shown on the member detail and listed in the member bill of material. The material will be shown on the detail and in the BOM even if you do not shop bolt or shop weld the material to the member. Also, the material does not have to touch the member to be a submaterial of the member.
- An alternative to Add Material: If you want to add material that will be shipped independently (not as a submaterial of a member), you should press F2 > check the box for "
 Miscellaneous Steel " > double-click the miscellaneous member type you want to add. Each miscellaneous member type is named after a material type.
- See (on this page):
Also see :
- Modeling (where Add Material is a tool)
- A solid form (member material is added to needs to be in)
- Bolt (a material type you can select when you Add Material )
- Model completed (material cannot be added to a member with this date set)
- Material Type Selection window (opened with Add Material )
- Rotate Material window (opened with Add Material )
- Material Copy (alternative to Add Material )
- Add Assembly (alternative to Add Material )
- Add Misc Member (similar to Add Material , but adds member)
- Set Reference Point (to change dimensioning reference point of added material)
- Add Material access control ( Utility )
Quick instructions (also see the Detailed instructions ) :
Preselection versus in-tool selection: This example shows preselecting a member in Select Items mode, then invoking Add Material . In-tool selection takes place when you do not do step 1 or select items other than just one member in step 1. Also, if you invoke Add Material from a mode, you can combine steps 1 and 2.
Restrictions: Material cannot be added to a member that has its " Model completed " date set or to a non-miscellaneous member that is marked for process .
|
1 . Select a member to add the material to. It changes to the " Primary selection color " (green). |

|
2 . Invoke Add Material and select the type of material to add. |
|
3 . Left-click ( Locate ) when the point location target snaps to the material's 1st point (its left end). |
|
4 . Left-click ( Locate ) when the point location target snaps to the material's 2nd point (right end). |
|
5 . Enter the settings for the material. |
|
6 . Press the " OK " button to accept the rotation that is shown on the Rotate Material window. |
|
7 . Left-click ( Locate ) when the target snaps to where you want the dimensioning reference point. |
|
8 . Right-click ( Return ) unless you want to add more material to this same member. |
Detailed instructions (also see the quick instructions ) :
The following instructions assume that you are using a 3-button mouse. You must do either step 1c (preselection) or step 3 (in-tool selection) to perform this operation.
1 . Before using this tool:
1a : The member you want to add the material to should be displayed in one of the three solid forms . Also, the member must be up to date, not marked for process . You may want to Construction Line Add Material to automatically generate construction lines along the edges and gage lines and half-depth of the material you want to add the material to. These can be used for point location when adding material.
1b (in many cases) : Snap to Surface of the member that you want to add the material to and place construction lines so that there are INCL points where you want to locate the material's work points. In some cases you may wish to add material during Find Material or Isolate Member .

Select Items bindings (step 1c) 1c (optional) : With an appropriate selection filter selected, select the one (1) member that you want to add the material to. When selected, the member will be displayed in the " Primary selection color ," which by default is green.
2 . Invoke Add Material using any one (1) of the following methods:
▸ Click the Add Material icon, which is pictured above. The icon can be taken from the group named ' Model -- Material ' and placed on the ribbon.
▸ Add Material can also be configured to be invoked using a keyboard shortcut , the context menu , or a mode . For the lightning interface, this configuration is done using Customize Interface . The default keyboard shortcut for Add Material is F3 .
▸ With Material Mode mouse bindings active, place your mouse pointer (
) on the member you want to add the material to, then middle-click ( Add ).
3 . Skip this step if you preselected a member. .
|
|
|
Select One Item bindings |
3a (if you didn't preselect) : Add Material prompts you to use Select One Item mouse bindings to left-click ( Select ) the one member you want to add the material to.
4 . The Material Type Selection window opens.
Alternative 1 : Select a material type then press " OK " to close the window.
Alternative 2 : Double-click a material type. The window will close without your having
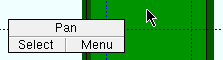
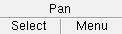
5 . Various Locate options become active along with Locate- Pan -Return mouse bindings. Do the following:
|
|
|
bindings |
5a : Select the Locate icon you want (if it's not selected already). Place your mouse pointer (
5b : Repeat step 5a to either locate a second point in the same place (to get a cross section), or to locate the second point where you want the right end of the material.
Note: The work points of some materials such as flat plate layout or bent plate layout may be designated by more than two points. Whether you locate points from left to right or down to up determines how the material is oriented (see the Material Type Selection window).
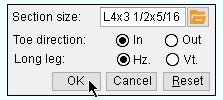
6 . The edit window for the type of material you selected in step 2 appears on screen. Tip: The first work point you located (in step 5a) is identified as the "left end" on this edit window.
6a : Change the settings as needed. If you are adding a rolled section (for example, a L , C , or W section), the section size you enter must be listed in the local shape file . For all types of material, a distance must be entered to the length field.
6b : When you have finished filling out information for both ends of the material, press the " OK " button at the bottom of the window.
7 . The Material Warning List opens. It lists by member number and piecemark the member you selected in step 1c (or 3a) and notifies you that this member will have to be redetailed.
![]()
![]()
Alternative 1 : Press " Yes " to add the material. Go to step 8.
Alternative 2 : Press the " No " button at the bottom of the warning list window to cancel the Add Material operation and keep everything as it was before step 2. Do not continue.
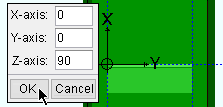
8 . The material appears on screen along with the Rotate Material window. The material origin reference point symbol (cross hairs within a circle) is shown on the material at the point you located in step 5a. The axes that you can rotate the material around (by default, " Member " axes) are drawn on screen through the origin symbol. Do one (1) of the following:
Alternative 1 : If the material does not need to be rotated, press the " OK " button. Go to step 9.
Alternative 2 : Rotate the material around one or more axes (changing the " Increment " as needed). Press " OK " when the material is rotated the way you want it. Go to step 9.
Alternative 3 : If you want to undo the last steps of the Add Material operation, press the " Cancel " button. Go back to step 5.
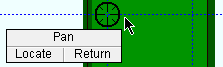
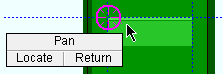
9 . Locate- Pan -Return mouse bindings become active, and the status line prompts, "Locate material dimension reference point."
|
|
|
bindings |
Alternative 1 : Select the Locate icon (snap) that you want, place the point location target where you want this material to be dimensioned from during Detail Members , then left-click ( Locate ). Go to step 10.
Alternative 2 : Right-click ( Return ) to accept the default position of the reference point (the default position is the first point that you located, in step 5a). Go to step 10.
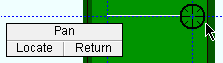
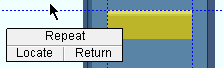
10 . Locate - Repeat - Return mouse bindings become active along with Locate options. Do one (1) of the following:
|
|
|
bindings |
Alternative 1 : Follow these instructions beginning with step 5 to add similar pieces of this same material to the member.
Alternative 2 : To add at a different location a duplicate of the material that you just added, position the point location target at that location and middle-click ( Repeat ).
Alternative 3 : When you are done adding material, right-click ( Return ). Possibility 1 : The mouse bindings that were active before you began this operation become active again. You are done with this operation Possibility 2 : Go to step 11.
11 . This step only applies if members that are like the member to which you are adding the material exist in your current Job. In which case, the Add Material - Options dialog opens. The dialog's " All members with the same mark " option applies to members with the same member piecemark . The " All like members (any mark) " option applies to those same members and may also apply to additional members that are exactly the same but have different marks -- for example, because you have applied a " User piecemark ."
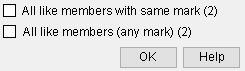
Alternative 1 : Check the box for one or the other of these options (
Alternative 2 : Leave the options not checked (
) if you want to apply the material to only the one member that you selected in step 1c (or 3a). Press the " OK " button. The mouse bindings that were active before you began this operation become active again.
12 . Any members affected by this operation are automatically marked for detailing.
Tip 1: To bolt a material to the main material of a beam, column, brace, girt or purlin, Add Holes to the material, then Mark for Processing the members. Process and Create Solids will automatically hole match the user-add holes to the member main materials and then generates bolts through the matching holes. For a miscellaneous member, you can interactively Match Holes , then Add Bolts .
Tip 2: To change the dimensioning reference point of the material(s) added using Add Material , use Set Reference Point .
Tip 3: After you have added material to a member, you may wish to create " Preset " or " New " member views in member isolation so that a view of the newly added submaterial will appear on the member detail.
Tip 4: When you have finished adding material to members, remember to visually inspect your work. Also, you may wish to perform a Clash Report to detect materials that overlap.

