Opens the Point Cloud Manager which lets you import, manage, and control E57 point clouds.
General Overview
Step-By-Step
Tips and Tricks
Related Tools
Delete:
Removes the particular point cloud scan from your job.
If all of the point cloud scans are currently present in the 3D model, a dialog prompts you to confirm the removal of all scans from its entire group. Clicking Yes removes all the scans in the cloud group that the selected name belongs to. If you click No, another dialog asks you to confirm the deletion of only the single scan the button is associated with.
Transform: Allows you to translate (move) the point cloud scan to a different location. The method of translation depends on the selection you make for Translate override.
Properties: Opens a Point Cloud Properties dialog that lists properties of the particular scan.
Color: or . Click the color swatch next to the check box to define a color using your operating system's color picker.
When this box is checked ( ), all points of the scan are displayed in the color that is specified here.
When the box is not checked ( ), the points are displayed using the colorization of the imported E57 file.
Visible: or .
When this box is checked ( ), the particular scan is displayed in the model. A Yes-No dialog gives you the option to show all scans within its group.
When the box is not checked ( ), the scan is hidden. A Yes-No dialog gives you the option to hide all scans within its group.
Row) Name: The items listed in this column are scans from point clouds that have been added using Import New File.
Names are listed in this format: [cloud group name] : [cloud scan name] : [cloud scan description]. If the point cloud was imported from a file, the cloud group name is the same as the originating file's name. If the scan was created by a user, the group name is "Limited-volume fence." Not all scans have description fields.
Translate override:Specify or Mouse. These options determine how you translate (move) the point cloud in the model when you click the Transform button.
If Specify is selected, the Transform Point Cloud window opens. The options on this window are the same as the Point Cloud E57 Options window that appears when you Import new File.
If Mouse is selected, the status line prompts you with the following steps:
1."Locate a reference point." Left-click (Locate) a reference point. You can also right-click to cancel the process.
2."Locate a destination point." Left-click (Locate) a destination point where you want the point cloud to be moved in relation to the reference point you located in step 1. You can also right-click to cancel the process.
3."Confirm new point cloud location." Left-click (Yes) to confirm, or right-click (No) cancel the process.
Press All to check ( ) the Visible setting for every point cloud scan.
Press None to uncheck ( ) the Visible setting for every point cloud scan.
Fence: Creates a new cloud point scan out of one or more selected points from any point cloud that has already been imported into the 3D model.
You select points for the new scan by using a selection window, which may be sized to create a clipped copy of the selected point cloud.
Creating a new scan increases the number of points in the 3D model.
The new scan is added to the "Limited-volume" point cloud group. If no points are selected, no point cloud scan will be created.
1. Before creating a scan:
1a(recommended): Switch to a plan view. To create a new scan, the originating view must be a plan view; however, the program can reorient you to a plan view in the next step.
1b(optional): Turn depth checking off or on to suit your purposes. You can only select scans whose points are visible in your current view, so you may turn it off, for example, to exclude a scan's points from the to-be-created scan
2. Press the Fence button.
A possibility: You are not in a plan view oriented so that its Y-axis is perfectly vertical and its X-axis is perfectly horizontal, relative to your computer screen. In that case, an alert opens. Click Yes to let the program reorient you to a plan view, or click No to cancel the creation of a new cloud point scan.
3.Locate- Pan -Return mouse bindings become active. The status line prompts, "Locate area that will bound limited-volume."
Alternative 1: Drag your mouse pointer diagonally across the screen while holding down the left mouse button (Locate) to form an area box around the rectangular area whose points you want copied into the to-be-created point cloud scan. Release the mouse button and go on to step 4.
Alternative 2: Right-click (Return) to end the Fence operation without adding a new point cloud scan to the model.
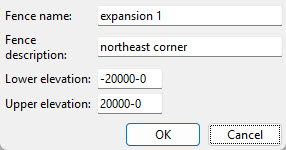
4. The Limited-volume Fence Properties window opens. Make the choices that you want on this window, then press OK. A point cloud scan is added to the 3D model. On the Point Cloud Manager window, a new entry is added belonging to the cloud group "Limited-volume."
Fence name: A string added to the scan's Name by which it is listed in the Point Cloud Manager window. In the example above, the to-be-created scan will be called "Limited-volume: Fence name : east corner."
Fence description: A string added to the scan's Name by which it is listed in the Point Cloud Manager window. In the example above, the to-be-created scan will be called "Limited-volume: Cloud name: east corner."
Lower elevation: 0 or a +/- distance. This defines the lower boundary of the selection you make when you Fence a point cloud scan. Points beyond the upper and lower boundaries will not be included in the to-be-created scan.
Upper elevation: 0 or a +/- distance. This defines the upper boundary of the selection you make when you Fence a point cloud scan. Points beyond the upper and lower boundaries will not be included in the to-be-created scan.
Import New File:
Imports a new point cloud into your model.
1. Press the Import New File button.
2. A selection window opens. Navigate to the folder that contains the file you want to import, then select the file. You can only select an E57 (.e57,.E57) file -- no other file type or extension is supported.
3. The Point Cloud E57 Options window opens. Make the choices that you want on this window, then press OK. A progress bar is displayed while the point cloud is being imported from the file you selected.
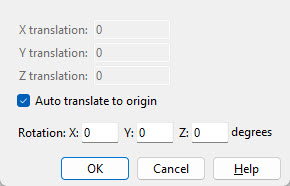
X translation: 0 or a +/- distance. This option can be used to adjust the global X axis coordinate of the point cloud. If you Auto translate to origin ( ), this option is disabled -- grayed out.
Entering a positive distance results in that amount being added to the X coordinate information that is in the E57 file.
Entering a negative distance results in that amount being subtracted from the X coordinate information in the file.
Y translation: Same as X translation, except that the translation will be done with respect to the global Y axis.
Z translation: Same as X translation, except that the translation will be done with respect to the global Z axis. You should only use Z translation if you want the point cloud to be brought to a higher or lower elevation.
Auto translate to origin: or
When this box is checked ( ), the coordinates of the point cloud scans are adjusted automatically so that an appropriate distance is added to or subtracted from the 0,0,0 global coordinate of the X-, Y-, and Z-axes when the point cloud is imported. Check this when a point cloud's origin is based on a survey benchmark that is at a great distance from the scanned objects.
When the box is not checked ( ), The X..., Y..., and Z translation options are enabled.
Rotation (degrees):X and/or Y and/or Z rotations can be entered.
Tip: To tell which global axis is which in a particular Modeling view, you can add an axes box to your toolbar.
These are global axes. For example, the Z axis is the elevation axis. It is oriented vertically.
Entering a positive number of degrees to X or Y or Z rotates the point cloud counterclockwise about that axis. A negative number rotates it clockwise about the axis.
Refresh List: Updates the information that is shown on the Point Cloud Manager window. When another user in a multi-user environment has imported a E57 point cloud into your current Job, you can Refresh List to add the scans from that point cloud group to the list.
Close: Closes the Point Cloud Manager window. Choices you have made on the window will continue to be applied to a point cloud even after the window is closed.
1. Click the Manage Point Clouds icon, which is pictured above. The icon can be found on the Tools page > Reference Objects section.
Alternative: Invoke Manage Point Clouds using the Find Tool by searching the command name and clicking the icon, which is pictured above.
2. The Point Cloud Manager window appears. When you are done importing new files and managing point clouds, click the Close button.
You can move, color, delete, or toggle the visibility of the scans within each imported point cloud group.
After the model is imported, you can select points from the cloud when the Point Clouds selection filter is active. This is useful, for example, when measuring between such points using the Ruler tool.
 Point Cloud Manager
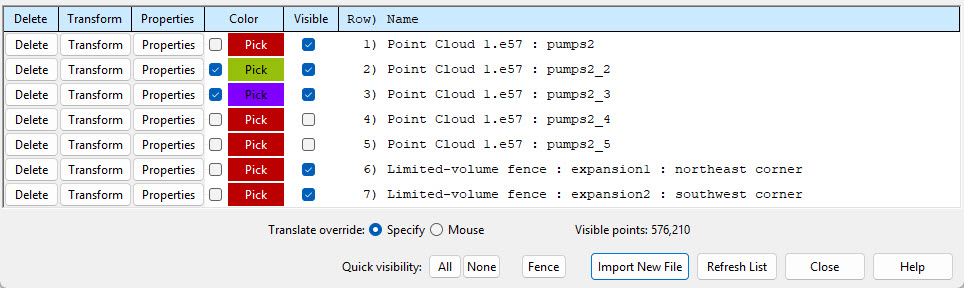
 or
or  . Click the color swatch next to the check box to define a color using your operating system's color picker.
 Specify or
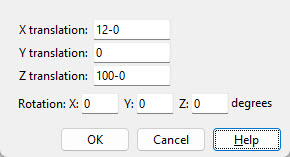


Learn more about alternative methods for launching commands.

