The Concrete Wall Edit window
|
|
|
To open this window (in Modeling ) :
- With the Default filter selected, double-click a concrete wall member.
- Add a concrete wall .
On this page or the Add Concrete Wall page :
- Wall properties (this page)
- Diagram (this page)
- Examples (add page) (
 )
)
- To add a concrete wall (add page) ( )
Also see :
- Modeling (where a concrete wall can be added or edited)
- Add Concrete Wall (tool)
- Rebar System (may be added to a concrete wall )
- Rebar Area Layout (like Rebar System , except the user locates points to define the area)
- Move Layout Nodes (another way to edit the layout )
- Reference Profile Layout (a way to model a wall for reference, without connectability)
| Wall properties |
Height: The vertical distance (in the primary dimension " Units " or other units ) from the bottom of the wall to the top of the wall. Concrete walls are perfectly vertical. All segments of a wall layout are this same " Height ."
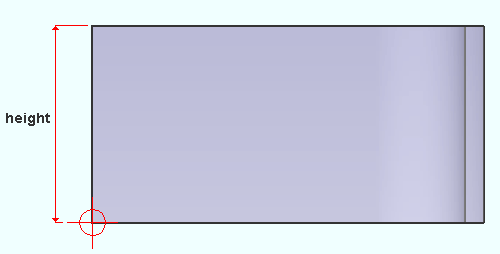
Changing the " Height " moves top of the wall higher or lower. Changing the " Height " does not reposition the bottom of the wall.
Thickness: The horizontal distance (in the primary dimension " Units " or other units ) from the interior face of the wall to the exterior face of the wall. All segments of a concrete wall layout are this same " Thickness ."
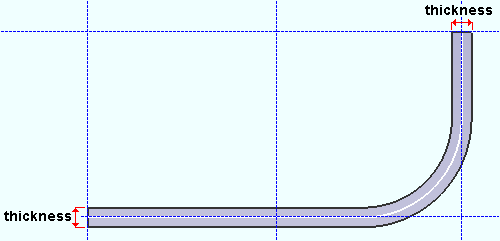
Changing the " Thickness " of a wall does not reposition the member line of the wall. In other words, it does not reposition the representation of the outline of the wall that is shown in stick form .
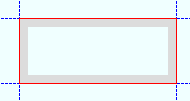
Reference: Center or Interior or Exterior . The choices you have for " Reference " behave differently depending on whether you laid out points for the concrete wall counterclockwise or clockwise. Changing the " Reference " of a wall does not reposition the member line of the wall. It repositions the concrete with respect to that member line. The member line of a wall is originally defined by its layout points and may be modified using the diagram .
If points were laid out counterclockwise:
|
|||
| ' Center ' centers the concrete " Thickness " around the wall's member line . ' Interior ' places the concrete to the interior of the wall's member line. ' Exterior ' places the concrete to the exterior of the wall's member line. |
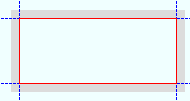
If points were laid out clockwise:
|
|||
| ' Center ' centers the concrete " Thickness " around the wall's member line . ' Interior ' places the concrete exterior to the wall's member line. ' Exterior ' places the concrete interior to the member line. |
Changing the " Reference " results in the " Volume (cubic yards) " " Volume (cubic feet) " and " Total length " being recalculated for this concrete wall after you press " OK ."
 |
| Tip: You can also change the coordinates by using the Move Layout Nodes tool in the model. |
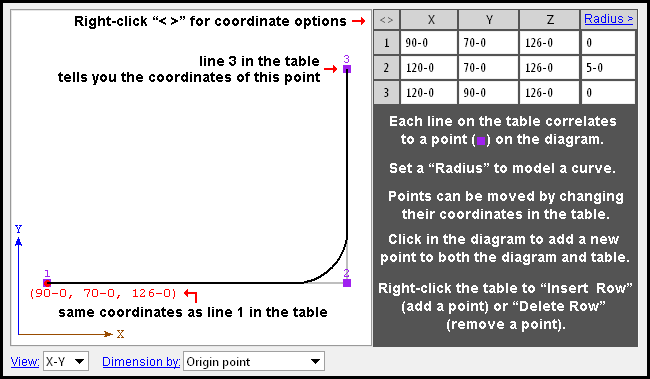
Radius: A distance (in the primary dimension " Units " or other units ) that defines the amount of corner rounding that takes place.
" Radius " is the radius of a circle. Two lines that are tangent to that circle meet at the located point. The arc of the rounded corner ends at the points of tangency of these two lines. 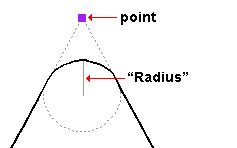
A " Radius " of ' 0 ' designates a sharp corner with no corner rounding.
Increasing the size of the " Radius " moves the edge of the rounded corner back from the corner point. This is because the " Radius " defines a circle that is tangent to both lines to the corner point. The arc of the rounded corner begins and ends at the tangent points.
You can set a different " Radius " for each corner. Clicking on the upper-right corner of the table (" Radius > ") lets you set the radius for each point to be the same value.
' X-Y ' shows a plan view of the layout points . If the " Z-axis " values of the concrete wall are the same (they don't necessarily have to be the same), then this is the view that will best represent the spatial relationships between those points.
' X-Z ' shows a elevation view of the layout points in a flat, X-Z plane that is at right angles to (orthogonal to) the Y global axis .
' Y-Z ' shows a elevation view of the layout points in a flat, Y-Z plane that is orthogonal to the X global axis.
Dimension by: Length and angle or Previous point or Origin point . This applies when you hover a point in the diagram with your mouse pointer ( ![]() ), regardless of whether or not you are adding points.
), regardless of whether or not you are adding points.
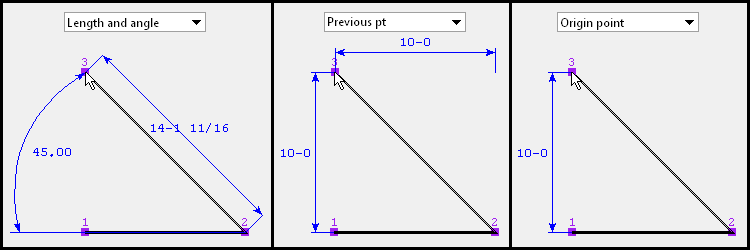
' Length and angle ' shows one or two dimensions and an angle. The dimension(s) are to the point you are hovering. One dimension may be to the previous point, and another dimension may be to the next point. The angle to the point you are hovering may be the included angle between the hovered point and the previous two points. Or it may be the angle between the hovered point and a horizontal or vertical bisector to the previous point.
VIDEO 
" Dimension by " is set to ' Length and angle ' and the distance and angle between points is entered by the narrator as the first two points are defined. The other points are defined by just clicking instead of typing. ' Previous point ' shows horizontal and/or vertical dimensions between the point you are hovering and the previous point in the diagram. Dimensions of zero will not be shown.
' Origin point ' shows horizontal and/or vertical dimensions from the origin point (point 1) to the point you are hovering. Dimensions of zero will not be shown.
Adding points: You can click a line in the diagram to add a point. The new point snaps to your mouse pointer until you left-click to locate that point or right-click to cancel. Dimensions are shown as you move your mouse pointer to reposition the snapped-to point. An alternative to clicking in the diagram to add points is to enter the points to the table.

