Change File Sizes ( Utility Functions )

Also see :

page 1 | contents | home > utilities > utility functions > change file sizes


Example :

You have created a Job and estimated it would have 200 members. Space was then allocated on the hard disk for a Job of that size. Revisions have increased the number of members in the Job to what is projected to be 250. You now would need to use this option to expand the file size, for example to accommodate up to 300 members. Generally it is a good idea to overestimate rather than underestimate the number of items that you need.

page 1 | contents | home > utilities > utility functions > change file sizes | top


Step-by-step instructions :

The Change File Sizes utility should be used when SDS2 programs have been periodically giving you warning messages that you do not have sufficient space allocated for an item of a particular type in your current Job. For example, you might get such a warning message when you are adding members.

1 . Before you begin, e-mail everybody in your work group and make sure that they exit your current Job .

1a : In addition, if allocations for global standards or CNC configurations are to be changed, make sure that all workstations have exited all SDS2 programs that share the data directory used by your current version of the SDS2 program you are running..

2 . Start the Change File Sizes utility:

2a : Home > Utilities > Utility Functions . If prompted to do so, enter a " Utility Password ." Then, on the Utility Functions menu, click " Change File Sizes ."

3 . Change File Sizes automatically closes Home and Utility Functions menu. An ok-cancel warning dialog opens.

All sessions using this job must exit before continuing with Change File Size operation, or database corruption may result.

In addition, if Global Standards or CNC Configurations are to be changed, then you must confirm that ALL workstations have exited ALL SDS2 windows.

No other users in current job.

     
The " OK " button on this window will be disabled (grayed out) if there are any users in your current Job .


Alternative 1 : Press the " OK " button and go to step 4. Note that the " OK " button can only be pressed when there are no SDS2 programs running your current Job .

Alternative 2 : Press " Cancel " to end this operation and keep everything as it was before step 2. You must press " Cancel " when there are login names listed in the dialog pictured above. After you press " Cancel ", Home will be reactivated. If you still want to Change File Sizes , you will need to make certain that users have exited your current Job before you try to perform this operation again.

4 (if applicable) : Skip this step if it does not apply. If your current Job is close to full, you will get a yes-no dialog like the following.

Do you want to expand all files that are over 75% full?


Alternative 1 : Press the " Yes " button to have Change File Sizes automatically fill out the " New Size " fields with quantities greater than currently " Allocated " for those items that are over 75% full. Go to step 5 to make any additional adjustments.

Alternative 2 : Press " No " to have Change File Sizes automatically fill out all the " New Size " fields with the same quantities currently entered for the " Allocated " fields.

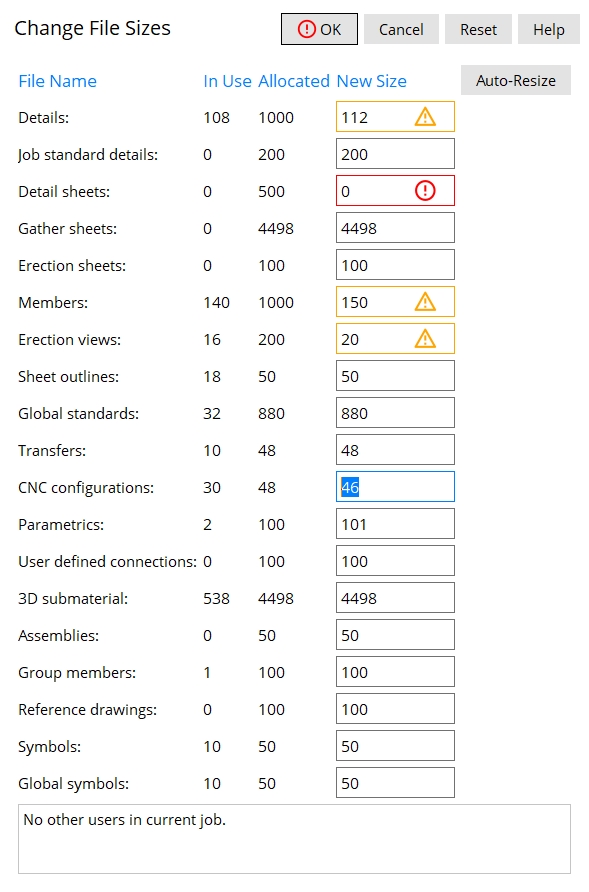
5 . The Expand/Reduce Options window opens. The window consists of a table divided into rows and columns. The " New Size " column sets the space allocated for items with a particular " File Name ." A ' Transfer ' is an output configuration -- other " File Names " should be self explanatory.

read-only read-only read-only
  File Name
( read-only )
In Use
( read-only )
Allocated
( read-only )
New Size
( editable )
The types of files whose allocated space can be changed by adjusting the number reported in the " New Size " column. The quantity of files of the " File Name " type in your current Job . For example, 37 means 37 files of that type have been created in your current Job. The number of files that there is space for in your current Job . For example, 64 means space is available for 64 files of that type. This column lets you change the quantity allocated in your current Job for files of the type described by " File Name ." Changing global standards or CNC configurations affects not just your current Job, but also all Jobs that access the data directory used by your current version of this program.
Please note : If this window says that, for example, 100 members are " In Use " and 1,000 have been " Allocated ," you may not necessarily be able to reduce the " New Size " down to 100. For example, if the member number [200] has been assigned to a member, you can enter a " New Size " no smaller than 200. This principle applies to other types of items as well.

Alternative 1 : Press " OK " to apply changes made to this window to your current Job . The next time you open this window, the numbers currently entered to " New Size " fields will be reported in the corresponding " Allocated " fields. Go to step 6.

Alternative 2 : Press " Cancel " to end this operation without changing file sizes. Do not continue.

6 . Home , which automatically closed in step 3 , is now is automatically reopened.

page 1 | contents | home > utilities > utility functions > change file sizes | top