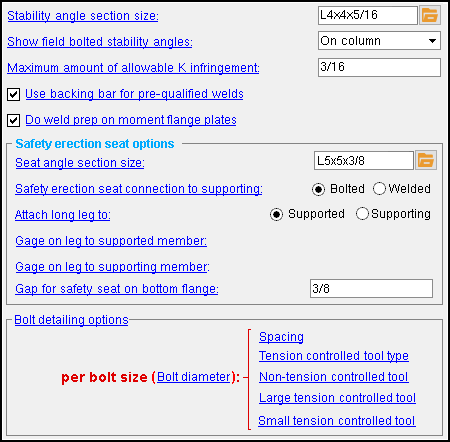
The Connection Erectability Settings setup window ( Fabricator Settings )
| Settings on this window are read-only . They tell you how this window has been set up for this Fabricator in a full-featured SDS2 program . |
Also see :
- Connection design (affected by entries made to this window)
home > project settings > fabricator > detailing > | classic
To open Connection Erectability Settings :
Method 1 : Home > Project Settings > Fabricator > Detailing > Connection Erectability Settings .
Methods 2, 3 & 4 : In Modeling or the Drawing Editor , choose Settings > Fabricator Settings > Detailing > Connection Erectability Settings (classic), or use a keyboard shortcut , or click the icon.
home > project settings > fabricator > detailing > | classic | top
Stability angle section size: The angle section to be used for ' On flange ' field bolted stability angles.
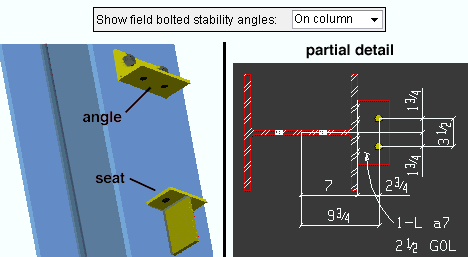
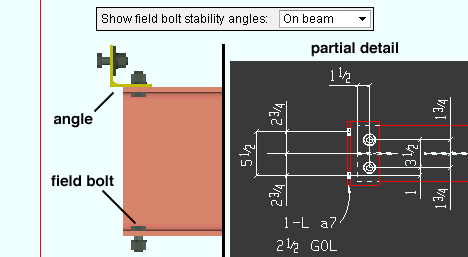
Show field bolted stability angles: On column or On beam or Ship loose . The selection made here applies (in a full-featured SDS2 program ) to selected beams with seated beam connections and also to beams with safety erection angles applied to the ' Top ' flange.
' On column ' designates that the angle be shop-attached to the column (and therefore detailed with the column).
' On beam ' designates that the angle be bolted to the beam in the shop and that it therefore should appear on the detail of the beam.
If ' Ship loose ' is selected, then for seated beam connections a stability angle will not be designed by the program and will not appear on details for either the column or the beam. For a clip angle , bent plate , end plate or shear connection, ' Ship loose ' will cause the safety erection angle to be shop bolted to the column.
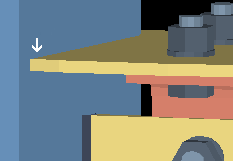
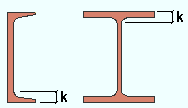
Maximum amount of allowable k infringement: The distance (in the primary dimension " Units " or other units ) that bolted connection material may be allowed to ride on the fillet of a wide flange or channel beam. This field may potentially affect the positioning of clip angles , bent plates , end plates , shear plates and beam splices .
|
k = k distance. Allowable k infringement is the distance a material can overlap into this area. |
Effect on a full-featured SDS2 program: The maximum infringement shown here will never be exceeded in connections that are designed in a full-featured SDS2 program . Connection design in such a program uses the beam's " k distance (detail) " (from the local shape file) to calculate the maximum amount of allowable k encroachment (see AISC Thirteenth Edition , Figure 10-3, p. 10-8). Connection design will use the calculated value unless it exceeds the value shown here. If the calculated value exceeds the value shown here, the program will use the value shown here.
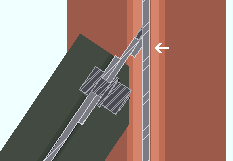
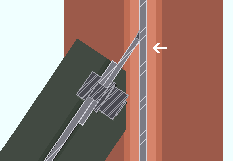
Use backing bar for pre-qualified welds: ![]() or
or ![]() . This applies to skewed beam-to-beam or beam-to-column shear tab connections . Standard practices call for a backing bar to be used for such welds. The views in the following illustrations are from below the top flanges of the beams.
. This applies to skewed beam-to-beam or beam-to-column shear tab connections . Standard practices call for a backing bar to be used for such welds. The views in the following illustrations are from below the top flanges of the beams.
|
|
If this box is checked (
) and ' Automatic ' is selected on the Beam Review window for " Use backing bar ," the program designs a backing bar if the angle between the beams is less than 45 degrees.
If the box is not checked (
) and ' Automatic ' is selected on the Beam Review window for " Use backing bar ," a backing bar will not be designed.
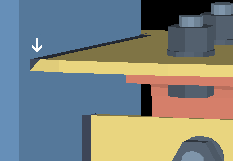
Do weld prep on moment flange plates: ![]() or
or ![]() . This applies to bolted moment connections whose flange plates have groove welds.
. This applies to bolted moment connections whose flange plates have groove welds.
|
|
If this box is checked (
), connection design bevels moment plates for groove welds when such welds are generated for system designed bolted moment flange plates due to loads.
If the box is not checked (
), groove welds are generated for system designed bolted moment flange plates and the Connection Design Calculations (or Expanded Calculations ) report them. However, backing chamfers are not shown in the 3D model
home > project settings > fabricator > detailing > | classic | top
------ Safety seat options ------
Seat angle section size: Any angle section ( angle ) that is listed in the local shape file . The angle is used for the connection design of a safety erection seat when " ![]() Use a safety erection seat " is checked under the "
Use a safety erection seat " is checked under the " ![]() Connection type " leaf on the Beam Edit window.
Connection type " leaf on the Beam Edit window.
Note: If the connection to the supporting member is ' Bolted ', there may not be sufficient entering and tightening clearances for bolts, even when the " Seat angle section size " exceeds the minimum size accepted by validation.
Safety erection seat connection to supporting: ![]() Bolted or
Bolted or ![]() Welded . This setup option applies to the connection design of a safety erection seat when its " Attachment " is set to ' Automatic ' under the "
Welded . This setup option applies to the connection design of a safety erection seat when its " Attachment " is set to ' Automatic ' under the " ![]() Connection type " leaf on the Beam Edit window.
Connection type " leaf on the Beam Edit window.
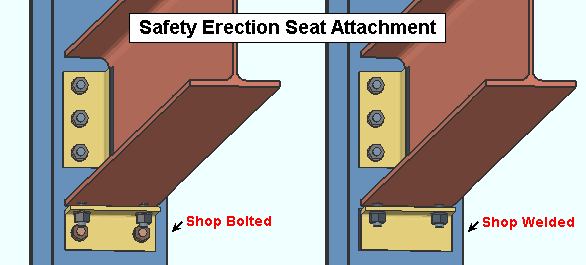
In a full-featured SDS2 program when " Attachment " is ' Automatic ' . . .
'
Bolted ' instructs connection design to shop bolt the safety erection seat to the column.
'
Welded ' instructs connection design to shop weld the seat to the column.
Attach long leg to: Supported or Supporting . This applies if the entered " Seat angle section size " has legs of unequal length.
' Supported ' field attaches the long leg of the angle to the supported beam.
' Supporting ' shop attaches the long leg of the angle to the supporting column.
Gage on leg to supported member: The distance (in the primary dimension " Units " or other units ) from the heel of the angle to the center of the row of holes on the leg that bolts to the supported beam.
Note: Connection design may apply a different GOL than the one you entered, depending on the bolt size, the angle material's allowable entering and tightening clearances, and its minimum edge distance.
Gage on leg to supporting member: The distance (in the primary dimension " Units " or other units ) from the outside corner of the angle to the center of the row of holes on the leg that bolts or welds to the supporting column.
Note: Connection design may apply a different GOL than the one you entered, depending on the bolt size, the angle material's allowable entering and tightening clearances, and its minimum edge distance.
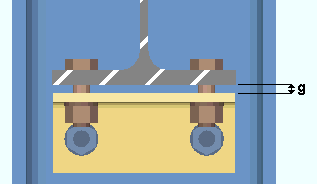
Gap for safety seat on bottom flange: The distance (in the primary dimension " Units " or other units ) of the gap between the safety erection seat and the bottom flange of the supported beam. This applies when " Location of safety erection seat " is set to ' Bottom ' and Auto is checked for " Safety erection seat gap " on the Beam Review window for the supported beam.
|
g = gap between the safety seat and the bottom flange of the beam. |
home > project settings > fabricator > detailing > | classic | top
------- Bolt detailing options -------
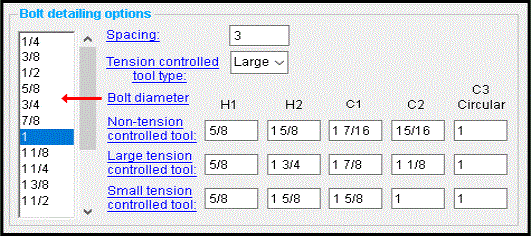
Bolt diameter: The diameter of the bolt (in the primary dimension " Units " or other units ) to which the other bolt detailing options are applied. For each bolt diameter, bolt row " Spacing " is applied, and a " Tension controlled tool type " (' Large ' or ' Small ') is selected. Entering and tightening distances are also entered for each diameter. Bolt diameters that are listed here are commonly recognized imperial and metric bolt sizes. (The diameters checked at Home > Project Settings > Job > Bolt Settings > " Available bolts " have no bearing on which bolts are listed in this selection box.)
Controlling bolt diameters on connections can be done (in a full-featured SDS2 program ) using the " NM bolt type to supported " and " NM bolt type to supporting " (beams), " NM bolt diameter " (columns), " NM bolt diameter " (vertical braces) and " NM bolt diameter " (horizontal braces). The bolt diameter that is used in the connection then sets the row spacing per the bolt " Spacing " values that are entered here.
Spacing: For each " Bolt diameter " that is selected, this option sets the distance between rows of bolts in a system connection .
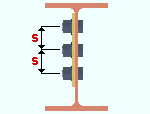
Bolt spacing is the distance between any two adjacent rows of bolts in a connection. A single-plate shear connection is shown in this example. 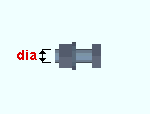
When connection design attempts to create a connection for a particular bolt diameter, it applies the bolt spacing for that bolt diameter, which is entered here. Effect on a full-featured SDS2 program: The bolt spacing values entered here apply in a full-featured SDS2 program to connection design for member ends. " Bolt spacings " potentially affect the positioning of holes on virtually all system connections , with the exception of base/cap plates and moment end plates.
Also see: " Top of Steel to First Hole ."
Tension controlled tool type: Large or Small . The type of impact wrench to be used in the field to enter and tighten tension control (TC) bolts of the selected " Bolt diameter ." The tension control tool type applies to that diameter when a TC bolt is selected for a connection. For example, the selected tool type will apply when a TC bolt is selected as the " NM bolt type to supported " or the " NM bolt type to supporting " under the " ![]() Connection type " leaf on the Beam window. Where TC bolts are used, a connection will fail when there is insufficient clearance for the tension control tool. In that case, changing the tool type, as is done in the following video, can allow the connection to pass.
Connection type " leaf on the Beam window. Where TC bolts are used, a connection will fail when there is insufficient clearance for the tension control tool. In that case, changing the tool type, as is done in the following video, can allow the connection to pass.
VIDEO 
The vertical brace connection failure message " Bolt diameter too large for member or supporting member flange " is cleared by changing from ' Large ' to ' Small ' the " Tension control tool type " for 3/4 inch bolts. (Recorded in SDS2 Detailing , v2018.)
' Large ' instructs connection design to use the " Large tensioned controlled tool " settings to determine which clearances are acceptable for the selected " Bolt diameter ."
' Small ' instructs connection design to use the " Small tensioned controlled tool " to determine which clearances are acceptable for the selected " Bolt diameter ."
Default settings to the "... tensioned controlled tool " options for each bolt diameter use values suited to North American or European erection practices, depending on which " Connection design method " you selected when your current Job was created.
Non-tension controlled tool: The entering and tightening clearance distances for conventional high-strength bolts of the selected " Bolt diameter ." The non-tension controlled tool settings apply to bolts of that diameter when a non-TC bolt is selected for a connection. For example, they apply when a non-TC bolt is selected as the " NM bolt type to supported " or the " NM bolt type to supporting " under the " ![]() Connection type " leaf on the Beam Review window.
Connection type " leaf on the Beam Review window.
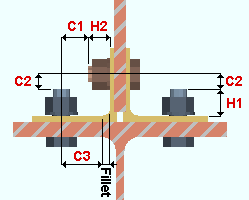
| Entering and Tightening Clearances
(see Table 7-16, p 7-81, AISC 13th ) |
|
|
H1 = height of head H2 = maximum shank extension (based on one standard washer) C1 = clearances for tightening C2 = clearance for entering C3 = clearance for fillet, circular only (based on one standard washer) |
Default settings to these fields for each bolt diameter use values suited to North American or European erection practices and tool diameters, depending on which " Connection design method " was selected when your current Job was created.
Large tension controlled tool: The entering and tightening clearance distances for tension control bolts of the selected " Bolt diameter " when the " Tension controlled tool type " is set to ' Large '.
| Entering and Tightening Clearances
(see Table 7-17, p 7-82, AISC 13th ) |
|

|
H1 = height of head H2 = maximum shank extension (based on one standard washer) C1 (Large) and C1 (Small) = clearances for tightening C2 = clearance for entering C3 = clearance for fillet (based on one standard washer) |
| C1 (Small) settings are set to ' 0 ' by default. | |
Default settings to these fields for each bolt diameter use values suited to North American or European erection practices and tool diameters, depending on which " Connection design method " was selected when your current Job was created.
Small tension controlled tool: The entering and tightening clearance distances for tension control bolts of the selected " Bolt diameter " when the " Tension controlled tool type " is set to ' Small '.
| Entering and Tightening Clearances
(see Table 7-17, p 7-82, AISC 13th ) |
|

|
H1 = height of head H2 = maximum shank extension (based on one standard washer) C1 (Large) and C1 (Small) = clearances for tightening C2 = clearance for entering C3 = clearance for fillet (based on one standard washer) |
| C1 (Small) settings are set to ' 0 ' by default. | |
Default settings to these fields for each bolt diameter use values suited to North American or European erection practices and tool diameters, depending on which " Connection design method " was selected when your current Job was created.
home > project settings > fabricator > detailing > | classic | top
