The Column Review window ( Modeling ) (" Status " & " Properties " enabled )
page 1 | contents | review | top
|
|||||||||||
|
|
||||||||||
Section size: The main material (e.g., ' W12x45 ') of the column(s). Only materials listed in the local shape file can be specified here.
|
||
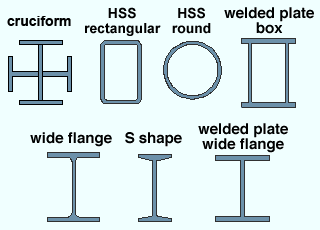
| Wide flange , welded plate wide flange , welded plate box , HSS round HSS rectangular and cruciform are acceptable shapes for which a full-featured SDS2 program is able to design the full range of selectable column " Input connection types ." Connections for braces and beams framing into these types of columns can also be designed (except where the curved surface of a pipe column makes certain connections impractical). |
Invalid section sizes: Material types other than those mentioned above may be used for columns, but the program is not able to generate system connections on those other material types. For instance, a full-featured SDS2 program allows the entry of channel or angle material for columns, but does not generate system connections on such columns. Also, the program only accepts a section size that is in the local shape file .
Note: Column work lines (stick form member lines) are drawn through the neutral axis of a wide flange , welded plate wide flange , welded plate box , HSS round or HSS rectangular column.
Status Display: Member status > Member section size
Piecemark or System piecemark or User piecemark or Frozen piecemark :
Sequence :
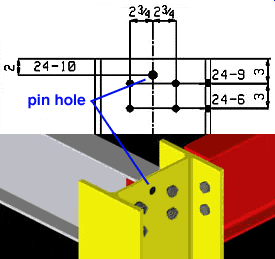
Erection pin hole: Automatic or Yes or No . An erection pin hole is a lift hole near the top of a column that can be used by a crane to lift the column into place.
|
When ' Automatic ' is selected, a full-featured SDS2 program does not design an erection pin hole in this situation if it determines that the pin hole interferes with the clip angle on the beam. It does design one when ' Yes ' is selected. |
' Automatic ' indicates that a full-featured SDS2 program has (or has not) designed a pin hole based on the selection made to " Show erection pin holes on columns " in Member Detailing Settings (setup).
' Yes ' instructs the program to create a pin hole centered on the half-depth line of the column. The pin hole is the diameter and edge distance specified in Member Detailing & Fabrication Options (in Fabricator Options ).
' No ' instructs the program to not design a pin hole -- regardless of the choice made in Fabricator Options .
Column rotation: A positive or negative (-) number from 90 to -90 degrees. ' 0 ' degrees orients the column based on the slope of a column (see the examples below). A ' positive number ' rotates the column counterclockwise from the zero position that number of degrees. A ' negative (-) number ' rotates the column clockwise from the zero position.
| A special case: For a welded plate wide flange column, which can have different-sized (unsymmetrical) flanges, the rotation can be from 0 to 360 degrees. Columns also behave this way for channels and cold formed channels , since they are also unsymmetrical. |
' 0 '  |
' 45 '

|
' -45 '

|
' 90 '

|
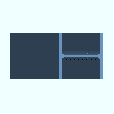
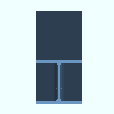
| ' 0 ' degrees sets the web of a perfectly vertical column parallel with the X axis in a plan view. | |||
' 0 ' degrees
 |
' 0 ' degrees
 |
' 0 ' degrees
 |
| As shown in the left example, ' 0 ' degrees sets the web of a sloping column parallel to the X axis if the slope of the column is along the X axis in a plan view. The middle example shows a column whose slope is along the Y axis in a plan view. | ||
Toe direction: In or Out . This " ![]() General settings " option applies when channel or angle material is entered as the column's " Section size ."
General settings " option applies when channel or angle material is entered as the column's " Section size ."
' In '

|
' Out '

|
' In ' points the toe(s) of the angle (with the " Long Leg " ' normal ') or channel column toward what SDS2 programs see as the near side of the column. In other words, ' In ' means that the toe(s) of the flange(s) point down (or to the right if the " Column rotation " is ' 90 ').
' Out ' points the toe(s) of the angle (with the " Long Leg " ' normal ') or channel column away from what SDS2 programs as the near side of the column. Since in a plan view these programs look at members from the bottom up (or right in for members whose webs are vertical in a plan view), ' Out ' means that the toe(s) of the flange(s) point up (or to the left if the " Column rotation " is ' 90 ').
Note: ' In ' and ' Out ' are reversed if ' Reversed ' is selected for the " Long Leg " of an angle.
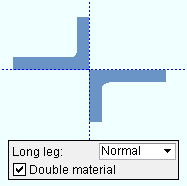
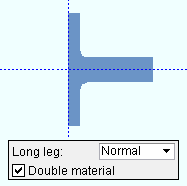
Configuration: Star or Back to back . This " ![]() General settings " option applies when angle material has been entered as the columns " Section size " and when the box for "
General settings " option applies when angle material has been entered as the columns " Section size " and when the box for " ![]() Double material " is checked.
Double material " is checked.
' Star '
|
' Back to back '
|
If ' Star ' is selected, the two angles are laid out so that the outside corner of each angle is along the work line of the column and no legs are back to back.
If ' Back to back ' is selected, the two angles are laid out so that one leg of each angle is back-to-back.
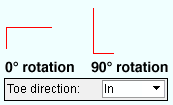
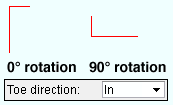
Long leg: Normal or Reversed . This " ![]() General settings " option applies when angle material is entered as the column's " Section size ."
General settings " option applies when angle material is entered as the column's " Section size ."
' Normal '
|
' Reversed '
|
' Normal ' positions the long leg of the angle horizontal in a plan view when ' 0 ' is entered as the " Column rotation ."
' Reversed ' positions the long leg of the angle vertical in a plan view when ' 0 ' is entered as the " Column rotation ."
Double material: ![]() or
or ![]() . This "
. This " ![]() General settings " option applies when the column's " Section size " is a channel or cold formed channel or angle material.
General settings " option applies when the column's " Section size " is a channel or cold formed channel or angle material.
 |
 |
If this box is checked (
), the column is made up of two identical channel or angle sections of whatever section size is entered as the " Section size ." For a double-channel column, the two channels (or cold-formed channels) are back-to-back, as shown in the above illustration. For an angle column of double material, the two angles are oriented with respect to one another and the member line per the " Configuration " (' Star ' or ' Back to back ').
If the box is not checked (
), the column is a single channel or angle section (whatever is the " Section size ").
Welded section is single material: ![]() or
or ![]() . This "
. This " ![]() General settings " option applies when the column's " Section size " is a welded plate wide flange or welded plate box .
General settings " option applies when the column's " Section size " is a welded plate wide flange or welded plate box .
|
|
If this box is checked (
) and the column has been auto detailed in a full-featured SDS2 program , the column's bill of material lists the welded plate wide flange or welded plate box section as a single section size. A single submaterial detail is drawn to depict the welded plate section.
If the box is not checked (
) and the column has been auto detailed , the column's bill of material lists the welded plate wide flange section as three plates (four plates for a welded plate box). Separate submaterial details are drawn for the plates.
If this box is checked (
), users of a full-featured SDS2 program are permitted to move one end (
) of the column to make it sloping. The column currently may or may not be sloping.
If the box is not checked (
), the column is perfectly vertical.
------------------
![]() or
or ![]() member general information settings:
member general information settings:
Main material Model complete Marked for processing Model complete date Marked for detailing Lift assignment Node-match job
------------------
WP to WP length: The distance (in the primary dimension " Units ") between the column's top and bottom " End elevation ." If the column is perfectly vertical, this is the actual length of the column's work line .
Tip: For a perfectly vertical column, subtracting the top- and bottom-end " Material setback " from the distance reported here gives you the length of the column main material.
page 1 | contents | review | top
|
|
The bottom end of a column is the end that is at the lower " End elevation ."
indicates that, in a full-featured SDS2 program , all options are disabled ( grayed out ) under [ Bottom end settings ] or [ Top end settings ] , thus preventing users from making changes to the end connection. To preserve the connection, users of that program are also prevented from manually editing or cutting or deleting connection materials on the locked end of the member.
indicates that a user of a full-featured SDS2 program is allowed to edit the options under [ Top end settings ] or [ Bottom end settings ] .
Status Display: Approval and modeling > Member end locked
page 1 | contents | review | top
|
|
|||||||||
|
|
||||||||
Connec tion: Force and/or Graphical or a System connection . This " ![]() Information " option and its related messages apply when this column end's " Input connection type " is a choice other than ' Plain end ' or ' User base/cap plate '.
Information " option and its related messages apply when this column end's " Input connection type " is a choice other than ' Plain end ' or ' User base/cap plate '.
' Force ' indicates a failed connection has been forced to be designed in a full-featured SDS2 program , even though the design may be ill advised from an engineering standpoint.


forced 

system The Connection Design Calculations report (and Expanded Connection Design Calculations ) include a warning that the connection has been forced.
' Graphical ' indicates that the connection on this end of the member is graphical and, therefore, will not be changed during connection design in a full-featured SDS2 program .


graphical 

system The Connection Design Calculations report (and Expanded Connection Design Calculations ) include the warning " GRAPHICAL CONNECTION -- STRENGTH CALCULATIONS NOT GENERATED ."
Status Display: Search > Graphical connections
Search: Graphical Connections
" Connection design locks set ," connection failure messages, other messages:
A user of a full-featured SDS2 program is able to lock connection settings. The following banner notifies you that the connection has at least one "
Connection design lock " or "
End preparations " setting that is locked (
):
Connection design locks set.
VIDEO 
Sections (" leaves ") within which at least one locked variable resides are marked (in the navigation tree) with a locked icon ( ). (Recorded in SDS2 Detailing , v2015.)
Search: Connection design locks set
Status Display: Search > Connection design locks setYou may find a connection failure banner like that shown below along with a
button. The button doesn't do anything in Site Planning. In a full-featured SDS2 program, the button provides context-sensitive help about the message.
| Invalid material type for this member |
Or you may find a green " Connection changed ... " banner that indicates that, in order to create a connection that works, connection design has deviated from the connection specs entered by the user. Tip: Compare the " Summary ," the " Input connection type ," the " System designed connection " and the " Connection specifications " to assess what has changed. Also see: Search for Connections Changed by System .
| Conn changed. Possibly: Splice vs Plain end |
If you are reviewing multiple columns and those columns have different connection changed or connection failure messages, you get a banner like the following:
| Multiple connection messages |
page 1 | contents | review | top
|
|
|||||||||||
|
|
||||||||||
End elevation: The elevation (in the primary dimension distance " Units ") of the work point at this end the column. The work point is at the bottom of the base plate or the top of cap plate.
Tip: To determine the end elevation on a column while working in the 3D model: invoke a command like Construction Line Add , select EXPT as the Locate option, then move the point location target to the work point at the end of a column and reference the Z coordinate reported in the X-Y-Z display .
Move material: ![]() or
or ![]() . The choice that has been made here does not indicate the choice made for this field in a full-featured SDS2 program . Rather, it shows the choice that has been made in User and Site Options .
. The choice that has been made here does not indicate the choice made for this field in a full-featured SDS2 program . Rather, it shows the choice that has been made in User and Site Options .
If this box is checked (
), then User and Site Options > Modeling > "
Maintain user material and holes relation to vertical column/vertical brace member left end " is on (checked).
If the box is not checked (
), then User and Site Options > Modeling > "
Maintain user material and holes relation to vertical column/vertical brace member left end " is off (not checked).
Minus dimension: Auto or a user-entered distance (in the primary dimension " Units " or in other units ). The minus dimension is the distance from the work point to the face of the connection if the connection material extends past the end of a member (e.g. a column cap plate).
If " Auto " is checked (
), then a full-featured SDS2 program checks the framing for members running over (or under) the column, and the minus dimension will be calculated as required for the column to clear the beam.
If " Auto " is not checked (
), uses of a full-featured SDS2 program have specified the distance entered to this field. A negative " Minus Dimension " makes the column (as measured to the face of the base/cap plate) longer; a positive " Minus Dimension " shortens the column (as measured to the base/cap plate) by that amount.
Note: The minus dimension is the distance from the work point to the face of the connection if the connection material extends past the end of a member (e.g. a column cap plate).
Status Display: Member status > Auto minus dimension (either end)
Status Display: Member status > Left end minus dimension and Right end minus dimension
Material setback: Auto or a user-entered distance (in the primary dimension " Units " or in other units ).
If " Auto " is checked (
), a full-featured SDS2 program calculates this distance. For this field to be applicable, the " Input connection type " for this end of the member must be " Plain end " or " User defined connection ."
If " Auto " is not checked (
), users of a full-featured SDS2 program have specified the distance entered to this field. The distance that is entered brings the end of the column's main material that distance back from the work point. Users might want to enter a " Material setback ," for instance, to adjust the length of the column main material without changing the " Minus dimension " (changing the " Minus dimension " would move the face of the cap plate).
Status Display: Member status > Auto material setback (either end)
Status Display: Member status > Left end material setback and Right end material setback
Status Display: Member status > Has input setback
Standard detail: None or the file name of a job standard detail or global standard detail file name.
During automatic detailing , the reference point on the " Standard Detail " shown here aligns with the work point on this end of the column, and the standard detail's bill of material combines with the column's bill of material.
Tip: Standard Details may be created in the Drawing Editor using Area Save .
page 1 | contents | review | top
|
|
|||||||||
|
|
||||||||
Input connection type: Auto standard or User defined or Plain end or Auto base/cap plate or User base/cap plate or Splice plate (column-to-column) or Clip angle (column to beam) or Shear (column to beam).
| Input connection | Comments |
| ' Auto standard ' | Designs a system connection per the column's framing condition . |
| ' User defined ' | The name of the connection is entered to " User defined connection " (below). |
| ' Plain end ' | Instructs connection design to not create a connection on this end of the column. You may find, however, that a graphical connection has been applied to the column. |
| ' Auto base/cap ' | Instructs connection design to create a base/cap plate for a column framing to (under or over) a beam. See the " Conn Spec " settings. |
| ' User base/cap ' |
Instructs connection design to create the base/cap plate specified by the " Plate schedule number " (below). Also see the " |
| ' Splice plate ' |
" |
|
' Clip angle ' ' Shear ' |
These are hanger connections. They fail with the message " Hangar connections not supported ." ' |
Design of the " Input connection type " shown here takes place in a full-featured SDS2 program .
" Connection specification " and connection design locks provide settings for finer control of a connection's design. The connection design locks can tell you how a full-featured SDS2 program has actually designed a connection
The " Design Calc " or " Expanded Calc " buttons on this window provide detailed information about a connection's design calculations.
User defined connection: The file name of the user defined connection that is applied on this end of the column.
This "
Connection type " option applies when ' User defined ' is the " Input connection type ."
Plate schedule number: The line number on the Base / Cap Plate Schedule of the base/cap plate that is applied on this end of the column.
This "
Connection type " option applies when ' User base/cap plate ' is the " Input connection type ."
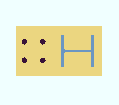
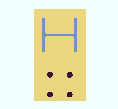
Plate rotation: A positive or negative number of degrees.
0 degrees
 |
90 degrees
 |
180 degrees
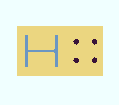 |
A positive number indicates the user base/cap plate has been rotated counterclockwise.
A negative (-) number indicates that the user base/cap has been rotated plate clockwise.
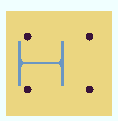
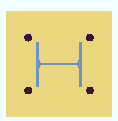
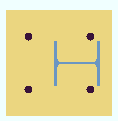
Offset parallel to web: The positive or negative distance (in the primary dimension " Units " or in other units ) that the base/cap plate is offset from the center of the column. In the following examples, both the " Plate rotation " and " Column rotation " are ' 0 '.
6 inches
 |
0 inches
 |
- 6 inches
 |
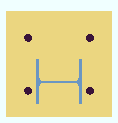
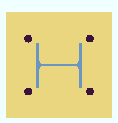
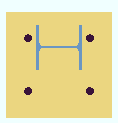
Offset parallel to flange: The positive or negative distance (in the primary dimension " Units " or in other units ) that the base/cap is offset from the center of the column. The direction of the offset is parallel with the flanges of the column. In the following examples, both the " Plate rotation " and " Column rotation " are ' 0 '.
6 inches
 |
0 inches
 |
- 6 inches
 |
System designed connection: The type of connection that a full-featured SDS2 program designed on this end of the column (e.g. ' Splice plate ' or ' Plain end ' or etc.).
NM bolt type: Auto or A325N or A325SC or A325X , etc. NM stands for "non-moment." This bolt type is used when ' Splice plate ' or ' Auto base/cap plate ' is the " System designed connection ."
In a full-featured SDS2 program . . .
'
Auto (checked) ' instructs connection design to use the non-moment " Bolt type " set at Home > Project Settings > Job > Bolt Settings for connections other than auto standard. For auto standard connections, connection design applies the " NM bolt type " set at Home > Project Settings > Job > Auto Standard Connections for that particular connection and framing condition.
'
Auto (not checked) ' lets you select a bolt type from the list box (
). Bolt types that are listed come from the Home > Project Settings > Job > Bolts, Washers, and Holes > Bolt Specifications .
NM bolt diameter: Auto or a user-entered diameter in fractions of an inch or millimeters.
| diameter |
|
In a full-featured SDS2 program . . .
'
Auto (checked) ' instructs connection design to use the non-moment " Bolt diameter " set at Home > Project Settings > Job > Bolt Settings for connections other than auto standard. For auto standard connections, connection design applies the " NM bolt diameter " set at Home > Project Settings > Job > Auto Standard Connections for the particular connection and framing condition.
'
Auto (not checked) ' lets you either type in the diameter of bolt, or select a bolt from the combo box (
). The bolts that are listed in the combo box come from the " Available bolts " setup list.
Use miscellaneous plates list: ![]() or
or ![]() .
.
If this box is checked (
), connection design looks to Home > Project Settings > Fabricator > Standard Fabricator Connections > Plates to determine the plate thicknesses to be used for plates on the connection for this end of the column.
If the box is not checked (
), connection design rounds the calculated required thickness of plates as based on the load to the next 1/16 inch (or 1/8 inch if the calculated required thickness is greater than 5/16 inch).
Exceptions and related settings: Fill plates for column splices are designed to exact thicknesses so that they fill the available space. The Base / Cap Plate Schedule sets thicknesses for user base/cap plates. The " Minimum beam stiffener plate thickness " affects beam stiffener thickness.
Disable framing situation checks: ![]() or
or ![]() . The choice made here does not affect this program. Framing situation checks are not done in Site Planning.
. The choice made here does not affect this program. Framing situation checks are not done in Site Planning.
If this box is checked (
), framing situation checks are turned off.
If the box is not checked (
), the framing situation checks are turned on.
page 1 | contents | review | top
|
|
|||||||||
|
|
||||||||
Different settings appear here, depending on whether ' Splice plate ' or ' Auto base/cap plate ' or ' User base/cap plate ' has been selected as the " Input connection type. "
----- Splice plate ----
| Column attachment | Channel lower connection |
| Butt plate | Channel connection side |
| Web plates | Splice plate grade |
| Channel web connection | Inner flange plates |
----- Auto base/cap plate ----
| Weld pattern | Use extended stiffeners |
| Use transverse beam stiffener | Base/cap plate grade |
| Align stiffeners with |
----- User base/cap plate ----
| Weld all around | Use transverse beam stiffener |
| Flange welds | Align stiffeners with |
| Web welds | Use extended stiffeners |
| Seal welds |
--- Clip angle ---
(Fails with " Hangar connections not supported " message.)
(' ![]() Force ' is required to get a solids model.)
Force ' is required to get a solids model.)
| Gage | Stagger on |
| Attachment | Use expanded vertical bolt spacing |
| Side | Use paddle plate |
| Attached to | Skew holes in angle |
--- Shear ---
(Fails with " Hangar connections not supported " message.)
(' ![]() Force ' is required to get a solids model.)
Force ' is required to get a solids model.)
| Attached to | Skew holes in plate |
| Shear plate side | Use back-up bar |
| Use expanded vertical bolt spacing | Shear plate grade |
| Use paddle plate |
page 1 | contents | review | top
|
|
|||||||||
|
|
||||||||
Warning: When Auto is not checked for a particular type of load, then the user of a full-featured SDS2 program has entered a load to that field. Users should make entries to load fields only at the direction of a qualified engineer.
Load (kips or kN): Auto or a user-entered load in kips (kilonewtons for ' Metric '). The load is used in design calculations for auto base/cap plates and splice plates . If stiffeners are desired in beams over or under columns with base/cap plates, a load must be entered for the column end that contacts the beam. If there are columns below and above a beam, a load should be entered for only one of the columns. The load determines the necessity for one pair of stiffeners or two pair. The stiffeners are the Home > Project Settings > Job > Design > Plate Design Settings > " Minimum stiffener plate thickness ." For column splices, connection design attempts to synchronize the design load on each of two columns being spliced so that they are the same values. If one column has an " ![]() Auto " load and the other column has a user-entered load, the load on both columns are set equal to the user-entered " Load ." If both columns have user-entered loads and those loads are not the same, the connection fails. If both columns have "
Auto " load and the other column has a user-entered load, the load on both columns are set equal to the user-entered " Load ." If both columns have user-entered loads and those loads are not the same, the connection fails. If both columns have " ![]() Auto " loads, connection design uses the smaller of the two calculated loads.
Auto " loads, connection design uses the smaller of the two calculated loads.
| Load: |
|
|
| or | ||
| Load: |
|
|
When ' Auto ' is checked (
), connection design calculates the load. The calculated numerical value -- calculated in this example -- is the actual value that is used to design the connection on this end of the column. Design method considerations: For ' ASD ' or ' LRFD ' and ' CISC 8 ' or ' CISC 9 ' and for base/cap plates in ' AS 4100 ', the ' Auto ' load is the column's capacity in compression, calculated assuming the column has an effective length of zero. For splice connections in ' AS 4100 ', the "
Auto " compression load is 15% of the column's capacity in compression, calculated assuming it has an effective length of zero, plus the bearing capacity between the two columns.
If " Auto " is not checked (
), a user of a full-featured SDS2 program has set the load. The user-entered value is used to design the connection.
Status Display: Member status > Left end compression load and Right end compression load
Status Display: Connection auto loads > Auto column load
Connection failure message: User entered loads at splice must match
Tying force (kN): 0 (zero) or a user-entered load (in kips for ' Imperial ', kilonewtons for ' Metric '). This " ![]() Loads " option is available for most " Connection design method s."
Loads " option is available for most " Connection design method s."
In a full-featured SDS2 program . . .
An entry of ' 0 ' (zero) prevents connection design from using the tying force in its calculations for the design of a connection on this end of the column.
A ' user-entered load ' instructs connection design to use this tying force to check the structural integrity of a splice connection on this end of the column, as required by Section 1615 of the International Building Code (2015) for high-rise buildings.
Moment (kip-in or kN.m): Auto or a user-entered load in kips-inches (kilonewton-meters for ' Metric '). Moment loads are used in design calculations for column splices only. If the spliced end on one column being spliced has an " ![]() Auto " moment and the spliced end on the other column has a user-entered moment, the load on both columns are set equal to the user-entered moment.
Auto " moment and the spliced end on the other column has a user-entered moment, the load on both columns are set equal to the user-entered moment.
| Moment: |
|
|
| or | ||
| Moment: |
|
|
When " Auto " is checked (
) for the spliced ends on two columns being spliced, connection design has entered a small moment so that a non-zero value is used in the design calculations for the column splice. The calculated numerical value -- calculated in this example -- is the actual value that is used to design the column splice on this end of the column. Design method considerations: For ' ASD ' or ' LRFD ', the "
Auto " moment load is taken as 6 kips for ASD (10 kips for LRFD) times the depth of the section. For ' CISC 8 ' or ' CISC 9 ', it is 10 kips (44.48 kN) times the depth of the section. For ' AS 4100 ', it is 30% of the section's moment capacity calculated per Clause 5.2.
If " Auto " is not checked (
), a user of a full-featured SDS2 program has set the moment. The user-entered value is used to design the column splice connection.
Status Display: Member status > Left end moment load and Right end moment load
Status Display: Connection auto loads > Auto column moment
Connection failure message: User entered loads at splice must match
Weak axis moment ( kip-in or kN-m ):0 (zero) or a user-entered load in kips-inches (kilonewton-meters for ' Metric '). Weak axis moment loads are used for connection design of column splices only. The load is applied about the weak axis of the column (also referred to as the minor principal centroidal axis of the column cross section). If the two columns in a splice connection have a different moment, the connection fails. See the warning above.
In a full-featured SDS2 program . . .
" Input connection type " must be " Splice plate ": This "
Loads " option is disabled when this column end's " Input connection type " is ' User defined ', ' Plain end ', ' Auto base/cap plate ', or ' User base/cap plate '.
End connection failure message:User entered loads at splice must match
Advanced Selection:m.Ends[0].WeakAxisMomentLoad
Parametric module: m.Ends[0].WeakAxisMomentLoad
Splice uplift (kips or kN): Auto or a user-entered load in kips (kilonewtons for ' Metric '). Uplift loads are used in design calculations for column splices only. If the spliced end on one column being spliced has an " ![]() Auto " splice uplift and the spliced end on the other column has a user-entered splice uplift, the load on both columns are set equal to the user-entered " Splice uplift ."
Auto " splice uplift and the spliced end on the other column has a user-entered splice uplift, the load on both columns are set equal to the user-entered " Splice uplift ."
| Splice uplift: |
|
|
| or | ||
| Splice uplift: |
|
|
When " Auto " is checked (
), connection design calculates the splice uplift. For connections other than splice plates, the load is set to 0.0. The calculated numerical value -- calculated in this example -- is the actual value that is used to design the column splice on this end of the column.
If " Auto " is not checked (
), a user of a full-featured SDS2 program has set the load. The user-entered value is used to design the column splice connection.
Note: This "
Loads " option is disabled (grayed out) when the " Input connection type " is ' User defined ', ' Plain end ', ' Auto base/cap plate ', or ' User base/cap plate '. If the " Input connection type " is ' Auto Standard ' and a value is entered for " Splice uplift " and a base/cap plate is specified in Auto Standard Connections for the framing situation, a connection will not be designed, and the user of the full-featured SDS2 program gets the following connection failure message:
Connection failure message: Uplift load not applicable to this connection
Connection failure message: User entered loads at splice must match
Status Display: Connection auto loads > Auto column splice uplift
Horizontal shear: Auto or a user-entered load in kips (kilonewtons for ' Metric '). This " ![]() Loads " option applies to the design of " Web plates ."
Loads " option applies to the design of " Web plates ."
| Horizontal shear: |
|
|
| or | ||
| Horizontal shear: |
|
|
If the box for ' Auto ' is checked (
), then during connection design in a full-featured SDS2 program , the load is set to 0 or to match the load that is entered on the opposing column end; that is, on the end of the column that this end of this column splices to. The horizontal shear value -- opposing in this example -- is the actual value that is used to design the web connection.
If the box for ' Auto ' is not checked (
), a user of the full-featured SDS2 program has set the load. The load that is entered governs the plate thickness and number of bolts on " Web plates ."
Status Display: Connection auto loads > Auto column horizontal shear
Connection failure message: User entered loads at splice must match
page 1 | contents | review | top
|
|
|||||||||||
|
|
||||||||||
A " ![]() Summary " appears on this window only if you are reviewing one column. There is no "
Summary " appears on this window only if you are reviewing one column. There is no " ![]() Summary " if you are reviewing multiple columns.
Summary " if you are reviewing multiple columns.
The "
Summary " leaf gives you a summary of the end connections at the top and bottom of the column.

The summary shows (in parentheses) the " System designed connection " and lists -- if applicable -- specifications of the connection as connection design actually designed it.
If other columns have been assigned the same piecemark as the one column you are editing, the summary lists those other columns by member number .
If the column is part of a group member, the summary shows the group member piecemark .
"
Connection design locks " and "
End preparations " that were locked (
) because the " Input connection type " is ' User defined ' are reported as " Locked Via User Defined ." All other locks that are locked (
) are reported as " Locked Via Member Edit ."
page 1 | contents | review | top
|
|
|||||||||||||
|
|
||||||||||||
Top flange operation : ' None ' or ' Cope plain ' or ' Cope field weld #3 (Standard) ' or ' Cope shop weld #3 (Standard) ' or ' Cut flange width ' or ' Cut flange flush ' or ' Clip flange ' or ' Notch ' or ' Notch NS/FS ' or ' Cope field weld #1 (FEMA) ' or ' Cope shop weld #1 (FEMA) ' or ' Clip web ' or ' Seismic cope field weld ' or ' Seismic cope shop weld '.
Bottom flange operation : same as above, except that this applies to the bottom flange.
page 1 | contents | review | top
|
|
|||||||||||||||
|
|
||||||||||||||
Status Display: Search > Connection design locks set
Search: Connection design locks set .
Design Calculations Report: Connection Design Lock SummaryLocked (
) connection design locks are entries made by users of a full-featured SDS2 program .
Unlocked (
) connection design locks are computer-generated values entered by S connection design . In many cases, connection design populates the unlocked fields based on user-entered setup choices.
These same connection design locks may also be found on the Connection Component Edit window for this connection.
When checked, "
Show images " displays drawings that depict the dimensions associated with connection design locks.
Connection design locks are grouped together under leaves with the following names:
Base Plates and Cap Plates
|
Splice Plates
|
page 1 | contents | review | top
|
|
|||||||||||||||||
|
|
||||||||||||||||
|
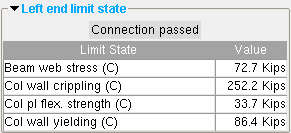
The limit states for an auto base plate. The values shown represent the allowable strength of the connection or of the column or a connecting beam. |
A limit state is a potential connection failure mode.
The capacity of a connection is calculated for various limit states during connection design . Each " Value " reported in the example above represents the strength of the connection or of the column itself or of its connecting members with respect to a particular limit state.
Since connection design takes place in a full-featured SDS2 program , but not in Site Planning, the limit states that are reported on this review-only window are static and cannot be changed.
If connection design in a full-featured program has determined that the capacity of a connection is not sufficient to stand up to "
Loads " that have been applied to the column, the program will have failed the connection and generated a connection failure message such as:
HSS wall crippling failure under cap plate The Design Calculations Report together with the Connection Calculation Cover Sheet (or the Expanded Connection Design Calculations as a stand-alone report) provide formulas and the results of calculations (or the actual calculations) that relate limit states to the design of the specific connection.
page 1 | contents | review | top
Bottom end settings
Information
Member
Connection type
Connection specifications
Loads
Summary
End preparations
Connection design locks
Bottom end limit state
Components
Top end settings
Information
Member
Connection type
Connection specifications
Loads
Summary
End preparations
Connection design locks
Top end limit state
Components
The following custom components may be applied to columns. If one of these components have been applied to this column, you will find options related to that component on this Column Review window:
Beam Stiffeners at Column Safety Tabs - Column HSS Cap Plates Base Plate Shear Key Base or Cap Plate Stiffeners Custom component settings will be shown on this window after a custom component has been added to this column in a full-featured SDS2 program .
Settings for custom components from outside distributors can also be reviewed on this window. However, since such custom components are not distributed with SDS2 programs, they are not documented in this help manual.
Tip: An alternative to reviewing a custom component on this window is to double-click material generated by that custom component in the model. The program will open a custom component review window that includes all the settings for that custom component, but does not include the other settings that can be found on the Column Review window.
page 1 | contents | review | top


"Properties" opens the Edit Properties window, on which you can make entries to custom properties . If, at the time it was created, your current Job was set to use a legacy flavor, the window that opens is named Custom Properties , not Edit Properties .
The Edit Properties window can also be used to read "
Log " entries or review or type "
Notes ."
Tip: Model > Member > Properties is an alternative to this button. It opens the Edit Properties window directly, without your first having to open a member review window.
" Status " opens the Member Status Review window for the column(s) you are reviewing on this window. You can use that window to update status information about the column(s).
" OK " (or the Enter key) closes the Column Review window (this window) and saves to the member file(s) any changes made on the Member Status Review window.
Change all: If you double-clicked a column and made a change to its status and the 3D model contains other columns with the same piecemark as this column, a yes-no dialog opens after you press " OK ." On that yes-no dialog is the question, " Do you want to change all .... " Press the " Yes " button to update the status of all the columns with this piecemark; press the " No " button to change only this one column.
Tip: The yes-no "change all" dialog tells you the count of the members with this " Piecemark ." Another way to find out the count of members under the piecemark is to look under the "
Summary " button on this window.
" Cancel " (or the Esc key) closes this window without saving any status changes made to this member on the Member Status Review window.
" Reset " undoes all status changes you made to this member on the Member Status Review window.
"Design Calc" outputs a report that includes this column's design calculations, general settings and top/bottom end settings. If you are reviewing multiple columns with the same piecemark (or different piecemarks), you get a report for each column. Each report is output to the destination specified at then User and Site Options > Output > " Reports ."
calcs Tip: To get a report listing similar specifications for multiple members, output a Check Report and a Design Calculations Report .
"Expanded Calc" outputs the Expanded Connection Design Calculations . Output is to your web browser.
Expanded Connection Design Calculations is a report that provides all of the information in the Connection Design Calculations combined with related information from the Connection Calculation Cover Sheet . In addition, the report shows you the calculations written out, in detail, in the report itself, instead of simply reporting the results. Certain browser requirements must be met in order for you to access this report.
If you are editing multiple columns with the same piecemark (or different piecemarks), you get a report for each column.
Connection design failures can be found with the aid of a search or by a quick scan of the document. Calculations that result in a connection failure are identified as " (NO GOOD) " in their concluding line. You might also search for the string "CONNECTION DESIGN FAILURE".
