 Add Grid Line ( Modeling > press g s )
Tool summary :
Also see :
|
- BSGL (quick layout option for Add Grid Line )
- Depth check for new views ( User and Site Options > Modeling > )
- Open View (to open a view created with Add Grid Line )
- Detail Erection Views (to create 2D drawing of view)
page 1 | contents | file > views/grids > | erection views
 Example :
When you Add Grid Line , you add a straight grid line which can be infinite (as shown below) or finite (drawn between to two located points). Grid lines are reference lines used in the layout of a structure. BSGL is a Locate option that was used to create these grid lines. Site Planning views are crane placement views as described at the top of this page.
|
|
Straight grid lines (infinite) laid out in a plan view. |
page 1 | contents | file > views/grids > | erection views | top
 Step-by-step instructions :
You should decide before activating this tool which direction you want the view to face. The following instructions assume that you are using a 3-button mouse, that the " Point location target " is set to ' Fancy ', and that you use mouse bindings similar to those shown in these illustrations.
|
|
1 . Invoke Add Grid Line . |
|
|
2 . Place the mouse pointer ( |
|
|
3 . The status line prompts, " Locate second point. " Left-click ( Locate ) where you want the second point. The arrowhead shows the view's direction. |
|
|
4 . On the New Erection View window, enter a name and select a view type. |
|
|
5 . Add more views, or right-click ( Return ) if you are done adding views. Tip: You can Open ( Ctrl + o ) any view that you just created. |
Note 1: To invoke Add Grid Line , you can do any of the following (In Modeling ):
Method 1 : Click the Add Grid Line icon, which is pictured above. The icon can be taken from the group named ' File -- Views/Grids ' and placed on a toolbar (classic) or the ribbon (lightning).
Method 2 : If " Modeling layout style " is ' Classic ', you can use the menu system to choose Edit > Views/Grids > Add Grid Line .
Method 3, 4 or 5 : Add Grid Line can also be configured to be invoked using a keyboard shortcut , the context menu , or a mode . For the lightning interface, this configuration is done using Customize Interface . The default keyboard shortcut for Add Grid Line is g s -- where s stands for "straight".
Note 2: Right-click ( Return ) in steps 2, 3 or 5 ends the operation.


bindings , steps 2, 3, 5 Note 3: If in step 4, you typed in the name of a view that already has been created, you get a yes-no warning with the message, "_ already exists. Replace? " Press " Yes " to replace the view that already has that name with the view you are saving. Press " No " to cancel this operation without adding a new grid line.
page 1 | contents | file > views/grids > | erection views | top
 The New Erection View or Edit Erection View window :
| YouTube video: Grid lines are added in a plan view by locating points at intersections of construction lines. New Erection View options are explained . (Recorded in SDS2 Detailing , v2020i) |
The New Erection View window opens during Add Grid Line or Add Curved Grid, 3 Points or Add Curved Grid, Radius in Modeling . The " Pen color " and " Line type " affect Modeling only if the grid line is a straight . For a curved grid line , the " Pen color " and " Line type " will be applied to curved grid lines shown on 2D erection view crane placement drawings.
The Edit Erection View window opens when you double-click a grid line with the selection filter set to ' All ' or ' Grid Lines '.
View name: Any string of up to 61 characters that you want to use as the name for this view. Unless you want this view to overwrite an existing erection view (see note 3 ), you should give this view an original name that has not been given to other views.
Auto pin to this view: N/A (not appicable to Site Planning) . Click here for information about how this option works in a full-featured SDS2 program.
Finite:
or
. Straight grid lines can be finite or infinite.
VIDEO 
Double-clicking a grid line when the selection filter is ' Grid Lines ' or ' All ' opens the Edit Erection View window. The " Finite " option on that window is then turned on and off. (Recorded in SDS2 Detailing , v2015.)
In a plan view: 

Vertical view height: The distance between the " Relative view depth " ' Top ' and ' Bottom ' elevations is the height that you will see when you Open ( Ctrl + o ) a finite grid line's elevation view. The elevation view accommodates the bottom elevations and the top elevations of all pieces of steel within its depth checking limits. In other words, the infinite grid line view's height is effectively infinite. Lateral view width: The distance between the two points located when the grid line was added is the view's width. In other words, the view's width is the length of the grid line minus the " Grid bubble setback ." The width of the grid line's view remains the same when its state is changed from " Finite " to "
Finite " to "
Finite ."
Depth check: The " In " and " Out " distances set for " Depth check ." In summary , the term "infinite" can be somewhat misleading. Regardless of whether a grid line is "finite" or "infinite," when you Open ( Ctrl + o ) that grid line's view, you will find that the view's width is limited to the points located when the view was added. A plan view created using Plan View , on the other hand, is truly infinite -- that is, its extents expand to accommodate the steel that can be seen at that plan view's elevation.
If this box is checked (
), the grid line will be finite . Its size will be limited by the points located when the grid line was added using Add Grid Line . For an erection view created using another method (e.g., Plan View followed by Save View As ), the grid line will be limited to the extents of the model that is within the grid line's view's depth check limits.
If the box is not checked (
), the grid line will be infinite .
Grid bubble setback: A positive number that is the factor by which the grid line will be extended in proportion to the diameter of its grid bubble. This applies when the grid line is " Finite ."
VIDEO 
Add Grid Line is used to place three different finite grid lines, each with a different " Grid bubble setback ." Add Grid Line was named New View in pre-2015 versions of SDS2 programs. (Recorded in SDS2 Detailing , v2015.)

Entering ' 1 ' extends the grid line one grid bubble diameter -- half a grid bubble diameter at each end. Relative view depth: The range of elevations within which a plan view 's reference elevation must be in order for this grid line to be visible. The " Top " elevation is the plan view elevation above which the grid line will no longer be visible. The " Bottom " elevation is the plan view elevation below which the grid line will no longer be visible.
VIDEO 
How " Relative view depth " affects which grid lines and which members are shown in an erection view. To get grid lines to show in erection view drawings, the view must be detailed using " Annotate erection views ." (Recorded in SDS2 Detailing , v2015.)
axes :

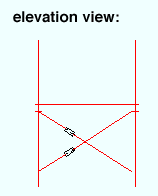
If you Open ( Ctrl + o ) a finite grid line that is shown in plan view, you will find yourself looking at an elevation view . Only members that are within the " Top " and " Bottom " elevations that are the specified " Relative view depth " will be shown in that elevation view. The " Depth check " settings for an elevation view also influence what members can be seen in a view.
Example 1: Setting " Top " to ' 140-0 ', " Bottom " to ' 130-0 ' would result in the finite grid line being visible in a plan view whose reference elevation is from ' 130-0 ' to ' 140-0 '. If you were to go to a View > Plan View at ' 141-0 ' or at ' 129-0 ', the grid line would no longer be visible.
Example 2: Setting " Top " to ' 140-0 ', " Bottom " to' 140-0 ' would result in the finite grid line being visible in a plan view whose reference elevation is ' 140-0 '. It would not be visible at any other elevation.
Note: Grid line visibility within a plan view is independent of the plan view's " Depth check " settings. It depends only on whether the plan view's reference elevation is within the grid line's specified " Top " and " Bottom " elevations.
Also see: View > Reference Elevation can be used to discover the elevation of your current plan view. The " Elevation " decoration, which you can place on your toolbar, displays a plan view's current elevation. Tools for changing a plan view's reference elevation are View > Plan View and View > Reference Elevation .
Arc or
Circle: This applies when you add a curved grid line using Add Curved Grid, Radius .
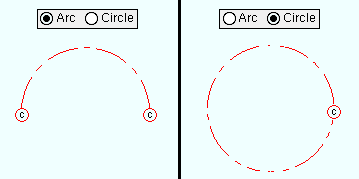
If ' Arc ' is selected , then after you press " OK " to close this window you will be prompted to locate the two points designating the ends of curved grid line. If '
Circle ' is selected , the curved grid line will be a circle, and you will only have to locate one point -- the point on the circle where you want the grid label to be.
Radius: The distance (in the primary dimension " Units " or other units ) from any point on the curved grid line to the curved grid's center.

For a curved grid line added using Add Curved Grid, Radius , you must enter a " Radius ." For one added using Add Curved Grid, 3 Points , the " Radius " is read-only (calculated for you from the points you located). Erection view type ( straight grid lines ): Primary or Secondary or Dimension only or Placement only . This applies to straight grid lines. The selection you make here sets how the grid line is to be dimensioned when you Detail Erection Views and choose to " Annotate erection views " for an erection view wherein that grid line is visible. Locate options in Modeling such as INCL or INCM snap to points on straight grid lines of any of these types.
Tip: You can, in Display Options , turn on or off the display of grid lines ( curved or straight ) based on their type (' Primary ' or ' Secondary ', etc.).
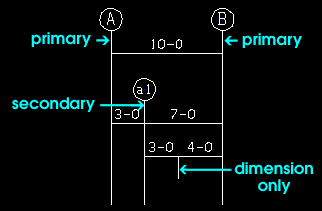
For straight grid lines , ' Primary ' dimensions appear above ' Secondary ' dimensions. ' Dimension only ' erection views are auto dimensioned, but not with grid markers. ' Placement only ' grid lines cannot be auto dimensioned (" Annotate erection views "). Erection view type ( curved grid lines ): Primary or Secondary or Dimension only or Placement only . This applies to curved grid lines . The selection you make here sets how the curved grid line is to be drawn when you Detail Erection Views and choose to " Annotate erection views " for an erection view wherein that curved grid line is visible. In Modeling , Locate options snap to points on curved grid lines of any of these types.
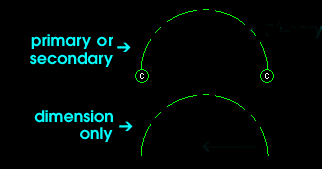
For curved grid lines , ' Primary ' or ' Secondary ' causes auto detailing to draw the bubbles at the ends of the grid line. ' Dimension only ' makes the bubbles not drawn. ' Placement only ' curved grid lines do not appear on erection view drawings. Depth check: " In " is the distance perpendicular to a view added using Add Grid Line ( Modeling ) in the direction pointed toward by the arrowhead that appeared when the view or section cut was located. " Out " is in the direction opposite to the arrowhead. Defaults: User and Site Options > Modeling > " Depth check for new views ."


depth check controls

The arrowhead points in the depth check " In " direction.
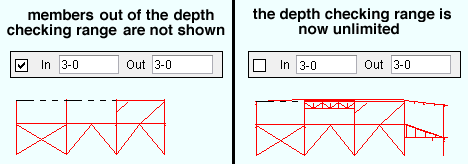
When this box is checked (
), then " Depth checking " is turned on in the new view you are creating, and that view will show members and/or materials within the specified " In " and " Out " distances.
When the box is not checked (
), " Depth checking " is turned off, and the depth of the new view you are creating is unlimited. This means that when you Open ( Ctrl + o ) this view, all parts of the structural model that can be seen into the screen and out of the screen from the work plane of that view will potentially be visible from that view.
Grid line pen color: The color of the grid line associated with the erection view that you are adding or editing. For a straight grid line , this sets the color of the grid line in Modeling only. For a curved grid line , this also sets the Drawing Editor pen color (and therefore, line thickness) of the grid line if you choose " Annotate erection views " when you Detail Erection Views for an erection view wherein that curved grid line is visible.

Grid line type: The dash pattern of the grid line that you are adding or editing. For a straight grid line , this sets the line type of the grid line in Modeling only. For a curved grid line , this also sets the Drawing Editor line type. To get curved grid lines on a erection view drawing, you need to choose " Annotate erection views " when you Detail Erection Views for an erection view wherein the desired curved grid line is visible in Modeling .

The button that is pressed sets the line type (dash pattern) of the erection view that you are adding. For detailing:
or
. This designates whether a view is intended to be used for modeling only, or for detailing as well. The designation that you apply here can be used in the downstream workflow to, for example, filter selection lists when you detail erection views ( Drawing Editor ) or open erection views ( Modeling ).
When this box is checked (
), then the new view you are creating or editing is designated as being intended to be used for detailing as well as modeling. As a result, when "
Show for detailing " is checked on the Select One Erection View dialog, only this view and others so designated will appear on its selection list. Also, when "
For detailing " is checked on the Process > Detail Erection Views > press " Settings " > Detail Erection View window, this view will appear on that window's selection list, while views that are not designated " For detailing " won't appear.
When the box is not checked (
), the new view that you are adding or editing is designated as being intended to be used for modeling only. You will still be able to select this erection view for detailing when "
For detailing " is unchecked on the Detail Erection View window.
page 1 | contents | file > views/grids > | top
Alternative 1 : Press " OK " (or the Enter key) to save the view.
Alternative 2 : Press " Cancel " (or the Esc key or the
button) to end the Add Grid Line operation without adding a new erection view.
page 1 | contents | file > views/grids > | erection views | top