Determining left end & near side for beams, columns and brace (topic)
Also see :
- Global coordinates (determine left end of a member)
- Member coordinates (0, 0, 0 point of member is on left end)
- Origin reference point (identifies member 0, 0, 0 point)
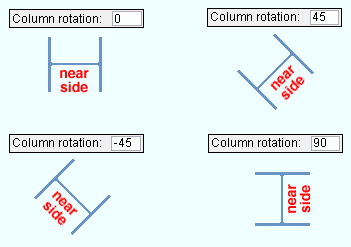
In a plan view in Modeling , the near side web of a beam, column or brace will be the face that looks to the bottom or toward the right of the screen. The following illustration shows columns in a plan view:
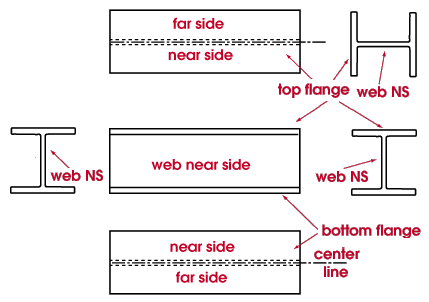
Web near side of a member is the face of that member that is shown in the main view on the member detail .
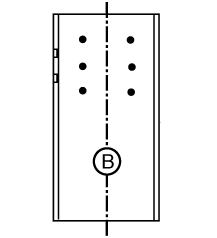
The near side of a column is always face B. The left end of a perfectly vertical column is its bottom end.
The near side for a miscellaneous member added with two or more points in a plan view or elevation view will be the face of that miscellaneous member that you see when looking at it in the view in which it was added (so long as its rotation with respect to its material axes is 0, 0, 0).
page 1 | contents | topics | top
Determining a member's near side by knowing its left end :
Knowing a member's left end can help you determine its near side. When you are looking at web near side of a non-vertical member, its left end is to your left and its right end is to your right. The left end of a member that is detailed horizontally is the end that appears on the left in its detail.
page 1 | contents | topics | top
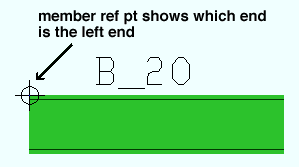
Using piecemarks to determine a member's left end :
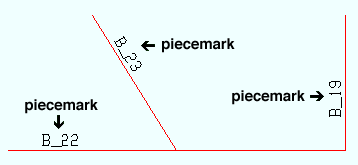
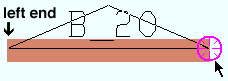
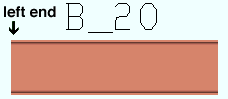
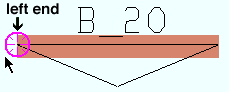
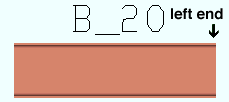
The piecemark label of a member not shown as a cross section in Modeling will be on the left end of the member (exception: if the member is relatively short or you have " Swapped member ends ," this will not hold true).
page 1 | contents | topics | top
A member's reference point is on its left end :
Doing an Edit Member is another way to determine which end of a member is its left end. The origin reference point on the member will be displayed, showing which end is its left end.
The origin reference point is also the 0, 0, 0 member coordinate of the member and corresponds to the left end member work point.
page 1 | contents | topics | top
Left end/ near side in isolate member mode :
In member isolation , the main member view will show a view of the member as it will appear in its detail, with its left end on the left, and the near side facing toward you.
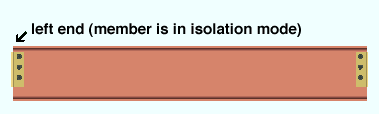
The main view of a member on a member detail always shows the near side of the member.
page 1 | contents | topics | top
Using Status Display to show the left end and/or right end of members :
In Status Display , you can select ' Member ' or ' Ends ' or ' Left ' or ' Right ' as the item to be color coded .
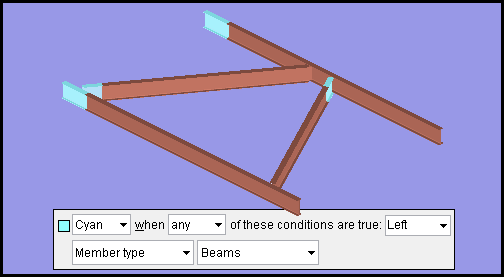
This example of a status display condition color codes beam left ends in the color cyan . If ' Right ' had been selected as the item to be color coded , the beams' right ends -- instead of their left ends -- would be cyan.
page 1 | contents | topics | top
How left end relates to global coordinates :
As a beam, column, brace, legacy miscellaneous or etc. is input to the 3D model in a full-featured SDS2 program , each work point of the member is assigned global coordinates per its position with respect to global axes . The program determines which end is the left end of a member as follows:
If an X global coordinate for one work point of a member is less than the X global coordinate for the other work point, then the lesser X coordinate will be the left end of the member.
If the X global coordinate for both work points of the member are the same (this would be the case for a beam shown vertical in a plan view), then the work point with the smallest Y global coordinate will be the left end of the member.
If both the X and Y global coordinates of both work points of a member are the same (this would be the case for a perfectly vertical column), then the work point with the smallest Z global coordinate is the left end of the member. Hence the bottom end of a perfectly vertical column is its left end.
Rule of thumb: For any member that has positive global coordinates, the end of that member that is closest to the 0, 0, 0 global coordinate is the left end of that member.
page 1 | contents | topics | top
Left end of a member in a plan view :
The left end of a member in a plan view can be determined by observing how the member is oriented with respect to the computer screen.
The left end of a member that is horizontal in a plan view will is the left end of the member.
The left end of a member that is vertical in a plan view is the lower end.
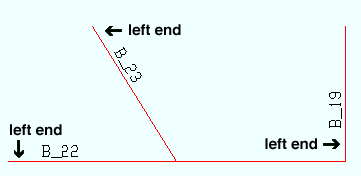
The left end of a member that is diagonal in a plan view is the most-to-the-left end.
Left end of members in an elevation view :
In an elevation view , determining which end of a member is its left end can be a bit more tricky. This is because views have directions.
|
Before : This example shows a section view being cut across the top flange of a beam in a plan view. |
|
After : The resulting section view shows the left end of the beam on your left. |
|
Before : Here's a section view being cut from right to left across the top flange of a beam in a plan view. |
|
After : The resulting section view shows the left end of the beam on your right. |
Tip 1: In a plan view, position a section view to face bottom up or right in. This will help you to more easily determine which end of a member is its left end. Click here for some examples.
Tip 2: An axes box is a tool that you can use to help you determine which end of a member is its left end in an elevation view.
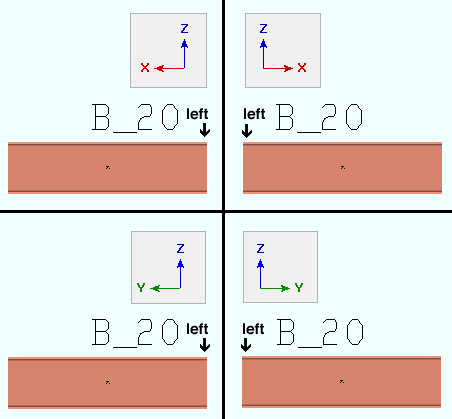
page 1 | contents | topics | top
End [0] is the left end of a member. End [1] is the right end of a member. Member ends are referred to in this way at the following locations:
| Reference | Location |
| End 0 or End 1 | Connection Design Calculations Report |
| Ends[0] or Ends[1] | Advanced Selection Dictionary |
| 0 or 1 | Shear Thru Plate On [mem num] [end] |