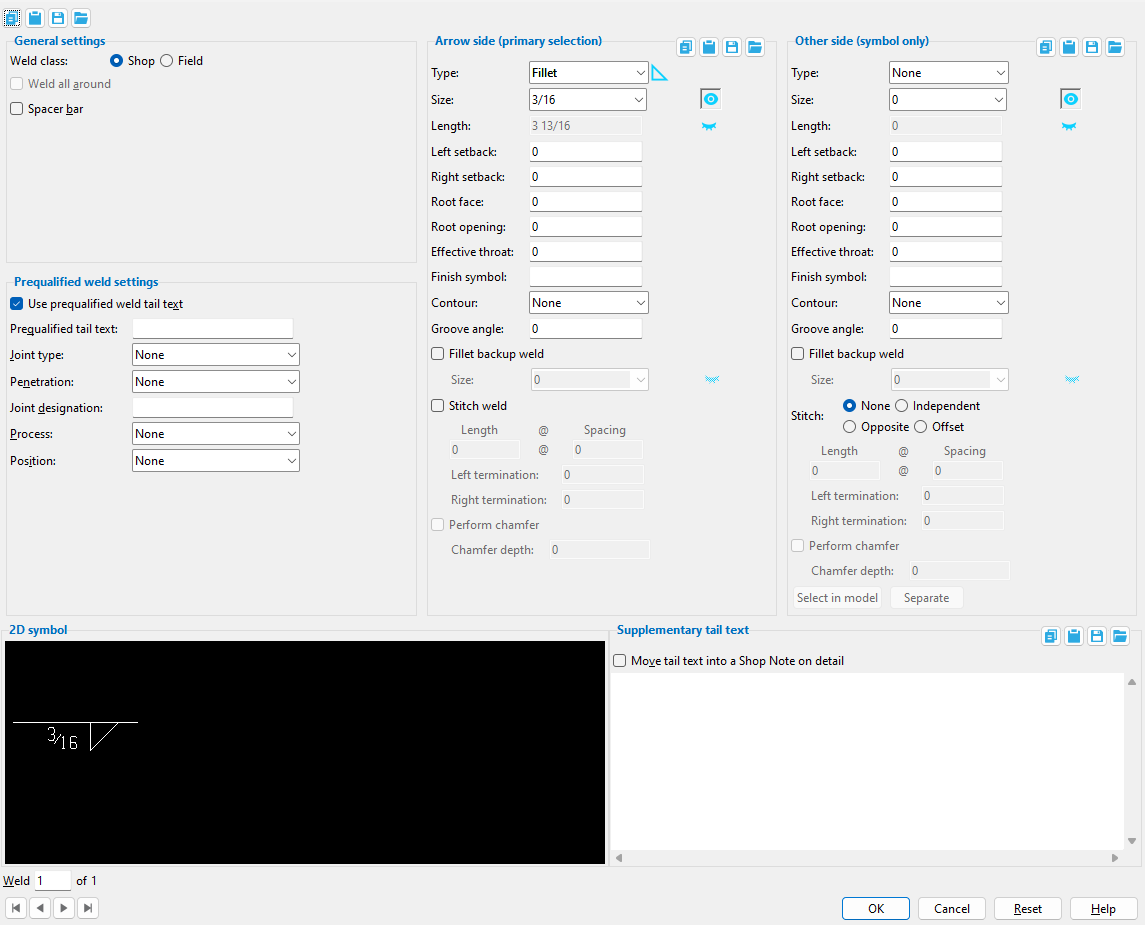
The Edit Weld(s) review window ( Modeling ) (read-only)
- To open this window (in Modeling ):
- Double-click a weld (the selection filter must = ' Welds ' or ' Legacy Default ' )
- Review Weld
- To review multiple welds
Also see :
- Weld Input (counterpart to this window in the Drawing Editor )
- Weld Design Settings (setup of system-generated welds)
- Welds in modeling (topic)
- Weld symbols (weld symbols on details)
page 1 | contents | model > weld > | model -- weld | 3D welds | top
------ General settings ------
' Field ' means that the materials being welded together are submaterials of different members. System connections for which 3D field welds are generated automatically include HSS braces field welded to gusset plates , welded column splices , welded moment connections and shear plates set to be " Attached to " the ' Supported '. Field welds are not drawn on member details. A flag like that shown in the weld symbol above indicates that the weld is a field weld.
' Shop ' means that the materials being welded are submaterials of the same member. The materials are shop welded. A weld symbol will be generated on the member detail the member is auto detailed in a full-featured SDS2 program .
Status Display: Weld status > Shop weld
Status Display: Weld status > Field weld
|
The circle on the end of this " 2D Symbol " designates weld-all-around. |
If this box is checked (
), then this weld may be a user-added weld. If this weld is a system generated weld, then " Weld pattern " = ' All around ' on an auto base/cap plate or the column with the base / cap plate is an HSS round or " Weld all around " for a user base/cap plate is set to ' Yes ' or, possibly, to ' Automatic '.
If the box is not checked (
), the weld is not a weld-all-around weld.
Spacer bar: ![]() or
or ![]() . This applies when ' V groove ' or ' Bevel groove ' is selected as the weld " Type ."
. This applies when ' V groove ' or ' Bevel groove ' is selected as the weld " Type ."
|
An arrow side V-groove weld with a spacer bar. |
If this box is checked (
If the box is not checked (
Status Display: Weld status > Spacer bar
page 1 | contents | model > weld > | model -- weld | 3D welds | top
------ Prequalified weld settings ------
| See Table 8-2, AISC Thirteenth Edition , p. 8-34 for more information on prequalified welded joints. |
Use prequalified weld tail text: ![]() or
or ![]() .
.
If this box is checked (
If the box is not checked (
Prequalified tail text: This text may have been entered manually by the user of a full-featured SDS2 program , or by selecting a " Joint type " and/or " Penetration " and/or " Weld type " and/or " Process " and/or " Position " and/or " Joint designation ."
| Order of prequalified tail text:
joint type - penetration weld type joint dsg - process - position --------------------------------------------------------------------- Note: ' Single ' or ' Double ' and " Weld type " sets the weld type. |
Status Display: Weld status > Prequalified tail text
Joint type: None or B or C or T or BC or TC or BTC . The selection made here is automatically entered to the appropriate position in the " Prequalified tail text " (above) and on the weld symbol.
| Tail Text | Joint Type |
| B | butt joint |
| C | corner joint |
| T | T-joint |
| BC | butt or corner joint |
| TC | T or corner joint |
| BTC | butt, T- or corner joint |
Status Display: Weld status > Weld joint
Penetration: None or L or U or P . The selection made here is automatically entered to the appropriate position in the " Prequalified tail text " (above) and on the weld symbol.
| Tail Text | Penetration |
| L | limited thickness, full penetration |
| U | unlimited thickness, full penetration |
| P | partial-penetration |
Status Display: Weld status > Weld penetration
Joint designation: The entry made here ( 1 character ) is automatically entered to the appropriate position in the " Prequalified tail text " (above) and on the weld symbol.
Status Display: Weld status > Joint designation
Process: None or S or G or F . The selection made here is automatically entered to the appropriate position in the " Prequalified tail text " (above) and on the weld symbol.
| Tail Text | Process |
| S | submerged arc welding (SAW) |
| G | gas metal arc welding (GMAW) |
| F | flux cored arc welding (FCAW) |
Status Display: Weld status > Weld process
Position: None or F or H or V or OH . The selection made here is automatically entered to the appropriate position in the " Prequalified tail text " (above) and on the weld symbol.
| Tail Text | Position |
| F | flat |
| H | horizontal |
| V | vertical |
| OH | overhead |
Status Display: Weld status > Weld position
page 1 | contents | model > weld > | model -- weld | 3D welds | top
------ Arrow side (primary selection) ------
| (primary selection) indicates that the arrow-side weld is displayed in the model in the User and Site Options > Modeling > " Primary selection color ." |
Type: Fillet or Square groove or Bevel groove or V groove or J groove or U groove or Flare bevel groove or Flare V groove or Plug or Backing weld . This applies to " Prequalified tail text " (the 3rd position) and to all other welds (including all SDS2 system-generated welds).
| symbol | name | weld used for... |
|
|
fillet | General welding of material. |
|
|
square groove | Butt joints. " Prequalified... " = 1. |
|
|
bevel groove | General full penetration welding of material. " Prequalified... " = 4 (5 for ' Double '). |
|
|
V groove | Butt joints of thicker material. " Prequalified... " = 2 |
|
|
J groove | Special full penetration welding of material. " Prequalified... " = 8 |
|
|
U groove | Butt joints of thicker material. " Prequalified... " = 6 |
|
|
flare bevel groove | For a radiused surface to flat surface (e.g. tube to plate). " Prequalified... " = 10. |
|
|
flare V groove | For a radiused surface to radiused surface. |
| |
plug | For a plug weld, the material requires plug weld holes . |
|
|
backing weld | For the back side of bevel or V, J or U groove welds. |
Status Display: Weld status > Weld type
Size: A distance (in the primary dimension " Units " or other units ) that indicates depth of preparation, size or strength of the weld. The eye button tor weld symbols may be set to ![]() or
or ![]() or
or ![]() .
.
|
Weld size is modeled in 3D as shown here. The eye button controls how the weld size is depicted on weld symbols in 2D drawings. |
Weld symbols : The " Size " of a single weld will be depicted on the " 2D symbol " (this window) and on subsequently detailed members depicting that particular weld as a weld symbol if the eye button is set to show (
). Clicking the eye button to 'not show' (
) hides the weld size. The eye button is gray (
) if you are editing multiple welds whose shown-hidden state is mixed . The state of the eye button affects auto detailing of members in a program such as SDS2 Detailing .
Status Display: Weld status > Weld size
Length: The length of the weld (in the primary dimension " Units " or other units ). The eye button tor weld symbols may be set to ![]() or
or ![]() or
or ![]() .
.
|
Weld length is modeled in 3D as shown here. The eye button controls how the weld length is depicted on weld symbols in 2D drawings. |
Weld symbols : The " Length " of a single weld will be depicted on its " 2D symbol " (this window) and on subsequently detailed members depicting that particular weld as a weld symbol if the eye button is set to show (
Status Display: Weld status > Weld length
Left setback: The distance (in the primary dimension " Units " or other units ) that the left end of the weld is set back from the edge of the material. ' 0 ' (zero) makes the left end of the weld go to the edge of the material.
Status Display: Weld status > L:eft setback
Right setback: The distance (in the primary dimension " Units " or other units ) that the right end of the weld is set back from the edge of the material. ' 0 ' (zero) makes the right end of the weld go to the edge of the material.
Status Display: Weld status > Right setback
Root face: A distance (in the primary dimension " Units " or other units ) that defines the root face for groove welds. The root face is the portion of a prepared edge that is not beveled or grooved.
|
Status Display: Weld status > Root face
Root opening: A distance (in the primary dimension " Units " or other units ) that defines the root opening for groove welds.
|
Status Display: Weld status > Root opening
Effective throat: A distance (in the primary dimension " Units " or other units ). In a fillet weld, this is the distance from the root to the face of the weld. The distance is measured in the plane where the weld is most likely to fail. An " Effective throat " distance may be applied to weld symbols for bevel and groove welds, not just fillet welds.
|
This symbol indicates that the arrow-side weld has an effective throat of 1/4 inch. |
Status Display: Weld status > Effective throat
Finish symbol: A letter (1 character) to appear on the weld symbol to designate the finish (reference f/F in the illustration below).
Status Display: Weld status > Finish symbol
Contour: None or Flush or Convex or Concave or Smooth toes .
' None ' results in no contour symbol being included as part of the " 2D symbol ."
' Flush ' adds a flat line as the contour symbol to the weld symbol.
' Concave ' adds a concave line.
' Convex ' adds a convex line.
' Smooth toes ' adds a contour symbol that looks like two back-to-back J's. It serves as an instruction to the welder to perform weld toe grinding.
Status Display: Weld status > Weld contour
Groove angle: The positive or negative (-) number of degrees ( -75 to 75 ) that defines the angle for bevel groove or V groove welds.
|
Status Display: Weld status > Groove angle
If this box is checked (
If the box is not checked (
Size: The size of the Fillet backup weld. The size can be selected from the drop-down menu of preloaded fillet weld sizes or manually typed into the field. The size can be shown next to the Fillet backup weld symbol. The eye button for weld symbols may be set to ( ![]() or
or ![]() or
or ![]() ) .
) .

If this box is checked (
If the box is not checked (
Status Display: Weld status > Stitch
Length: A distance (in the primary dimension " Units " or other units ) that defines the length of each weld segment in a stitch weld.
|
Status Display: Weld status > Stitch length
Spacing: The distance (in the primary dimension " Units " or other units ) from the beginning of one weld segment to the beginning of the next weld segment.
|
Status Display: Weld status > Stitch spacing
Left termination: The weld length (in the primary dimension " Units " or other units ) of the weld segment at the left end of a stitch weld.
|
Status Display: Weld status > Left termination
Right termination: The weld length (in the primary dimension " Units " or other units ) of the weld segment at the right end of a stitch weld.
|
Status Display: Weld status > Right termination
page 1 | contents | model > weld > | model -- weld | 3D welds | top
------ Other side (secondary selection or symbol only) ------
| (secondary selection) indicates that the other-side weld is displayed in the model in the " Secondary selection color ." |
| (symbol only) indicates that changes to other-side weld options affect the weld symbol only, not the model. |
Type: Same as " Type " for the arrow side , except that this applies to the other side.
Size: Same as " Size " for the arrow side , except that this applies to the other side.
Length: Same as " Length " for the arrow side , except that this applies to the other side.
Left setback: Same as " Left setback " for the arrow side , except that this applies to the other side.
Right setback: Same as " Right setback " for the arrow side , except that this applies to the other side.
Root face: Same as " Root face " for the arrow side , except that this applies to the other side.
Root opening: Same as " Root opening " for the arrow side , except that this applies to the other side.
Effective throat: Same as " Effective throat " for the arrow side , except that this applies to the other side.
Finish symbol: Same as " Finish symbol " for the arrow side , except that this applies to the other side.
Contour: Same as " Contour " for the arrow side , except that this applies to the other side.
Groove angle: Same as " Groove angle " for the arrow side , except that this applies to the other side.
Fillet backup weld: Same as " Fillet backup weld " for the arrow side , except that this applies to the other side.
Size: Same as " Size " for the arrow side , except that this applies to the other side.
Stitch: None or ![]() Independent or
Independent or ![]() Opposite or
Opposite or ![]() Offset .
Offset .
' None '
 |
' Opposite '
 |
' Offset '
 |
'
None ' results in a continuous weld (not a stitch weld).
'
'
'
Length: Same as " Length " for the arrow side , except that this applies to the other side .
Spacing: Same as " Spacing " for the arrow side , except that this applies to the other side .
Left termination: Same as " Left termination " for the arrow side , except that this applies to the other side .
Right termination: Same as " Right termination " for the arrow side , except that this applies to the other side .
page 1 | contents | model > weld > | model -- weld | 3D welds | top
|
No weld symbol will be shown if you are editing multiple weld numbers. |
|
The " Length " of a weld is depicted on the " 2D symbol " when the eye button next to " Length " is set to show ( |
|
Combined welds are depicted with one weld symbol. In the model, the arrow-side weld is the " Primary selection color ," the other-side weld is the " Secondary selection color ." |
If " Weld class " is set to ' Shop ', the weld symbol will be drawn on the member detail during auto detailing in a full-featured SDS2 program .. If the " Weld class " is ' Field ', the weld symbol will not be shown on the member detail.
page 1 | contents | model > weld > | model -- weld | 3D welds | top
------ Supplementary tail text ------
If this field is left blank and " Use prequalified weld tail text " is not checked, a tail will not be drawn on the weld symbol. If a character string is entered, a tail with that character string as the tail text is drawn on the weld symbol during Detail Members in a full-featured SDS2 program .
| Tail text entered here : |
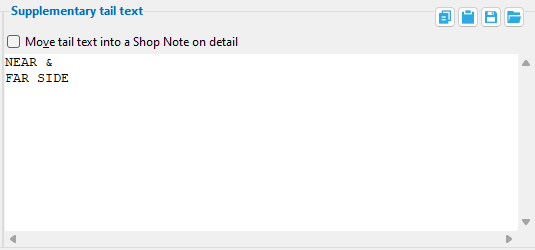
|
| Tail text on weld symbol : |
|
Move tail text into a Shop Note on detail: ![]() or
or ![]() . This applies in a full-featured SDS2 program when a text string has been added to the Supplementary tail text field.
. This applies in a full-featured SDS2 program when a text string has been added to the Supplementary tail text field.
If this box is checked (
Single material : 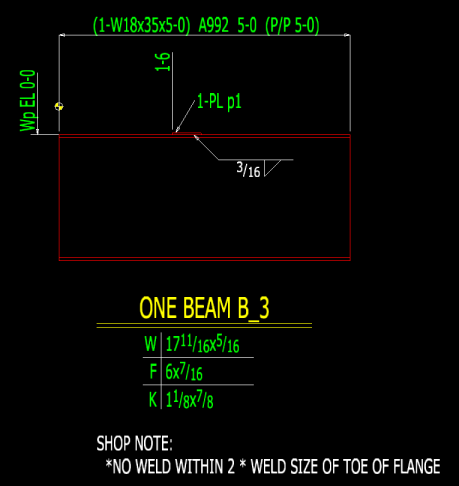
Multiple matching materials with matching welds : 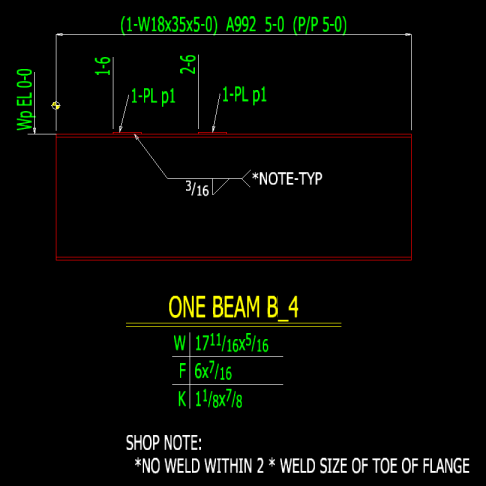
If the box is not checked (
page 1 | contents | model > weld > | model -- weld | 3D welds | top
To close the Edit Weld(s) review window :

"OK" (or the Esc key or the Enter key or the
button) closes this window.
page 1 | contents | model > weld > | model -- weld | 3D welds | top