The Update Attributes window ( Modeling & Drawing Editor )
On this or a related page :
- Tabs (this page):
-
.|| General || Approval/Modeling || Fabrication || Shipping || Erection || - " By Piecemark " " By Area " " Cancel " " Reset "
-
- Step-by-step instructions (a related page):
- Introduction
- Step 1: Optionally select members if you press " By Area " in step 5
- Step 2: Invoke Update Attributes to open this window
- Step 3: Select a tab
- Step 4: Make entries to be applied to members/details
- Step 5: Press either " By Piecemark " or " By Area"
- Step 6: Select the members/details to update
- Step 7: Status of selected members is updated
Also see :
- Point selection by area box (affects Update Attributes )
- Member Status Review (alternative to Update Attributes )
- Home > Analytics (to track status at Home )
- Drawing Data (alternative to Update Attributes )
- Status Display (to display members/materials per status) (
 )
)
- Default hide items settings (affect By Pcmk only)
- Entering dates (topic)
home > utilities | model > (3d classic) | file > (2d classic) | step-by-step instructions
| || General || Approval/Modeling || Fabrication || Shipping || Erection || |
| Step 4 explains making entries to these fields. Step 5 & step 6 explain applying your choices to members. |
Member hold status: Held or Not held . Holding a member is usually interpreted as meaning holding a member's detail drawing from release to the shop.
|
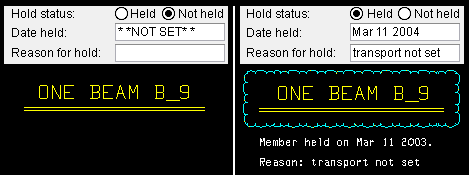
If ' Held ' is selected here and applied to a member that was previously ' Not held ', a cloud will be drawn around the callout on the member detail the next time the affected member is auto detailed in a full-featured SDS2 program . If a date has been entered to " Date held " and a reason has been entered to " Reason for member hold ," that date and reason will also appear on the drawing.
Selecting ' Not held ' and then auto detailing (in a full-featured SDS2 program ) will remove the cloud and annotations from affected member details which previously had such annotations.
Member Status Review: Member hold status
Status Display: General status options > Hold status
Status Report by XXX: Member hold status
Date held: **NOT SET** or the month day year (see entering dates ) that you want to appear as an annotation on affected member detail(s) the next time auto detailing is done on members in a full-featured SDS2 program .
A ' month day year ' entry only applies if you have selected ' Held ' for " Member hold status ." The entry you type in will affect subsequently detailed drawings of the members you select in step 6 .
Member Status Review: Date held
Status Display: General status options > Hold status
Status Report by XXX: Member hold status
Reason for hold: Any reason ( up to 29 characters ) that you might consider valid for holding a member.
The string of characters entered here will be applied to the details of members you select in step 6 when those members are auto detailed in a full-featured SDS2 program (so long as ' Held ' is selected for " Member hold status "). Valid reasons might be "materials not available" or "transport not set" or "per order of the engineer."
Member Status Review: Reason for member hold
Status Display: General status options > Reason for hold
Status Report by XXX: Member hold status
Category: Any category definition from the Member Categories list in Fabricator Options .
To enter a category definition, press the "file cabinet" browse button (
) and select a category from the list that appears. The category you enter here will be applied to the members you select in step 6 .
Member Status Review: Member category
Status Display: Member status > Category
Status Report by XXX: Category
Hide Items: Category
Detail complete date: **NOT SET** or a month day year (see entering dates ) that prevents changes from being made to a Drawing Editor drawing. The choice you make here will be applied to the drawings you select in step 6 . Selecting detail sheets/gather sheets/erection sheets applies the detail complete flag to those sheets and gives you options (" Yes to All " and " No to All ") to apply the " Detail complete date " to all the drawing items on all of the sheets; or you can use another pair of options (" Yes " or " No ") to apply the " Detail complete date " to all drawing items on only those sheets for which you press the " Yes " button.
' **NOT SET** ' removes the status designation of "detail complete" from a member detail, submaterial detail, erection view drawing or sheet, thus allowing you to Save changes to that drawing, or the user of a full-featured SDS2 program to auto detail that drawing again.
If a ' month day year ' is applied to drawings, those drawings will be hidden on the selection window that appears when the user of a full-featured SDS2 program invokes Detail Members or Detail Submaterial or Detail Erection Views . If that user attempts to auto detail the affected drawings, the program will give that user a warning message instead of regenerating the drawings. Users will also be UNABLE to Save changes made in the Drawing Editor to drawings designated as complete.
Hide Items: Detail complete
Drawing Data: Detail complete
Status Display: Approval and modeling > Detail complete date
Status Report by XXX: Detail complete
Detail frozen date: **NOT SET** or the month day year (see entering dates ) that the drawings were frozen. This applies to member details only. The choice you make is applied to the member details that you select in step 6 . When you select " By Pcmk ," a separate window (" Select Piecemarks ") will open.
If a ' month day year ' is entered, the details of the members whose piecemarks you select in step 6 will be put into a frozen, read-only state in a full-featured SDS2 program , similar to their read-only state in SDS2 Site Planning. The piecemark of a drawing that is frozen cannot be renamed using tools such as Rename Project Items or Change Marks or Save Change Piecemarks or Detail Sheet Autoloading (which are not available in SDS2 Site Planning). Users of a full-featured SDS2 program can add graphics to comment layers while in such a member detail, but not to any other drawing layers. And the affected member detail cannot be re-detailed until it is thawed.
' **NOT SET** ' unfreezes ("thaws") the member details whose piecemarks you select in step 6 . The thawed details immediately becomes editable for users of a full-featured SDS2 program . Automatic detailing is permitted to update the details. The piecemarks of the details can be changed.
" Detail frozen date " versus " Detail complete date ": When you set a " Detail complete date ," the user of a full-featured SDS2 program can still override that date and change the member detail. Once a " Detail frozen date " has been set, only comment layers can be changed. The " Detail frozen date " must be cleared before non-comment layers can be changed in a full-featured SDS2 program..
Drawing Data: (if you select " By Piecemark "): Detail frozen
Status Display: Approval and modeling > Member detail frozen
Piecemark status: Freeze or Thaw .
' Freeze ' does a Freeze piecemark operation on the piecemarks of the members that you select in step 6 (or preselected in step 1b ), thus causing their piecemarks to become frozen . The " Piecemark group " number of the selected members will be changed as a result of this operation, but the piecemark assigned to the selected members will not change. However, piecemarks of members other than the ones you select may change -- see these scenarios . Frozen piecemarks remain system piecemarks if they were system piecemarks when they were frozen. They have all the characteristics of other system piecemarks, except that new members cannot be combined under them.
' Thaw ' does a Thaw piecemark operation on the members that you select in step 6 (or preselected in step 1b ), thus causing their piecemarks to thaw, which means that they can be combined under other piecemarks. If members whose piecemarks you thawed are exactly like other members with different non-frozen system piecemarks, the members with the newly thawed piecemarks will be combined under those other piecemarks.
Related topics: Freeze and Thaw piecemark scenarios , frozen piecemarks
Member review windows: Frozen piecemark , Piecemark group
Status Display: Approval and modeling > Member piecemark frozen
' Yes ' marks members that you select in step 6 (or preselected in step 1b ) as CNC downloaded. The box for " CNC downloaded " in Member Status Review will be checked (
).
' No ' marks members that you select in step 6 (or preselected in step 1b ) as not CNC downloaded. The box for " CNC downloaded " in Member Status Review will be un checked (
).
Effect on CNC downloading: If User and Site Options > Site > " Hide items that have been downloaded from CNC selection menu " is turned on, then all piecemarks that are associated with any members that are marked as CNC downloaded will be masked (hidden) on the selection dialog for CNC downloading by
Details .
CNC selection dialog: Click here (the link is to the SDS2 Detailing manual).
Member Status Review: CNC downloaded
home > utilities | model > (3d classic) | file > (3d classic) | step-by-step instructions | top
| || General || Approval/Modeling || Fabrication || Shipping || Erection || |
| Step 4 explains making entries to these fields. Step 5 & step 6 explain applying your choices to members. To enter today's date, double-click; to enter **NOT SET** , type 0 then press Tab . |
Submitted for approval: **NOT SET** or the month day year (see entering dates ). The exact meaning of " Submitted for approval " is open for interpretation. Generally this status setting is the date that drawings or other documents that pertain to particular members were sent for approval. The entry made here will be applied to the members you select in step 6 .
Drawing Data (if you select " By Piecemark "): Sent for approval
Member Status Review: Submitted for approval
Status Display: Approval and modeling > Submitted for approval
Status Report by XXX: Submitted for approval
Received from approval: **NOT SET** or the month day year (see entering dates ). The exact meaning of " Received from approval " is open for interpretation. Generally this status setting is the date that documents that pertain to particular members were returned after having been reviewed for approval. Your entry will be applied to the members you select in step 6 .
Drawing Data ):" By Piecemark "(if you select Received approval
Member Status Review: Received from approval
Status Display: Approval and modeling > Received from approval
Status Report by XXX: Received from approval
Approval status: Approved or Rejected or Revise and resubmit or Approved as noted or Not reviewed . Your entry will be applied to the members you select in step 6 .
Drawing Data (if you select " By Piecemark "): Approval status
Member Status Review: Approval status
Status Display: Approval and modeling > Approval status
Status Report by XXX: Approval status
home > utilities | model > (3d classic) | file > (3d classic) | step-by-step instructions | top
| || General || Approval/Modeling || Fabrication || Shipping || Erection || |
| Step 4 explains making entries to these fields. Step 5 & step 6 explain applying your choices to members. To enter today's date, double-click; to enter **NOT SET** , type 0 then press Tab . |
Projected fabrication complete: **NOT SET** or the month day year (see entering dates ) when the shop projects fabrication of particular members to be completed. Your entry will be applied to the members you select in step 6 .
Member Status Review: Projected fabrication complete
Status Display: Fabrication status > Projected for fabrication
Status Report by XXX: Projected for fabrication
Released for fabrication: **NOT SET** or the month day year (see entering dates ) when member details were released to the shop so that members on those details could be fabricated. This entry will be applied to the members you select in step 6 .
Drawing Data (if you select " By Piecemark "): In shop
Member Status Review: Released for fabrication
Status Display: Fabrication status > Released for fabrication
Status Report by XXX: Released for fabrication
Fabrication completed: **NOT SET** or the month day year (see entering dates ) that fabrication of the members you select in step 6 was completed.
Drawing Data (if you select " By Piecemark "): Fabricated
Member Status Review: Fabrication completed
Status Display: Fabrication status > Completed fabrication
Status Report by XXX: Fabrication complete
home > utilities | model > (3d classic) | file > (3d classic) | step-by-step instructions | top
| || General || Approval/Modeling || Fabrication || Shipping || Erection || |
| Step 4 explains making entries to these fields. Step 5 & step 6 explain applying your choices to members. To enter today's date, double-click; to enter **NOT SET** , type 0 then press Tab . |
Projected shipped date: **NOT SET** or the month day year (see entering dates ) when the members you select in step 6 are projected for shipment to the construction site.
Member Status Review: Projected shipped date
Status Display: Shipping and erection status > Shipping projected
Status Report by XXX: Projected to ship
Actual ship date: **NOT SET** or the month day year (see entering dates ) when the group of members you select in step 6 was shipped.
Drawing Data (if you select " By Piecemark "): Actual ship date
Member Status Review: Actual ship date
Status Display: Shipping and erection status > Shipping actual
Status Report by XXX: Actually shipped
home > utilities | model > (3d classic) | file > (3d classic) | step-by-step instructions | top
| || General || Approval/Modeling || Fabrication || Shipping || Erection || |
| Step 4 explains making entries to these fields. Step 5 & step 6 explain applying your choices to members. To enter today's date, double-click; to enter **NOT SET** , type 0 then press Tab . |
Received on job site: **NOT SET** or the month day year (see entering dates ) that the contractor has received at the construction site the members you will select in step 6 .
Member Status Review: Received on job site
Status Display: Shipping and erection status > At job site
Status Report by XXX: Received at jobsite
Erected: **NOT SET** or the month day year (see entering dates ) that the members you will select in step 6 were incorporated into the structure being built.
Drawing Data (if you select " By Piecemark "): Erected
Member Status Review: Erected
Status Display: Shipping and erection status > Erected
Status Report by XXX: Erected
home > utilities | model > (3d classic) | file > (3d classic) | step-by-step instructions | top
![]()
![]()
![]()
![]()
"By Piecemark" or "By Area" -- see step 5 . These buttons set the method used to select the members (or members and their details and sheets) that you want the status information applied to.
" By Piecemark " lets you update detail sheets and/or member details as well as members. As described in step 6 , if "
" By Area " does not appear in the Drawing Editor or on the version of this window that is opened from Home . In Modeling , it is disabled (grayed out) if the " Detail complete date " or " Detail frozen date " are set to be updated. It will only update status information on the selected members in the model. It does not update member details or detail sheets.
Note: If you selected members (in step 1b ) before you invoked Update Attributes , you will skip step 6 and go to step 7 when you press the " By Area " button.
"Cancel" (or the Esc key) closes this window and ends the Update Attributes operation without changing the status of members.
"Reset" undoes all changes made to this window since you first opened it. Go back to step 2 of the Update Attributes procedure.
home > utilities | model > (3d classic) | file > (3d classic) | step-by-step instructions | top