 CNC downloading: the total process
- Step 1: Before you begin
- Step 2: CNC setup
- Step 3: (optional) Verify only
- Step 4: Error handling
- Step 5: Output configuration
- Step 6: Downloading *
* If you want to output a report instead of a download file, you can skip step 6 and instead press " Report " on the Computer Numerically Controlled menu. Also, instead of step 6, you can download in the model by selecting members or by selecting material .
Also see :
- CNC - Download Members by location (for downloading from the model)
- CNC - Download Material by location (for downloading from the model)
- Transmittal of "CNC Items" ( Home )
CNC contents | CNC main menu | CNC topics
1a : In SDS2, make certain that the Job you want to download CNC data from is your current Job and that it is complete and ready.
1b : The 3D data used by a CNC machine is generated in the SDS2 3D model. Therefore, any time you change options at Home > Project Settings > Job (or Fabricator Setup options such as in " CNC Center Marks " or " Position and Match Marks "), you must Process and Create Solids for the designated changes to take effect.
1c : It is generally a good idea to have completed the entire 3D model (or the sequence or zone that you are working on) prior to CNC downloading.
1d : The information that is downloaded using the SDS2 CNC Module appears on details in the form of slots, holes, and material cuts. Therefore, all details should have been reviewed and approved prior to CNC downloading. This, however, is not a requirement for CNC downloading. You can download without first auto detailing .
Warning : Changes made to a drawing in the Drawing Editor are not included in a CNC download file. If you want to add a hole or a cut to a material, you must do so in Modeling if you want those changes included in the CNC download.
CNC contents | CNC main menu | CNC topics | top
2a : On the Computer Numerically Controlled window, confirm that the currently selected " CNC configuration " is the setup configuration that you want. Also make sure that the " CNC type " is correct -- the " CNC type " sets the file format of the download file .
2b : If the currently selected " CNC Configuration " is not the one you want, press the " File " browse button (
) to change to a different one.
2c ( optional ): If you want to create a new setup configuration (for example, because you have purchased a license for a new " Configuration type "), press the " File " browse button (
2e ( optional ): If you need to modify your currently selected " CNC Configuration ," press the " Setup " button.
CNC contents | CNC main menu | CNC topics | top
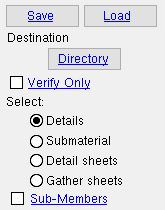
Step 3 ( optional ): Verify only
|
Verification without downloading : Checking the box for " |
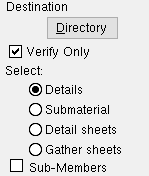
3a : Make sure that the box for " Disable error checking " in CNC Setup is not checked (
).
3b : Press the " Download " button, check the box for "
Verify Only ," then select the items you want to verify.
3c : The SDS2 CNC program outputs error messages to the Output-Request Summary (if there are any errors). " Print " the list of errors or " Save " it to disk (see report viewer ) if you plan to do step 4.
CNC contents | CNC main menu | CNC topics | top
- If you " Download " and select a material that has a single error (for example, one hole that can't be fabricated), the SDS2 CNC program generates an error message for that material. If ' Fail piece ' is selected for Download holes outside diameter range as " and " Download holes too close to edge, web, flange, bend and hole as ," a hole error prevents the download file for that material from being generated.
- You can correct the problem that produces an error message, or you can check the box for " Disable error checking " to get a download without correcting the problem.
- Refer to the documentation on the various error messages for an explanation of how various CNC Setup options can affect which materials get error messages. You may want to adjust the entries made to CNC Setup options to prevent future error messages.
- Selecting ' Fail hole, print report ' or ' Fail hole, no report ' for " Download holes outside diameter range as " and/or " Download holes too close to edge, web, flange, bend and hole as " allows you to download only those holes that do not produce errors.
- Selecting ' A mark ' for " Download holes outside diameter range as " and/or " Download holes too close to edge, web, flange, bend and hole as " changes holes that are in error to CNC marks.
- On the Hole Edit window, you can check the box for " Valid for CNC downloading " to prevent an error and thus allow the material to be downloaded.
CNC contents | CNC main menu | CNC topics | top
5a ( optional ): User and Site Options > Output > " CNC " and " Edit configuration " set the directory (
) that CNC data files will, by default, be downloaded to. Since different machines may call for different methods of downloading (some machines may use flash drives, others may read CNC files from a server), you may want to create an output configuration specifically for the machine you will be downloading to. This step is optional at this point because you can change the output destination at the time that you download (step 6).
5b ( optional ): If you want the download files you output to be organized by tool set, then check the box for " Batch download " on the CNC Setup window.
CNC contents | CNC main menu | CNC topics | top
| These instructions assume that you are downloading from the Computer Numerically Controlled window. An alternative is to download from the model by selecting members or by selecting material . Also, if you want to output a report instead of download files, you can skip step 6 and instead press " Report " on the Computer Numerically Controlled menu. |
On the Computer Numerically Controlled window:
6a ( optional ): If you want to generate download files for more than one " CNC type ," you can press the "file cabinet" browse button (
6b : Press the " Download " button.
6c : On the selection dialog that opens. Set the type of items to be downloaded to '
Details ' or '
|
File naming: Select by ' |
- If User and Site Options > Site > " Hide items that have been downloaded from CNC selection menu " is checked ( ), those items which have already been downloaded are not included on this selection dialog if you select by ' Details ' or ' Submaterial '. To have these already downloaded items listed, you can check the box for " Show All " (
 ).
).
- A special case: If you select by ' Details ' and select a group member piecemark , each component member of that group member will be downloaded to a separate file named after that component member's piecemark. If you would like to download individual submembers of the group member, instead of all of them, you can check the box for " Sub-Members ."
After the selection dialog closes:
- If the box for " Disable error checking " is not checked ( ), the CNC data for each of the materials you selected undergoes verification again.
- A download file is always generated for each selected material that is free of errors.
- A download file may be generated even for materials that have errors if " Disable error checking " is checked ( ).
- A download file may be generated even for materials that have errors if a choice other than ' Fail piece ' is selected for " Download holes outside diameter range as " and/or " Download holes too close to edge, web, flange, bend and hole as ."
- The download files are placed in the destination set in step 5 or step 6. The download files are typically named after member piecemarks (upper case) or submaterial marks (lower case). If you selected multiple CNC configurations or you elected to " Batch download ," the files will be placed in appropriate subfolders ( ) within the folder set as the destination in step 5 or step 6b.
- Tracking downloads: If a download file is generated for a member, you will find when you edit that member > press " Status " > that " Downloaded to CNC " is checked on the Member Status Review window. When a download file is generated for a submaterial, " CNC Downloaded " on the material's General Information window is set to ' Yes '.

