Automatic Detailing (topic)
Also see :
- Detail complete flag (prevents redetailing of existing drawings)
- Comment layers (used in a SDS2 review station to annotate drawings)
page 1 | contents | topics | top
Automatic detailing (in a full-featured SDS2 program )
Automatic detailing is the automatic production (in a full-featured SDS2 program ) of member details , group member details, submaterial details and erection view drawings. Automatic detailing cannot be done in a SDS2 review station .
A full-featured SDS2 program can produce these three types of drawings automatically, without a human being ever having to manually draw a line.
When you review drawings of these types, be aware that certain Job/ Fabricator Options directly affect how these drawing types are generated.
Also be aware that, for example, an SDS2 Detailing user can modify these drawings using various Drawing Editor commands.
page 1 | contents | topics | top
Member details
Also see: detail sheets , making comments & entering status data .
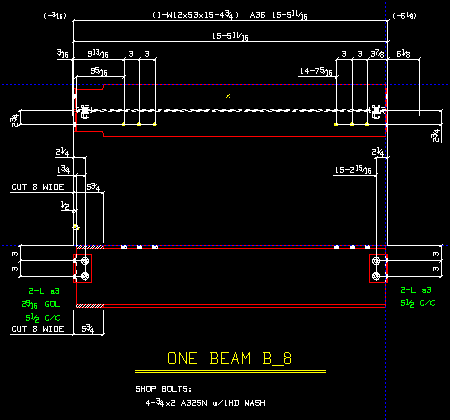
A member detail is a drawing of a single member that represents all members in your current Job that have the same member mark . The example of a member detail shown below is for all beams with the piecemark B_9. In this case, only one beam in the 3D model has that piecemark.
|
page 1 | contents | topics | top
How member details are named :
Each system-generated member detail is identified by the piecemark of the members that are depicted in the drawing.
In a full-featured SDS2 program , when a member first added, the program assigns that member the " System Piecemark Prefix " listed in Fabricator > Piecemarking > Member Descriptions that identifies the type of the member (e.g. B_ for a beam). Then the program gives that member the lowest available number that is not already assigned to another member of that type.
A user of a full-featured SDS2 program has many option available that can be used to change system-assigned piecemarks. You cannot change a member piecemark in a SDS2 review station .
page 1 | contents | topics | top
Associated with each system-generated member detail is a database of complete bill of material information which may be accessed using Objects > Bill of Material > Review Bill in the Drawing Editor .
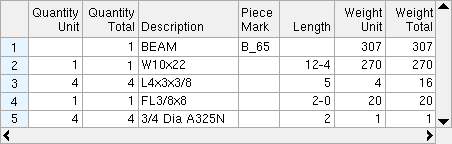
Line 1 on a system-generated member detail tells information about the members that have been assigned the member piecemark. The lines following line 1 relay information about the submaterials that make up those members with that piecemark.
A full-featured SDS2 program compiles bill info for system-generated member details automatically when the user auto details members -- for other drawing types the SDS2 full-featured program user has to use Edit Bill to enter the bill information interactively.
This info will automatically be compiled into the bill of material on a sheet as member details are placed on that sheet.
page 1 | contents | topics | top
Using reports to review member details :
You can print out a Bill of Material Plot Order by Detail instead of executing Edit Bill while you are reviewing the particular drawing. Both the report and the bill editor relay exactly the same information about the bill of material of members with a particular piecemark.
Printing a Bill of Material Plot Order by Sheet for a particular detail sheet will get you exactly the same information as will plotting the same detail sheet (that is, if the sheet has a bill of material on it).
A Material Summary report and Submaterial Piecemark List are other ways to get compilations of data based on member bills of material.
page 1 | contents | topics | top
Step-by-step review of member details :
1 . Begin the review process while in any Drawing Editor drawing.
1a : Choose File > Open .
1b (if your current drawing has changed) : Optionally enter a " Detail complete date " and press " Yes " to save changes made to your current drawing, or press " No " to not save your revisions to that drawing.
2 . A drawing selection dialog opens.
2a : Select '
Details ' to list the names of all member detail drawings that are up to date in the selection window.
2b : Select the name of the member detail drawing you want to review, then click the " OK " button.
3 . The member detail drawing is shown on screen.
3a (optional) : Use Navigate tools to look at parts of the drawing in greater detail.
3b (optional) : Use Review 2D Items to review the specifications of materials, bolts or holes that are depicted on the drawing.
3c (optional) : Use Review Bill to review the bill of material associated with the member detail you are looking at.
3d (optional) : Use Drawing Data to apply set status flags for the particular member detail that you are reviewing.
3e (optional) : Add objects to comment layers in order to communicate with users of a full-featured SDS2 program (who can view your comments when they Open that same drawing in that program).
3f : When you are done reviewing the drawing, follow these instructions beginning with step 1 to close your current drawing and open a different drawing to review.
page 1 | contents | topics | top
Submaterial details
Also see: gather sheets , making comments & entering status data
A submaterial detail is a drawing of an individual piece of material.
That one piece of material may be used many times in the 3D model, on members with different piecemarks, on members with the same piecemark, or sometimes even two or four times on the same member.
Submaterial details can only be created by automatic detailing . They cannot be created by a user.
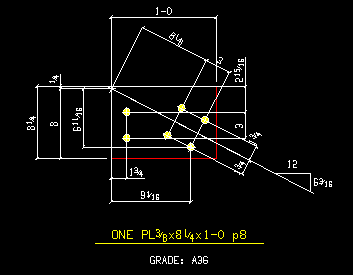
The submaterial detail shown below is a drawing of a plate.
|
page 1 | contents | topics | top
How submaterial details are named :
A submaterial detail is a picture of a single piece of material that represents all submaterial pieces with the same submaterial mark . Submaterials are named after this submaterial mark.
All submaterials that are alike are assigned a single submaterial mark per Home > Project Settings > Fabricator > Member and Material Piecemarking > the " Prefixes " tab.
Home > Project Settings > Fabricator > Member and Material Piecemarking > the " Submaterial " tab > " Broken apart by sequence " sets submaterials that are otherwise exactly alike to receive different piecemarks if they are in different sequences. A full-featured SDS2 program even gives users the option to Home > Project Settings > Fabricator > Member and Material Piecemarking > the " Submaterial " tab > " Include the sequence in the submaterial's name ."
page 1 | contents | topics | top
Step-by-step review of submaterial details :
1 . Begin the review process while in any Drawing Editor drawing.
1a : Choose File > Open .
1b (if your current drawing has changed) : Optionally enter a " Detail complete date " and press " Yes " to save changes made to your current drawing, or press " No " to not save your revisions to that drawing.
2 . A drawing selection window opens.
2a : Select '
2b : Select the name of the submaterial detail you want to review, then click the " OK " button.
3 . The submaterial detail is shown on screen.
3a (optional) : Use Navigate tools to look at parts of the submaterial drawing in greater detail.
3b (optional) : Use Review 2D Items to review the settings of a material, or of a hole or bolt in the material.
3c (optional) : Add objects to comment layers in order to communicate with users of, for example, SDS2 Detailing (who can view your comments when they Open that same drawing in their full-featured SDS2 program).
3d : When you are done reviewing the drawing, follow these instructions beginning with step 1 to close your current drawing and open a different drawing to review.
page 1 | contents | topics | top
Erection view details
Also see: erection sheets , making comments & entering status data
Erection view details are drawings of individual erection views that the user of a full-featured SDS2 program has created in Modeling . The user can use Modeling options to create isometric views , plan views or elevation views . Erection view details can only be created by automatic detailing . They cannot be drawn by the user.
Full-featured SDS2 program users can modify erection view details in Drawing Editor , but the user cannot use the Drawing Editor to create trueerection view drawings from scratch.
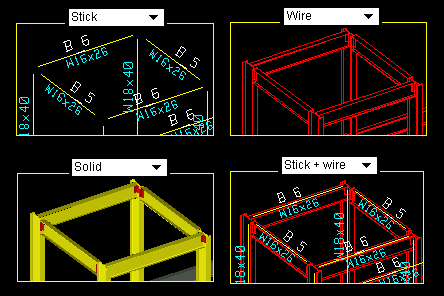
As shown in the illustration below, members in erection view drawings can be displayed in stick , wire, solid, stick + wire, or combinations of forms (designated manually). The full-featured SDS2 program user designates the form of members during automatic detailing of erection views.
|
page 1 | contents | topics | top
How erection view details are named :
Erection view details are given the same name as the erection view they are regenerated from.
If you have, for example, an SDS2 Detailing user change the name of the erection view, the erection view detail's name will change also.
page 1 | contents | topics | top
Step-by-step review of erection view drawings :
1 . Begin the review process while in any Drawing Editor drawing.
1a : Choose File > Open .
1b (if your current drawing has changed) : Optionally enter a " Detail complete date " and press " Yes " to save changes made to your current drawing, or press " No " to not save your revisions to that drawing.
2 . A drawing selection dialog opens.
2a : Select '
2b : Select the name of the erection view drawing you want to review, then click the " OK " button.
3 . The erection view is shown on screen.
3a (optional) : Use Navigate tools to look at parts of the erection view in greater detail.
3b (optional) : Use Review 2D Items to review the specifications of materials in the drawing that are depicted in solids form. You cannot do this with materials that are depicted in stick form.
3c (optional) : Add objects to comment layers in order to communicate with users of, for example, SDS2 Detailing , who can view your comments when they Open that same drawing.
3d : When you are done reviewing the drawing, follow these instructions beginning with step 1 to close your current drawing and open a different drawing to review.