 Save Assembly
Tool summary :
- Saves, under the current file name, all materials that attach to the assembly member.
- If, in Modeling , you preselected members and did a File > Assembly > New , then those preselected members will be brought into the Assembly Editor . If you then do a File > Save or File > Save As , the steps that follow are exactly the same for both Save and Save As :
| For this example, the members and materials were brought into the Assembly Editor by preselecting them in the model, then choosing Model > Assembly > New .
|
| 1 . In the Assembly Editor , choose File > Save or File > Save As .
|

|
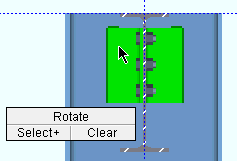
2 . Select one or more materials, welds or bolts. In this example, left-click with the Shift key ( Select+ ) selects the second clip angle and the welds -- the bolts are not selected.
|

|
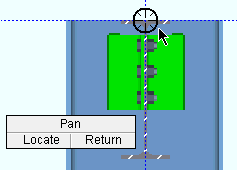
3 . Place the mouse pointer (  ) so that the point location target snaps to where you want the reference point, then left-click ( Locate ). ) so that the point location target snaps to where you want the reference point, then left-click ( Locate ).
|

|
4 . Type in a name and press " OK " to save the assembly to a file with that name.
|
- As the above example shows, the Assembly Editor commands File > Save As and File > Save do exactly the same thing if no assembly file has yet been created. However, if a file is being edited in the Assembly Editor , then Save As and Save behave differently. Tip: To edit a file in the Assembly Editor , choose File > Open , or choose Model > Assembly > Edit in Modeling .
- When you are editing an assembly (in the Assembly Editor ), Save and Save As are different operations. With Save As , you can give the file a new name and you will be prompted to select the materials that you want to include in the assembly. With Save , the current file name will be retained and all materials that attach to the assembly member will automatically be selected to be a part of the assembly.
- For example, you could use File > Open to open an assembly, then use Model > Material > Add to add a material to that assembly. When you then choose File > Save , the material that you added will automatically be selected as part of the assembly you are saving, and you will be prompted to choose a reference point. The modified assembly will have the same name as it had before it was modified. Retaining that same name will not affect any incidences of that assembly that were previously applied to the model. Any modifications that have been made to an assembly will only be applied to subsequently added assemblies with that file name.
Also see :
| VIDEO
|

|
In the assembly editor , File > Save As saves an assembly, a built-up tee that includes materials and welds. The assembly is given the same name as an assembly that is already in Modeling . Only those materials that the user selects are saved. After Model > Assembly > Add to add the assembly in Modeling , Model > Assembly > Edit reopens the Assembly Editor . The narrator uses View > Relative Depth to move 1 1/2 inch above the surface of the top edge of the built-up tee, then uses File > Save and the point locator INCL to modify the reference point of the assembly. The old assembly is then deleted in Modeling , and the new assembly is added. Since holes in the assembly go to member main member on a non-miscellaneous member (in this case, a beam), Process and Create Solids automatically matches holes and adds bolts.
|
|
page 1 | contents | file > save
 Save Assembly ( Assembly Editor )

) so that the point location target snaps to where you want the reference point, then left-click ( Locate ).


