 Save Assembly As ( Assembly Editor )
Tool summary :
For this example, the members and materials were brought into the Assembly Editor by preselecting them in the model, then choosing Model > Assembly > New . 1 . In the Assembly Editor , choose File > Save or File > Save As . 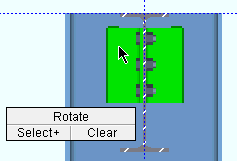
2 . Select one or more materials, welds or bolts. In this example, left-click with the Shift key ( Select+ ) selects the second clip angle and the welds -- the bolts are not selected. 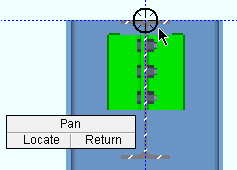
3 . Place the mouse pointer ( ) so that the point location target snaps to where you want the reference point, then left-click ( Locate ).
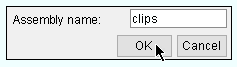
4 . Type in a name and press " OK " to save the assembly to a file with that name.
- As the above example shows, File > Save As and File > Save will do exactly the same thing if no assembly file has yet been created. However, if a file is being edited in the Assembly Editor , then Save As and Save behave differently. Tip: To edit a file in the Assembly Editor , choose File > Open while in the Assembly Editor , or choose Model > Assembly > Edit in Modeling .
- When you are editing an assembly (in the Assembly Editor ) , Save As and Save are different operations. With Save As , you can give the file a new name and you will be prompted to select the materials that you want to include in the assembly. With Save , the current file name will be retained and all materials that attach to the assembly member will automatically be selected to be a part of the assembly.
- Save As can be used to create two different versions of the same assembly, one for adding the assembly in an elevation view , the other for adding it in a plan view .
- If you add an extra hole, material or weld to an assembly you have already created, then File > Save As could be used to give the assembly with the newly added extra item a new name.
- Giving an assembly the same name as an assembly that currently exists in the model is also permitted. Using the Assembly Editor to modify an assembly that, for example, has a file name sm34 will not affect instances of sm34 assemblies that have already been added in the model. It only affects subsequently added sm34 assemblies.
Also see :
|

