Bolt Edit (Drawing Editor)
- General Overview
- Related Tools
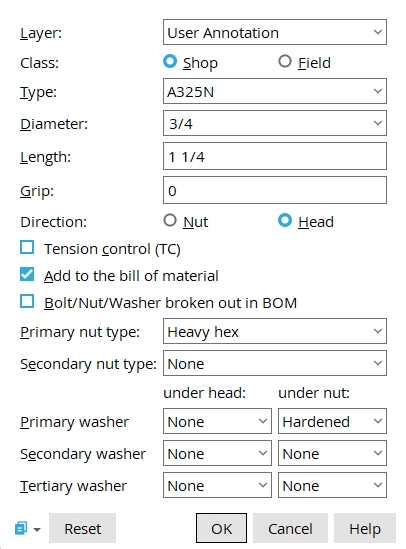
Layer: The drawing layer that the bolt you are adding or editing will be drawn on. If the layer is hidden (not marked Show), the bolt will disappear after the first update.
![]()
Defaults: For an Add Bolt operation, the default selection (
) is the layer that was selected on the Layer Panel before you began the operation. For an Edit Bolt operation, the default selection is the layer that the Drawing Editor object is currently on.
Shop bolts are bolts that are to be applied in the shop. If you add a bolt to a member detail in the Drawing Editor and check the box for Add bolt to the bill of material and selectShop as the Bolt class, the bolt is added as a shop bolt to the bill of material. This adding to the bill of material has to be done when adding the bolt. I cannot be done by editing the bolt.
Field bolts are sometimes referred to as site bolts. If you add a bolt to a member detail in the Drawing Editor and check the box for Add bolt to the bill of material and selectField as the Bolt class, the bolt is added as a field bolt to the bill of material.
Type: A325NG or A325S or A325SX or etc.
Setup: If the bolt type that you want does not appear as a selectable option on this list box's menu, you may add it to the menu using the Bolt Specifications in Job Options.
Diameter: The diameter (inches or mm) of the shank of the bolt you are editing or adding.
diameter ![]()
To make an entry: You can type in a diameter or select a bolt diameter from the menu. Diameters listed on the menu come from Home > Project Settings > Job > Bolts, Washers, and Holes > Bolt Settings > the Available bolt diameters list.
Defaults: The default value shown here for the first time you do an Add Bolt operation is the default non-moment Bolt diameter for this Job entered in Bolt Settings . For subsequently added bolts, the default is the diameter of the last-added or last-edited bolt .
Length: The distance from inside the bolt head to the end of the bolt shaft.
length ![]()
Note: Head thickness is not included in the calculation of bolt length because head thickness may vary from manufacturer to manufacturer or even from batch to batch.
Grip: The inside distance between the bolt head and nut. If the bolt has washers, then the distance is the inside distance between the washers.
grip ![]()
Direction: Head or Nut . This applies only when you have added a bolt by locating twice at the same location.

|
|
| head | nut |
Select Head if you want the head of the bolt to be shown on the drawing.
Select Nut if you want the nut to be shown.
If this box
is checked, the bolt will be designated as a tension control bolt.
If the box
is not checked, the bolt bolt will be designated as a non tension control bolt.
Add bolt to the bill of material: ![]() or
or ![]() . This applies to Add Bolt operations only.
. This applies to Add Bolt operations only.
If this box
If the box
Also see: Bolt class lets you add shop bolts or field bolts in this way.
Bolt/Nut/Washer broken out in BOM: ![]() or
or ![]() . This option is disabled when Tension control (TC) is
. This option is disabled when Tension control (TC) is ![]() checked. The option can apply to any bolt that you can edit on a member detail. Normally only shop bolts are drawn on member details.
checked. The option can apply to any bolt that you can edit on a member detail. Normally only shop bolts are drawn on member details.
|
If this box
If the box
Defaults: Home > Project Settings > Fabricator > Detailing > Bolt Detailing Settings > Bolt/Nut/Washer broken out in BOM
Primary nut type: None or Heavy hex or Heavy square or Jam. The nut that is in the primary position is the nut that is closest to the steel being fastened. It is the inside nut.
Secondary nut type: None or Heavy hex or Heavy square or Jam.
Primary washer under head: None or Flat or Hardened or Bevel or Plate (square plate) or Load (direct tension indicator). The washer under the head of the bolt that is in the primary position is the washer that is closest to the steel being fastened.
washer under head ![]()
| type | shape | BOM | setup thickness |
| flat |
|
FL | Flat washers |
| hardened |
|
HD | Hardened washers |
| bevel |
|
BVL | Bevel washers |
| square
plate |
|
PL | Plate washers |
| direct tension indicator |
|
DTI | Direct tension indicator |
Secondary washer under head: None or Flat or Hardened or Bevel or Plate (square plate) or Load (direct tension indicator). Same as Primary washer under head, except that this washer is placed in the secondary position.
Tertiary washer under head: None or Flat or Hardened or Bevel or Plate (square plate) or Load (direct tension indicator). Same as Primary washer under head, except that this washer is placed in the tertiary position.
Primary washer under nut: None or Flat or Hardened or Bevel or Plate (square plate) or Load (direct tension indicator). The washer under the nut that is in the primary position is the washer that is closest to the steel being fastened.
washer under nut ![]()
| type | shape | BOM | setup thickness |
| flat |
|
FL | Flat washers |
| hardened |
|
HD | Hardened washers |
| bevel |
|
BVL | Bevel washers |
| square
plate |
|
PL | Plate washers |
| direct tension indicator |
|
DTI | Direct tension indicator |
Secondary washer under nut: None or Flat or Hardened or Bevel or Plate (square plate) or Load (direct tension indicator).
Tertiary washer under nut: None or Flat or Hardened or Bevel or Plate (square plate) or Load (direct tension indicator).
 Forms
Forms

|
|
OK (or the Enter key) closes the DSTV Options window. The CNC Setup window again becomes active. Press OK on that window to save the choices made on this window to the currently selected CNC configuration file in your current Job.
Cancel (or the Esc key) closes this window without saving any changes made to it. The CNC Setup window again becomes active.
Reset undoes changes made to the bolt edit window. The window remains open.

