 Pour Stop Component
- Tool Summary
- Step-By-Step
- Related Tools
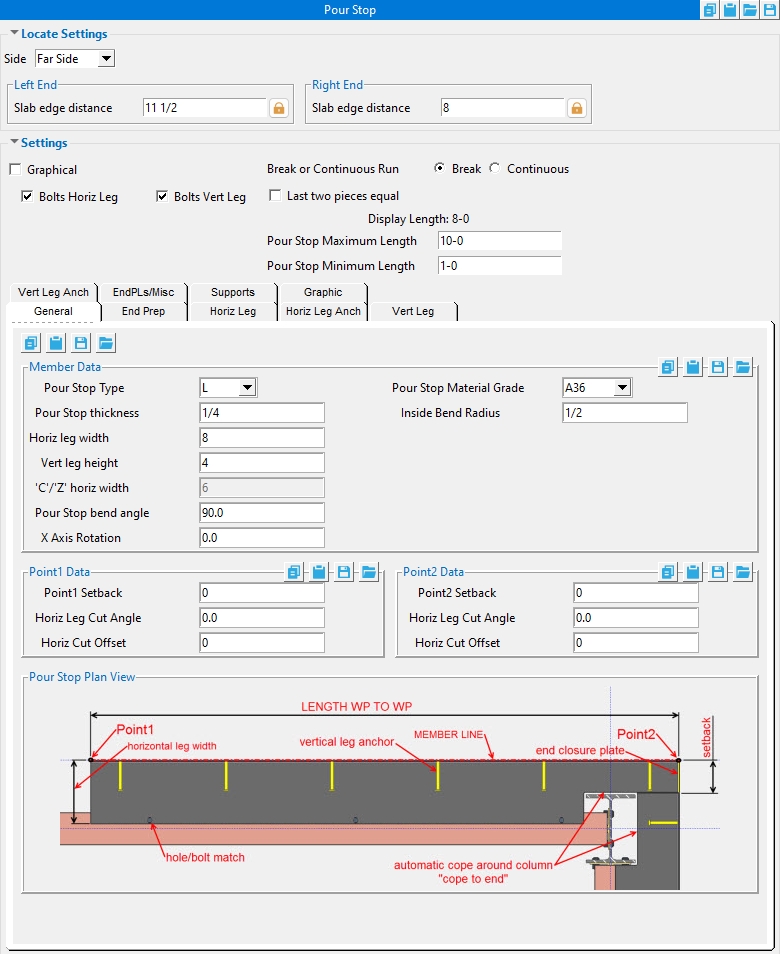
Locate Settings
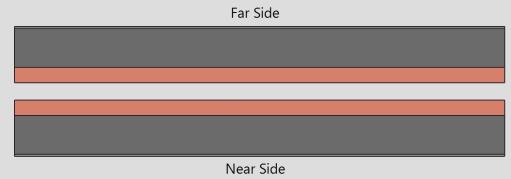
' Near Side ' places the vertical leg of the pour stop on the near side of the beam.
' Far Side ' places the vertical leg of the pour stop on the far side of the beam.
Slab Edge Distance : A distance from the center of the beam to the outside edge of the vertical leg. When the distance is unlocked ( ![]() ), the ' Slab Edge Distance ' defaults to the ' Horizontal Leg Length '. When the distance is locked (
), the ' Slab Edge Distance ' defaults to the ' Horizontal Leg Length '. When the distance is locked ( ![]() ) this value is set by the user.
) this value is set by the user.

SED = Slab Edge Distance
Settings
If the box is checked (
), this means the component was modified outside of its edit screen. This can be made graphical by doing a Cut Layout , Exact Fit , Mitre , Cope , Notch , Cut on Plane , Chamfer or Edit Material on a material generated by the system or by deleting any attached materials. Edit Hole on a system-generated hole, erasing a hole, or Add Hole in the main material also makes the member graphical. Create Solids will not alter graphical components (exception : Create Solids does match holes and generate bolts through matching holes).
If the box is not checked (
), this means that the component was not modified outside of its edit screen. If this is unchecked, when you press "OK ", the component will be regenerated to the settings that are in the component edit screen. This means, for example, if the main material has been cut into using the Cut Layout command, the cut will disappear after you press " OK " .
Bolts Horiz Leg : ![]() or
or ![]() . Same as " Add bolts " under the " Horiz Leg " tab. If this box is checked (
. Same as " Add bolts " under the " Horiz Leg " tab. If this box is checked ( ![]() ), bolts are inserted through the holes in the pour stop horizontal leg and supported member. This option is disabled (grayed out) in the " Horiz Leg " tab when the " Hole spacing type " is ' NONE '.
), bolts are inserted through the holes in the pour stop horizontal leg and supported member. This option is disabled (grayed out) in the " Horiz Leg " tab when the " Hole spacing type " is ' NONE '.
Bolts Vert Leg : ![]() or
or ![]() . Same as " Add bolts " under the " Vert Leg " tab. If this box is checked (
. Same as " Add bolts " under the " Vert Leg " tab. If this box is checked ( ![]() ), bolts are inserted through the holes in the pour stop vertical leg and supported member. This option is disabled (grayed out) in the " Vert Leg " tab when the " Hole spacing type " is ' NONE '.
), bolts are inserted through the holes in the pour stop vertical leg and supported member. This option is disabled (grayed out) in the " Vert Leg " tab when the " Hole spacing type " is ' NONE '.
Break or Continuous Run : Break or Continuous.
' Break ' splits the pour stop bent plate or angle material into multiple sections. If this option is selected ' Last two pieces equal ' and the ' Pour Stop Maximum and Minimum Length ' options are shown.
' Continuous Run ' keeps the pour stop bent plate material or angle material as a single material the full length of the run.
If the box is checked (
If the box is not checked (
Pour Stop Maximum Length : The maximum length that any bent plate or angle material created by the ' Pour Stop component ' can be.
Pour Stop Minimum Length : The minimum length that any bent plate or angle material created by the ' Pour Stop component ' can be.
All other options can be found on the Pour Stop member page.
1 . Invoke Add Pour Stop Component by clicking the Add Pour Stop Component icon, which is pictured above. The icon can be found on the Material page > Dynamic Components section. Proceed to step 2.
Alternative 1 : Pre-select a member to enable the Members contextual page and click the Add Component icon found in the Materials/Components section. Browse to Pour Stop Component in the select component list. Skip step 2.
Alternative 2 : Invoke Add Pour Stop Component using the Find Tool by searching the command name and clicking the Add Pour Stop Component icon, which is pictured above. Proceed to step 2.
2 . Select the beam you want to add the ' Pour Stop 'component to.
Alternative : You can press the Esc key or right-click and choose " Cancel " on the shortcut menu to cancel the command.
3 . The Pour Stop Component window opens, allowing you to specify the settings for your pour stop. Press " OK " to close the Pour Stop component window, ending the command.
- Copy Component (related tool)
- Move Component (related tool)
- Explode Component (to reduce the component to its constituent materials and welds)
- Bent Plate
- Pour Stop Component Settings
- Pour Stop (member)
- Pour Stop (tool)

