 The Parametric Hole Add window
| Quick Notes |

Also see :
- Parametric Point Maps
- Objects, Attributes, Methods and Functions
- Default non-moment bolt diameter (sets default hole size)
- Add Hole window ( Modeling equivalent to this window)
Please note: If the " Hole group rotation " on this window is 0 (zero), the X hole group axis is parallel with the X material axis . The X hole group axis rotates with the " Hole group rotation ."
Warning : If your startup code specifies imperial Units("...") , make entries to distance fields on this window in decimal inches, not fractions. Also, do not use hyphens (-). If you enter a fraction using integers, Python truncates the results of the division operation to an integer (examples: 1/8 = 0 ; 5/4 = 1 ). If you enter fractions with decimal points, Python calculates the precise decimal value (examples: 1.0/8.0 = .125 ; 5.0/4.0 = 1.25 ). If you enter a hyphen, Python interprets the hyphen as a minus sign (examples: 1-2 = -1 ; 3-2 = 1 ). See numbers (floating point numbers and integers). Tip : To enter a dimension string and convert it to a floating point distance that is properly factored based on the startup code Units("...") , you can use the dim("...") function.
![]() Example for Match Holes (also see the instructions for Add Holes ):
Example for Match Holes (also see the instructions for Add Holes ):
The following script uses mtrl.HoleList() to generate a list of holes for matching. This allows the user that runs this script to select a material instead of individual holes.
# Matches holes in 1st material to 2nd material that is selected.
from mtrl_list import MtrlLocate
from hole_add import *
mtrl = MtrlLocate("Select material with holes", "Single")
mtrl_to_match = MtrlLocate("Select material to match", "Single")
# hole group add begin
hole1 = Hole()
hole1.Material = [mtrl_to_match,]
hole1.Holes = mtrl.HoleList()
hole1.HoleType = "Standard Round"
hole1.ShowWindow = "Yes"
hole1.Create()
hole group add end
------ General settings ------
Bolt diameter ( obj . BoltDiameter or obj.bolt_dia ): The diameter of the bolts to be inserted into the holes that make up the hole group you are defining on this window. You can either type in any diameter (inches or mm), or you can select a bolt diameter from the combo box ( ![]() ). The diameters that are listed in the combo box come from Home > Project Settings > Job > Bolt Settings > the " Available bolt diameters " list.
). The diameters that are listed in the combo box come from Home > Project Settings > Job > Bolt Settings > the " Available bolt diameters " list.
From the " Bolt diameter " entered here and the " Hole type " entered below, Hole diameter is calculated according to Table J3.1 ( ASD 9th , p5-71) or Table J3.3 ( LRFD 3rd , p6-82) when obj.CalculateHoleSize is entered to " Hole diameter ."
Hole diameter ( obj . Diameter or obj.hole_dia ): The diameter of the holes in the hole group you are defining on this window. You can enter a value here if you like, but it is usually better to cause the diameter to be calculated from the bolt diameter (entered above) and hole type (entered below) by entering obj.CalculateHoleSize . A hole diameter is a floating point number in mm or inches, depending on the startup code Units(' ... ') .
Example: You enter obj.CalculateHoleSize . When the script is Run the hole diameter is calculated from the " Bolt diameter " and " Hole type " per Table J3.1 ( ASD 9th ) or Table J3.3 ( LRFD 3rd ) . The result is a line of parametric code that reads: obj.Diameter = obj.CalculateHoleSize .
Put hole through both sides of hollow section? ( obj . BothSides or obj.both_sides ): ![]() or
or ![]() ( "Yes" or "No" ). This applies when you are adding holes to hollow sections ( HSS round or HSS rectangular material). The choice you make here results in the entry of a string ( "Yes" or "No" ) to the parametric code.
( "Yes" or "No" ). This applies when you are adding holes to hollow sections ( HSS round or HSS rectangular material). The choice you make here results in the entry of a string ( "Yes" or "No" ) to the parametric code.
If this box is checked (
), the pattern of holes you are adding is duplicated through the opposite wall of the material. The result is a line of parametric code that reads: obj.BothSides = "Yes" .
If the box is not checked (
), the pattern of holes shown on screen is only on the surface that is shown. The parametric code reads: obj.BothSides = "No" .
Hole type ( obj . HoleType or obj.hole_type ): "Standard Round" or "Short Slot" or "Oversized round" or "Long Slot" or "Cope Hole" or "Erection Pin Hole" or "Anchor Bolt Hole" or "Plug Weld Hole" . From the " Hole type " entered here and the " Bolt diameter " entered above, the required hole diameter is calculated when obj.CalculateHoleSize is entered to " Hole diameter ." In the parametric code, the selection you make here is entered as a string .

A "Standard Round" hole is perfectly round and typically has a " Hole diameter " 1/16 inch larger than the " Bolt diameter ."
A "Short Slot" hole is oblong in shape and has a relatively short " Slot length " (1 1/4 inch for a 1 inch diameter hole).
An "Oversized" hole inputs a " Hole diameter " 3/16 inch larger than the " Bolt diameter ."
A "Long Slot" hole is oblong in shape, has a diameter 1/16 inch larger than the input bolt diameter, and has a relatively long " Slot length " (2 3/8 inch for a 1 inch diameter hole).
A "Cope Hole" is for using a punch or drilling machine instead of a cutting machine to cope a piece of material.
An "Erection Pin Hole" is a hole on the end of a column for use by a crane to lift the column into place (see show erection pin holes on columns ).
An "Anchor Bolt Hole" is a hole for anchor bolts in a column base plate. Holes must be of this type in order for them to be automatically dimensioned when the " Dimension anchor bolt layout " option is selected during erection view regeneration.
A "Plug Weld Hole" is for adding to a material before the material is plug welded (plug weld holes are not matched to material during hole matching).
Slot rotation ( obj . SlotRotation or obj.slot_rot ): A positive or negative floating point number of degrees from 360.0 to -360.0 . This applies when "Long Slot" or "Short Slot" is entered as the " Hole type ." 0 degrees sets the length of the slot parallel to the material X axis when the " Hole group rotation " is 0 degrees. Slot rotations can be modeled to a precision of 0.1 degree.
-
<= hole group X axis => 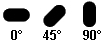
Example: The X material axis of a clip angle on a square cut horizontal beam is vertical; to make the slots on this clip angle horizontal, you would have to rotate them 90 degrees (assuming the " Hole group rotation " is 0 degrees).
Slot length ( obj . SlotLength or obj.length ): A distance ( floating point number ) in mm or inches, depending on the startup code Units(' ... ') . This distance is measured between the two points farthest from one another on the perimeter of a slot. This applies when " Long Slot " or " Short Slot " is entered as the " Hole type ."

Tip: You may prefer to calculate the slot length from the bolt diameter and hole type by entering obj.CalculateSlotLength .
Example: You enter obj.CalculateSlotLength (where obj = object name ). When the script is Run the hole diameter is calculated from the " Bolt diameter " and " Hole type " per Table J3.1 ( ASD , p 5-71) or Table J3.3 ( LRFD , p 6-82) . The result is a line of parametric code that reads: obj.Length = obj.CalculateSlotLength .
Hole face ( obj . face or obj.face ): Not Applicable .
Specifying a face is not necessary for adding holes. When a face is not specified, a hole will be added perpendicular to the first polygon which is found to contain the specified point.
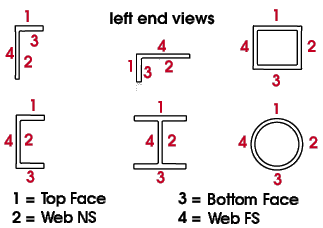
The following is no longer applicable . It is a description of the how the obj.face attribute used to work, This description is maintained as an explanation for older parametric scripts that incorporate the obj.face attribute. " Top Face" or " Web NS" or " Bottom Face" or " Web FS" or " NS Face" (for plates only) or " FS Face" (for plates only). This is the face of the material the hole is to be drilled or punched from. The face names for different materials are illustrated below. The choice you make here results in the entry of a string to the parametric code.
Preferred bolt type ( obj . BoltType or obj.bolt_type ): "Auto" or "A325N" or etc. The choice you make here results in the entry of a string to the parametric code.
If "Auto" is selected, the " Default non-moment bolt type for this job " is used as the bolt type for this hole.
Selecting a specific bolt type such as "A325N" specifies that bolt type be used.
Example: You select A325N as the " Preferred Bolt Type for bolting ." The result is a line of parametric code that reads: obj.BoltType = "A325N" (where obj = object name ).
Valid for CNC downloading ( obj . ShouldBeValid or obj.valid_cnc ): ![]() or
or ![]() ( "Yes" or "No" ). The choice you make here results in the entry of a string ( "Yes" or "No" ) to the parametric code.
( "Yes" or "No" ). The choice you make here results in the entry of a string ( "Yes" or "No" ) to the parametric code.
If this box is checked (
If the box is not checked (
------ Hole pattern options ------
X reference offset ( obj . ReferenceOffsetX or obj.X_ref_offset ): The distance from " Point 1 " to the first column of holes. A distance is a floating point number in mm or inches, depending on the startup code Units(' ... ') .
Note: When the " Hole group rotation " is 0 degrees, this dimension parallels the X material axis . Changing the " Hole group rotation " rotates the axis along which this offset is measured.
Example: You enter 6.0 to " X reference offset ." The result is a line of parametric code that reads: obj.ReferenceOffsetX = 6.0 (where obj is the " Object name ").
Y reference offset ( obj . ReferenceOffsetY or obj.Y_ref_offset ): The distance from " Point 1 " to the first column of holes. A distance is a floating point number in mm or inches, depending on the startup code Units(' ... ') .
Note: When the " Hole group rotation " is 0 degrees, this dimension parallels the Y material axis . Changing the " Hole group rotation " rotates the axis along which this offset is measured.
Example: You enter 6.0 to " Y reference offset ." The result is a line of parametric code that reads: obj.ReferenceOffsetY = 6.0 (where obj is the " Object name ").
X spacing ( obj . SpacingX or obj.X_spa ): The distance between columns of holes in a hole group. A distance is a floating point number in mm or inches, depending on the startup code Units(' ... ') .
Note: If the " Hole group rotation " is 0 (the default), this distance is parallel with the X axis of the material that you are adding holes to.
Example: You enter 3.0 for " X spacing ." The result is a line of parametric code that reads: obj.SpacingX = 3.0 (where obj is the " Object name ").
Y spacing ( obj . SpacingY or obj.Y_spa ): The distance between rows of holes in a hole group. A distance is a floating point number in mm or inches, depending on the startup code Units(' ... ') .
Note: If the " Hole group rotation " is 0 (the default), this distance is parallel with the Y axis of the material that you are adding holes to.
Example: You enter 3.0 for " Y spacing ." The result is a line of parametric code that reads: obj.SpacingY = 3.0 (where obj is the " Object name ").
Hole group rotation ( obj . GroupRotation or obj.group_rot ): The positive or negative (-) floating point number of degrees ( 180.0 to -180.0 ) that the hole group is to be rotated.
0 degrees sets the hole group rotation parallel with the X axis of the material you are adding the holes to.
A positive number of degrees rotates the hole group counterclockwise (and the hole group axes shown on screen).
A negative (-) number of degrees rotates the hole group clockwise.
Note: The number of degrees that you set for the " Hole group rotation " affects the angle at which the " X reference offset " or " Y reference offset " is measured from the reference point.
Example: You enter 0 to " Hole group rotation ." The resulting parametric code reads: obj.GroupRotation = 0 (where obj is the " Object name ").
Relative position ( obj . Locate or obj.locate ):
| "Above Left" or "Above" or "Above Right" |
| or "Center Left" or "Center" or "Center Right" |
| or "Below Left" or "Below" or "Below Right" |
Rows ( obj . Rows or obj.rows ): For a hole group whose Y axis is vertical (on a horizontal beam, the Y axis is vertical), this is the number ( integer > 0) of rows of holes in the hole group that are above or below the hole group reference point, or it is half the number of rows both above and below the hole group reference point, or it is the " special case " described below. Rows of holes align with the Y hole group axis .
A special case: When you have designated rows of holes for both above and below the reference point and have entered a " Y reference offset " of 0, the number of rows of holes you actually get is twice the number entered here minus 1.
Note: How rows of holes are oriented with respect to the reference point (and also the number of holes you get) depends on the hole group orientation button that is pressed.
Example: For " Rows " you enter 3 . The result is a line of parametric code that reads: obj.Rows = 3 (where obj is the " Object name ").
Columns ( obj . Columns or obj.columns ): For a hole group whose X axis is horizontal (on a horizontal beam, the X axis is horizontal), this is the number ( integer > 0) of columns of holes in the hole group that are to the right or left of the hole group reference point, or it is half the number of columns both to the right and left of the hole group reference point, or it is the " special case " described below. Rows of holes align with the X hole group axis .
A special case: When you have designated columns of holes for both the left and right of the reference point and entered a " X reference offset " of 0, the number of columns of holes you get is twice the number entered here minus 1.
Note: How columns of holes are oriented with respect to the reference point (and also the number of holes you get) depends on the hole group orientation button that is pressed.
Example: For " Columns " you enter 3 . The result is a line of parametric code that reads: obj.Columns = 3 (where obj is the " Object name ").
![]()
![]()
![]()
"OK" (or the Enter key) closes this window and saves your changes to RAM.
"Cancel" (or the Esc key) closes this window without saving any changes.
"Reset" undoes all changes made to this window since you first opened it. The window remains open.

